Repost , Figured This Would Be Handy For Somebody

repost , figured this would be handy for somebody
More Posts from Ardouradvice and Others
any shading tips?
AH I LOVE SHADING AND RENDERING let me see what i can dig up from my brain for you
i say....... single colour blend mode layer is a good starting point for shading but i'd also manually pick colours to make the shadow more dynamic, if that makes sense..


left has a yellow-y hard light layer as its only shading, and right has the hard light layer alongside some colours i added myself
also, i like to mess with the saturation and hue when i add the extra colours.. it adds depth (life??) to the shadows that you wouldnt get with a flat colour


IN ADDITION TO THIS desaturating your colours makes them look lighter, and hightening the saturation makes them seem darker! i play with this a lot it's fun
not shown here is also using completely different colours than the one you're shading, like green/teal for blue, or red for purple! this is especially helpful when shading grays and whites
basically get funky with your colours and try shit until you find a formula that works for you!!!! this is just what i do and im a self-taught nerd so
10 Non-Lethal Injuries to Add Pain to Your Writing
If you need a simple way to make your characters feel pain, here are some ideas:
1. Sprained Ankle
A common injury that can severely limit mobility. This is useful because your characters will have to experience a mild struggle and adapt their plans to their new lack of mobiliy. Perfect to add tension to a chase scene.
2. Rib Contusion
A painful bruise on the ribs can make breathing difficult, helping you sneak in those ragged wheezes during a fight scene. Could also be used for something sport-related! It's impactful enough to leave a lingering pain but not enough to hinder their overall movement.
3. Concussions
This common brain injury can lead to confusion, dizziness, and mood swings, affecting a character’s judgment heavily. It can also cause mild amnesia.
I enjoy using concussions when you need another character to subtly take over the fight/scene, it's an easy way to switch POVs. You could also use it if you need a 'cute' recovery moment with A and B.
4. Fractured Finger
A broken finger can complicate tasks that require fine motor skills. This would be perfect for characters like artists, writers, etc. Or, a fighter who brushes it off as nothing till they try to throw a punch and are hit with pain.
5. Road Rash
Road rash is an abrasion caused by friction. Aka scraping skin. The raw, painful sting resulting from a fall can be a quick but effective way to add pain to your writing. Tip: it's great if you need a mild injury for a child.
6. Shoulder Dislocation
This injury can be excruciating and often leads to an inability to use one arm, forcing characters to confront their limitations while adding urgency to their situation. Good for torture scenes.
7. Deep Laceration
A deep laceration is a cut that requires stitches. As someone who got stitches as a kid, they really aren't that bad! A 2-3 inch wound (in length) provides just enough pain and blood to add that dramatic flair to your writing while not severely deterring your character.
This is also a great wound to look back on since it often scars. Note: the deeper and wider the cut the worse your character's condition. Don't give them a 5 inch deep gash and call that mild.
8. Burns
Whether from fire, chemicals, or hot surfaces, burns can cause intense suffering and lingering trauma. Like the previous injury, the lasting physical and emotional trauma of a burn is a great wound for characters to look back on.
If you want to explore writing burns, read here.
9. Pulled Muscle
This can create ongoing pain and restrict movement, offering a window to force your character to lean on another. Note: I personally use muscle related injuries when I want to focus more on the pain and sprains to focus on a lack of mobility.
10. Tendonitis
Inflammation of a tendon can cause chronic pain and limit a character's ability to perform tasks they usually take for granted. When exploring tendonitis make sure you research well as this can easily turn into a more severe injury.
This is a quick, brief list of ideas to provide writers inspiration. Since it is a shorter blog, I have not covered the injuries in detail. This is inspiration, not a thorough guide. Happy writing! :)
Looking For More Writing Tips And Tricks?
Check out the rest of Quillology with Haya; a blog dedicated to writing and publishing tips for authors!
Instagram Tiktok
hey i hope its okay to ask but i was wondering what your process for art looks like? you have a really unique style thats like. somewhat eyestrainy but still soft looking and i'm just curious because it is very tasty
Got super long winded so check under cut :]
also this is for my more.. recent art? for more of my older stuff I made THIS a while back <- the prev thing also has a lot more actual discussion on the Whys of color choices and the like. More informative? I actually cared a lot more about making things look nice back than HAHA


Sometimes I will stop here [most of the time actually [or a bit before [forgoing colored lines]]]


And again, liable to stop at Any of these points. [exept Only flat colors that looks boring as hell HAHA]
Finished product VVV


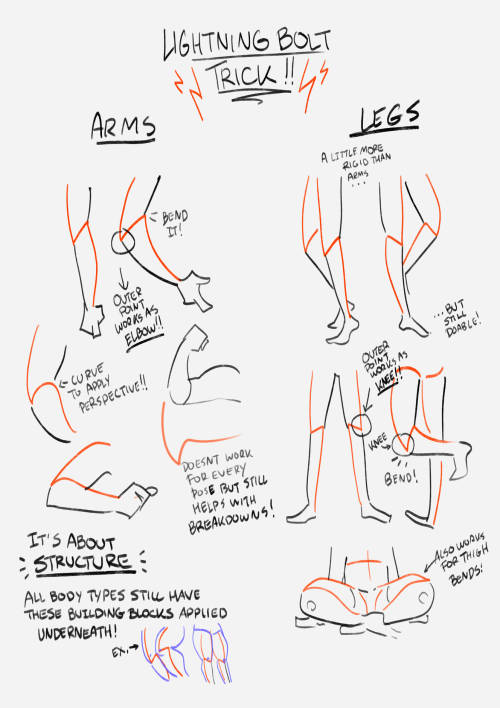
this showed up in my FB memories, the lightning bolt trick! I don't sketch out the lightning bolt much nowadays but it's still super helpful when I need to lay out tricky arms and leg poses. And I still apply the logic of it, especially with how I draw arms :' ) Biggest thing it helps with is shape breakdown and visualization, we gotta use whatever works to break down shapes into simpler concepts for our brains 👏💓
Apparently a lot of people get dialogue punctuation wrong despite having an otherwise solid grasp of grammar, possibly because they’re used to writing essays rather than prose. I don’t wanna be the asshole who complains about writing errors and then doesn’t offer to help, so here are the basics summarized as simply as I could manage on my phone (“dialogue tag” just refers to phrases like “he said,” “she whispered,” “they asked”):
“For most dialogue, use a comma after the sentence and don’t capitalize the next word after the quotation mark,” she said.
“But what if you’re using a question mark rather than a period?” they asked.
“When using a dialogue tag, you never capitalize the word after the quotation mark unless it’s a proper noun!” she snapped.
“When breaking up a single sentence with a dialogue tag,” she said, “use commas.”
“This is a single sentence,” she said. “Now, this is a second stand-alone sentence, so there’s no comma after ‘she said.’”
“There’s no dialogue tag after this sentence, so end it with a period rather than a comma.” She frowned, suddenly concerned that the entire post was as unasked for as it was sanctimonious.


When inventing a fantasy religion a lot of people a) make the mistake of assuming that everyone in fantasy world would worship the same gods and b) assume that polytheistic religions see all of their gods as morally good


Hover Notes or ‘Floating Boxes’in Ao3
This is a fun option if you use, for example, phrases in other languages in your story. I often do, and this is a nice way to give translations without having to scroll to the end of the text, or putting them in the starting notes where people have to keep checking back – or where they spoiler the story!
HOWEVER. The drawback is that the floating boxes only work when a ‘mouse’ is ‘hovered’ over the marked text. They do NOT show up on tablet or phone screens, so you’ll still need to put a list of translations in the notes for readers using those devices.
Let’s have an example.
“Qu’est ce que tu veux?”
Now if you speak French, you might know that means “What do you want?”
But not all of your readers will know that. So, you offer them a translation. And since the boxes don’t appear unless you hover directly above them, I usually add a Beginning Note to the chapter that reads something like this;
‘Hover over italicised foreign language text for translations! (Mobile and tablet users please see the Ending Notes)’
In HTML mode in Ao3, (if you try this in Rich Text mode you will get a horrible mess so don’t) the line with this example would appear as:
<p>“<em>Qu’est ce que tu veux?</em>”</p>
To add the floating box with the translation, you would select the words to be translated (that is, Qu’est ce que tu veux?) and paste in the following HTML.
<span title=“What do you want?”>Qu’est ce que tu veux?</span>
The whole line will now read:
<p>“<em> <span title=“What do you want?”>Qu’est ce que tu veux?</span> </em>”</p>
Review your work, hover over the part that requires translating, and you should see the following:

And you’re done!
I tend to set up a Word doc with all the <span> lines I want to use created in it, and then when the time comes, just copy/paste them into Ao3. Saves lots of time!
-
 squishyyuri liked this · 1 week ago
 -
 beigetiger liked this · 1 week ago
 -
 abucketofstars reblogged this · 1 week ago
 -
abucketofstars liked this · 1 week ago
-
 itisriv liked this · 2 weeks ago
 -
 juusou liked this · 2 weeks ago
 -
 ultravoyager liked this · 2 weeks ago
 -
 cheese-is-a-milk-loaf reblogged this · 2 weeks ago
 -
 proj3ctv liked this · 2 weeks ago
 -
 diospore liked this · 2 weeks ago
 -
 hydralutris liked this · 2 weeks ago
 -
 worldweary-walker reblogged this · 2 weeks ago
 -
 cobaltrequiem liked this · 2 weeks ago
 -
 gracedreems liked this · 2 weeks ago
 -
 pinkelotjeart liked this · 2 weeks ago
 -
 boatemboys reblogged this · 2 weeks ago
 -
boatemboys liked this · 2 weeks ago
-
 thxrgism reblogged this · 2 weeks ago
 -
thxrgism liked this · 2 weeks ago
-
 silly-zai reblogged this · 2 weeks ago
 -
silly-zai liked this · 2 weeks ago
-
 bloodied-hands-in-the-night-sky reblogged this · 2 weeks ago
 -
 fyodorsushankaaa reblogged this · 2 weeks ago
 -
fyodorsushankaaa liked this · 2 weeks ago
-
 moongasux reblogged this · 2 weeks ago
 -
 verdaneart liked this · 2 weeks ago
 -
 dynamitedarlingg liked this · 2 weeks ago
 -
 faggotcowboys reblogged this · 2 weeks ago
 -
 palustrine liked this · 3 weeks ago
 -
 scenekid677 liked this · 3 weeks ago
 -
 murmurbug liked this · 3 weeks ago
 -
 lambsoul liked this · 3 weeks ago
 -
 dakedo0o liked this · 3 weeks ago
 -
 savedartthings reblogged this · 3 weeks ago
 -
 swampycreatures liked this · 3 weeks ago
 -
 hi-everyone-howareyou liked this · 1 month ago
 -
 yoko-likes-2-save-stuffs reblogged this · 1 month ago
 -
 puzzlevision liked this · 1 month ago
 -
 almostandrogynousmiracle liked this · 1 month ago
 -
 linkdryn reblogged this · 1 month ago
 -
 fleshbook liked this · 1 month ago
 -
 sophrosins reblogged this · 1 month ago
 -
sophrosins liked this · 1 month ago
-
 shoefaced2 reblogged this · 1 month ago
 -
 cosmos-moth liked this · 1 month ago
 -
 skullywullypully reblogged this · 1 month ago
 -
skullywullypully liked this · 1 month ago
-
 bangtanzxx liked this · 1 month ago
 -
 so1ae1a liked this · 1 month ago

sideblog for @letardoursprout so i have somewhere to collect all the tutorials/advice that i likeicon by lovelyshiz. header by hexh-pixel
66 posts