Wow Making Tutorials Is Harder Than I Thought… In Any Case, I Hope It Helps!

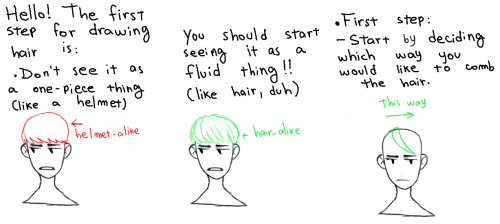
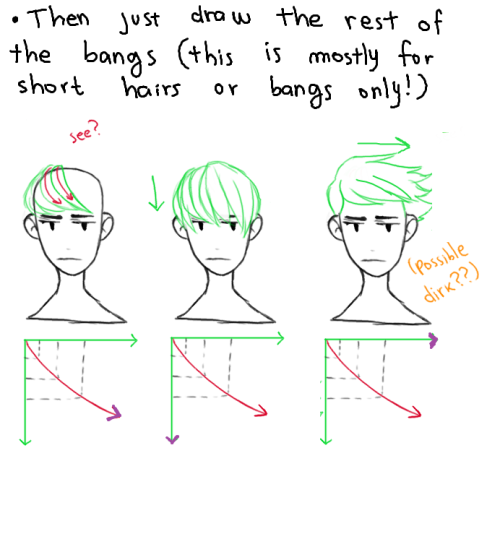


Wow making tutorials is harder than I thought… In any case, I hope it helps!
More Posts from Arttuti and Others


can you give a run down on skintones?
PART ONE: COLOR SELECTION.
In painting skin tones, a lot of the time I see people choose colors that are over-saturated or unbalanced. There isn’t really an exact art to this that I can explain—you just need to get a feel for what saturation balance you need for that particular skintone. Here are some examples of what I usually pick.

As you can see, I used different base colors (orange, reddish, yellow) for the skin shades in all three examples. The reason for this is because all skin tones have a different base color besides just Light, Medium, and dark. Some people divide them into categories of “warm” and “cool.” Pantone has some really good examples and references for this.

PART TWO: COLOR VARIATION.
Another big part about drawing and painting skin tones that a lot of people forget is how skin thickness affects color variation. The presence of bone, blood, and muscle underneath the skin affects its colors. This is especially noticeable on the face.

The colors here are a little exaggerated to show my point, but with a little adjusting and blending…

Voila! Subtle, but more realistic.
PART THREE: DETAILS.
Our skin is the largest organ on our body, and as our body’s first line of defense against the outside world, it’ll be covered with tiny details and imperfections. Things like sunburns, tans, freckles, scars, and facial hair all add character to your subject matter. Here are some examples!
TANS: Everyone tans differently, depending on your ethnicity and skin tone. Fair skinned folks tend to burn more than tan, which means you’ll need a more startling, eye-catching red.If you have a skin type that tends to tan more, the color will be more brown than red. For black skin tones, the tan is less red. (And while we’re on the subject: black people DO tan, so it’s important for you to put on sunscreen and be careful in the sun, too.)

Those are the areas that the sun tends to hit the most—and things like goggles, hats, and masks can change the shape of that area.
FRECKLES AND MOLES: Freckles are also products of the sun. Some people have freckles that stay year-round, while others have freckles that fade in the winter and return in the summer. Moles are skin cells that grow in a cluster instead of being spread throughout the skin. When exposed to the sun, they tend to darken. (Another note on skin health: if you have any oddly-shaped/colored moles, moles that have changed color, size, or shape, or anything of the sort, please check with your doctor!)
Freckles like to cluster around each other, sort of like stars, and they vary greatly in size. You can have a few freckles in one place, or a lot of freckles in multiple places. Most commonly freckled areas are your face, shoulders and neck, back, and forearms.

FACIAL HAIR: Facial hair also affects the colors of the face. For simplicity’s sake we’ll be using black hair, as it is the most noticeable. Facial hair usually grows in these areas, and can make the skin look blueish/grayish because of the darker hairs beneath the skin. If your hair is red, this also very noticeable.

END NOTE.
There you go! That’s about all I can think of at the moment for skin tones. As always, references and practice are your best friend (and so is this neat little trick that pheberoni has.) Good luck with your arting!


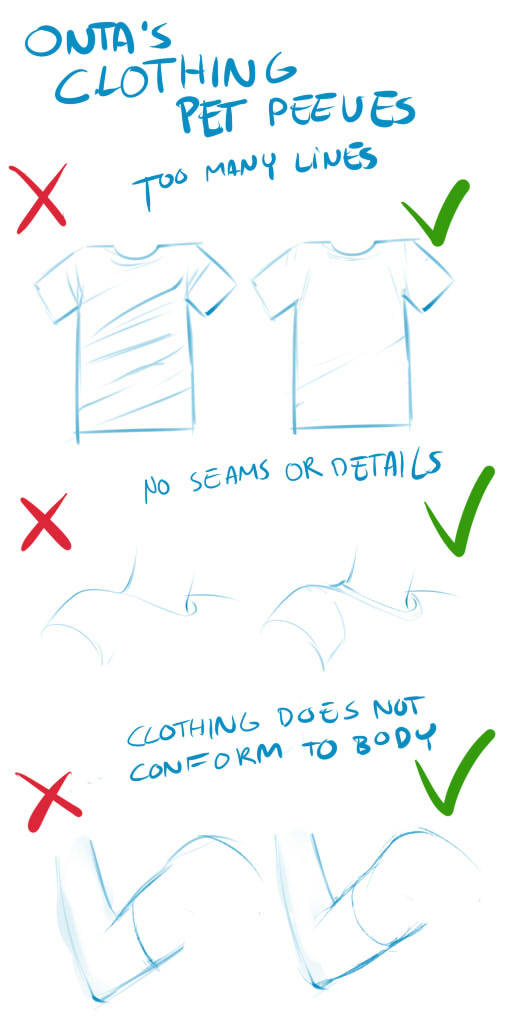
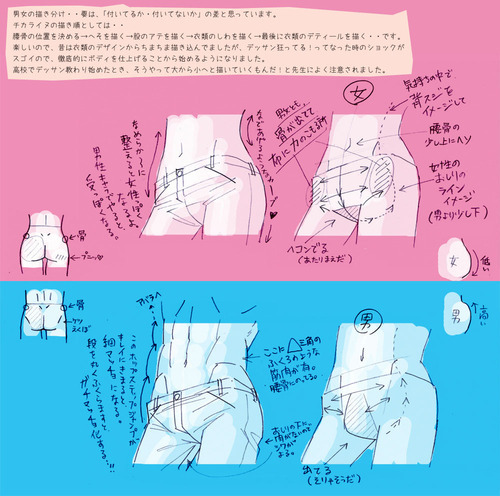
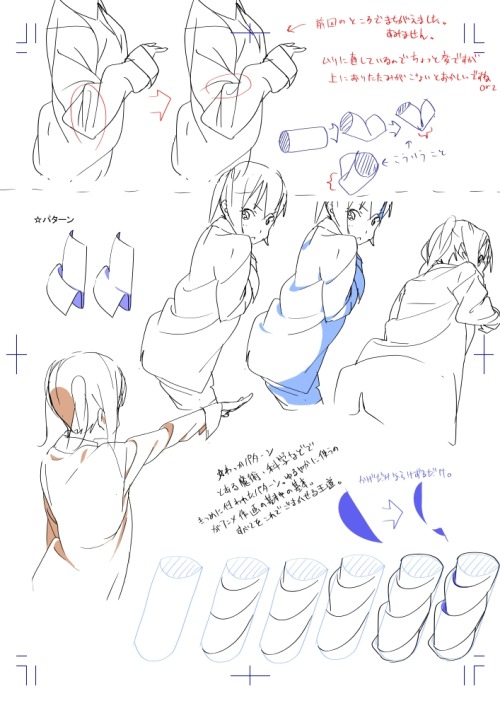
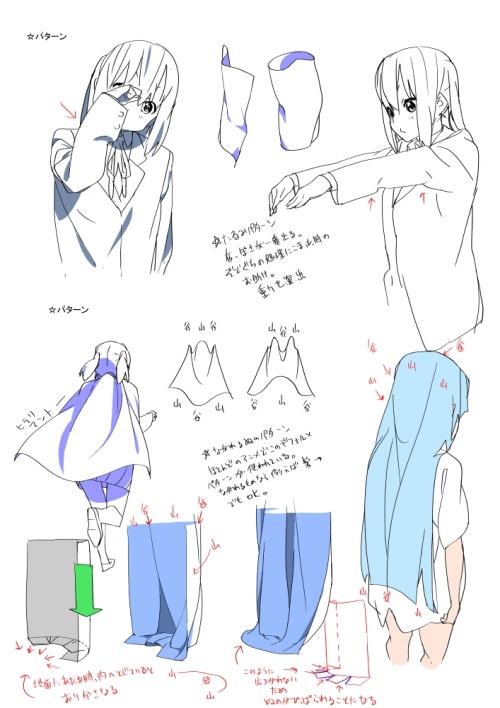
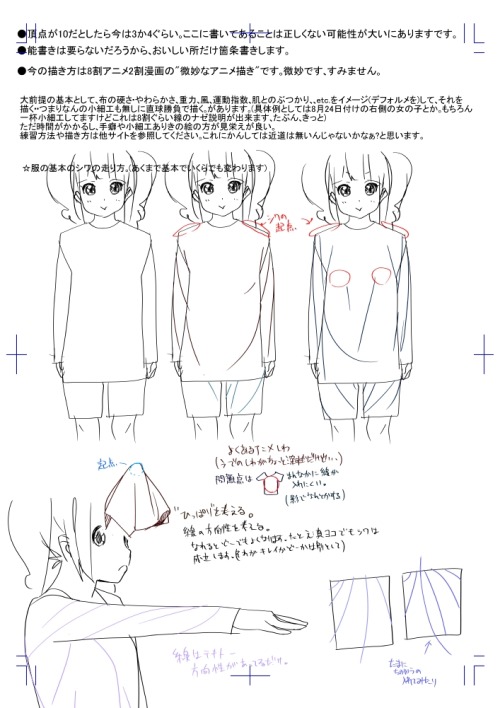
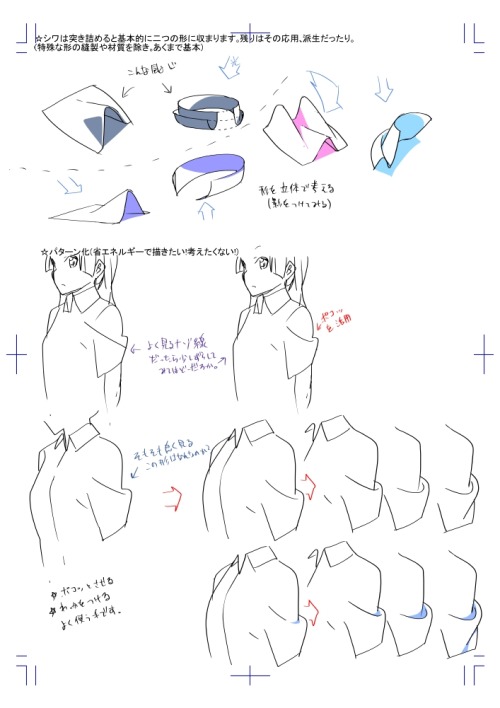
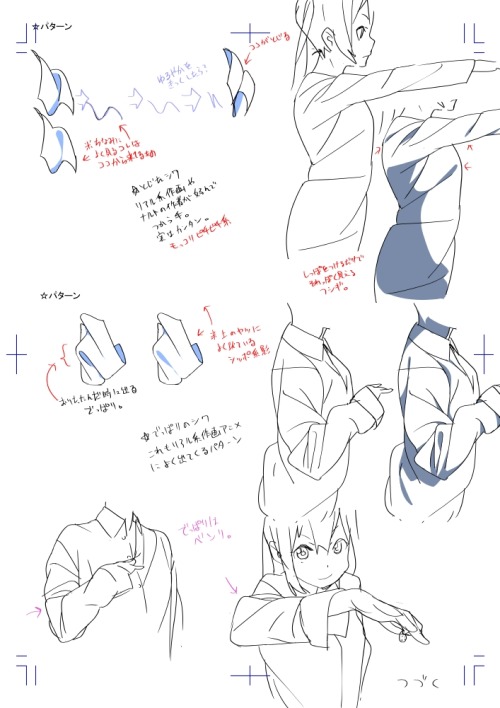
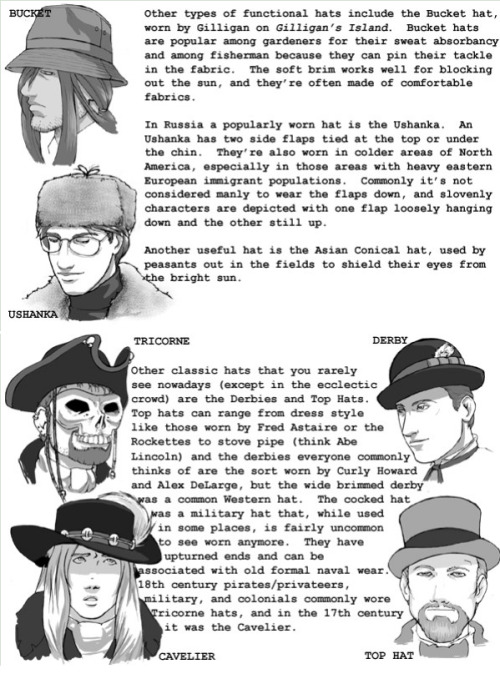
Clothing Tutorials,Tips and Guides
In order to make interesting designs of clothing, look around the web about outfit design, keep your mind with fresh ideas so then you can draw nice outfits on your characters.
Remember to keep in mind color theory when designing an outfit too, keep it balanced unless you are aiming for a sparkledog, then go nuts with the colors.

I share my secret tips on how I draw detailed illustrations effortlessly! P-please check it out…!
Ay yo binch, how you draw teeths so good. They look great

Thanks! :^)
Usually I just start by filling in the mouth (all black since I mostly sketch in black and white) and then I use an eraser to make the shapes for the insides of the mouth (teeth, tongue). Since Ruby has monster-ish teeth, I draw them pretty sharp.

Draw different shapes and fill them in!
How to other eye
ALRIGHT, so, I know a lot of people have trouble making eyes match. Yesterday I found out a way to make it significantly easier! Here’s a small guide.

Well, first of all, you have your face. mark where the eyes should be on it.

Then mark the corners of the eyes and go over the middle again, to make the next step easier

Alright, I know it sounds a bit crazy, but draw this shape, trying to make it as symmetrical as you can.

Draw the eyes using that shape as a guide and TA-DA! They match! For different eye shapes you tweak the angle of the two guide lines.

And it also helps with angles where the size and shape of the eye is distorted, you just put it in perspective.

I think the theory behind it is that the thing that makes it hard to make the eyes match is the angle of the corners, and this type of guideline helps make them even, which makes the eyes look symmetrical. Welp, here it is! I hope it helps someone!


-
 707shappiness reblogged this · 1 month ago
 -
 artking-4 reblogged this · 5 months ago
 -
 kndkid96 liked this · 10 months ago
 -
artking-4 reblogged this · 1 year ago
-
 pastanotorious liked this · 1 year ago
 -
 skullywullypully reblogged this · 1 year ago
 -
skullywullypully liked this · 1 year ago
-
 nezjazz reblogged this · 1 year ago
 -
 terrific-togekiss reblogged this · 1 year ago
 -
terrific-togekiss liked this · 1 year ago
-
 crowdoesart21 reblogged this · 1 year ago
 -
 martialwriter liked this · 1 year ago
 -
 silicon14blog liked this · 1 year ago
 -
 cryingunderthewaterfall liked this · 1 year ago
 -
 theendlessfamily liked this · 2 years ago
 -
 bonewheel reblogged this · 2 years ago
 -
 0ce4n-m4n liked this · 2 years ago
 -
 cozybrushes liked this · 2 years ago
 -
 nonsense-incarnate reblogged this · 2 years ago
 -
 poppoforpresident reblogged this · 2 years ago
 -
 coltaire reblogged this · 2 years ago
 -
coltaire liked this · 2 years ago
-
 satyromanicum liked this · 2 years ago
 -
 hufflely-puffly liked this · 2 years ago
 -
 missclovercat reblogged this · 2 years ago
 -
 bakfoo reblogged this · 2 years ago
 -
 gloomiyuno liked this · 2 years ago
 -
sugarbeam-refs reblogged this · 2 years ago
-
 milkywhitechocolatte liked this · 2 years ago
 -
 fantasyclass liked this · 2 years ago
 -
 babyangelhumanslime liked this · 3 years ago
 -
 mess-in-public liked this · 3 years ago
 -
flyerradial liked this · 3 years ago
-
 rhymeswithpurple9 liked this · 3 years ago
 -
 killmepieceofshit liked this · 3 years ago
 -
 kaorinkos reblogged this · 3 years ago
 -
 shuravinia liked this · 3 years ago
 -
 egg2k16 reblogged this · 3 years ago
 -
 macrowdu reblogged this · 3 years ago
 -
macrowdu liked this · 3 years ago
-
 asublimehimbo liked this · 3 years ago
 -
 blessedjoy reblogged this · 3 years ago
 -
 demoruu liked this · 3 years ago
