Hands
Hands
As I do with most things, I draw hands from a series of gesture strokes that insinuate the pose and shape I want. Something I personally find very appealing about hands are all the joints, bends, and crooked bits so I start with those and build the rounder, meaty bits from there.

In the first two steps here if you just look at the individual strokes I’ve drawn, you can see they’re just some curves, really, that sketch out the shape of the hand, and I’m focusing on the joints and knuckles. (The fingertips in the second one are actually rly unnecessary and ugly to me haha – that’s usually the kind of thing I’d just throw down in step 3.)
And again below, just starting w/ some curves and squigglies to show the joints and knuckles:


These hands are by no means realistic or fully proportional but drawing’s supposed to be fun and these are really fun! I’m like, really not about that whole “draw a box and then the little tubes and those are the fingers” thing. It’s too technical and so much life gets lost when you sketch that way. Maybe it’s helpful for a pose you’re uncertain about but then just look at a photo or your own hand to see how things work, y’know?
Something else I’m really about is using shading and line to emphasize the bends and stuff even after I’ve got the hand down:

The first image here you can tell the fingers are bent, but they also look lumpy imo. To stylize further, I add some thin lines for the joints and fingernails, and then shade for some extra depth + to pronounce the foreshortening etc. (Fingers are so ugly from this angle! But we gotta draw them like this sometimes…)
Some examples where these extra lines assist in conveying the shape:

And shading:

(Bottom right is the same pose as a previous example which I didn’t realize till now sorry haha)
Some general tips:
- Use asymmetry!!! When the joints don’t line up exactly right, or you’ve drawn two hands doing the same thing but idk one’s curled a little bit more or the right pinky sticks out but the left doesn’t – these little touches make the drawing more dynamic, even if the general pose/concept is flat.
- Thumbs are really cool? They’re like trapezoidal. The same tapering thing kinda happens where the hand meets the wrist. A hand is like a big thumb
- Two things that a lot of beginner artists get wrong: which side the thumb is on (…always double-check…I still double-check sometimes too), and drawing the fingers straight instead of slightly bent when trying to draw a relaxed hand. Relaxed fingers curl! And this is much easier to draw imo than perfectly tense fingers
- Study your own hands and think about their shape. Part of developing a style + comfort with drawing a particular thing is how you choose to simplify the form thru line. I explained above that I focus on the joints and knuckles and seek to simplify those with curves and squiggles but maybe you’re more interested in a different aspect. (Like, you can see I don’t draw palms v much…that’s cuz I like knuckles haha)
Hope this is helpful/feel free to ask followup questions!
More Posts from Arttuti and Others
Hey! I love your art style and was wondering if you had any tips for drawing braids? Any techniques you found useful?
Hello! And thank you very much!
There may be easier ways of building braids than what I do, but this is just my process for drawing them, so take it with a grain of salt.
I’ll start with a line for whatever direction I want the braid to go in, if I don’t do a line and I have any kind of motion to the hair, boy do I mess it up lol

Next I’ll do wide half triangles, the line being my center, the right side or the left side always dropped lower than the other. If both sides meet in the center at the same level it’s not going to look very braid-like or have the illusion of being tangled with itself.

Afterwards you can remove the middle line if you want to take it further and connect each one with an alternating pattern like this one, giving it more of a braided look in the center.

Once the center is solid, you can add all the details you want in any style you like, curving inwards towards the center. I tend to like the more stained glass-ish appearance for hair so I’ll do very choppy, squared off lines to detail.


This works for whatever position you want to put the braid into using the wide triangles to build it up. It works for tightly woven or loose and messy braids depending on how wide/long you make the original half triangles.


I hope this helps!


Could you give a tutorial on how you do hair? I just looooovvvveeee the way you did rhetts hair & beard
Hey! Thank you so much. I’m not a good teacher, but I’ll give it a shot :)
Step 1: DO NOT TRY TO DRAW EACH HAIR! Draw each bunch of hair but NEVER each hair.
Step 2: Draw a faint outline of the entire portrait using the reference photo:

Step 3: Pick one bunch of hair, and make loose, dark strokes to draw the roots of the hair. Make similar strokes at the other end of the bunch. (Remember, you’re not drawing each strand. You’re essentially drawing shadows). Don’t let them meet. This is important to render the shine in the hair. Let the pencil lift off the paper as you move towards the middle from both ends.

Step 4: Use a paper stump to smudge out the roots and the outer edge of the hair. Make loose strokes, starting from the darkest end towards the centre of the bunch. Let a few strokes run all the way through the centre to make it look like a natural shine. Then use a dark pencil to re-do smaller strokes on both ends of the bunch, to increase the contrast.

Step 5: Treat each bunch separately, and repeat till you cover the full head. To finish off, erase a few highlights from the middle of the bunches, to give a consistent shine, and smudge out the hairline for a more natural shadowed look.

I hope that was useful! Let me know if you want me to give a step by step for the rest of his face too :) - I would be completing this portrait anyway!
Okay so I followed this video about foreshortening and…


Sycra. I love you so much for making this video.


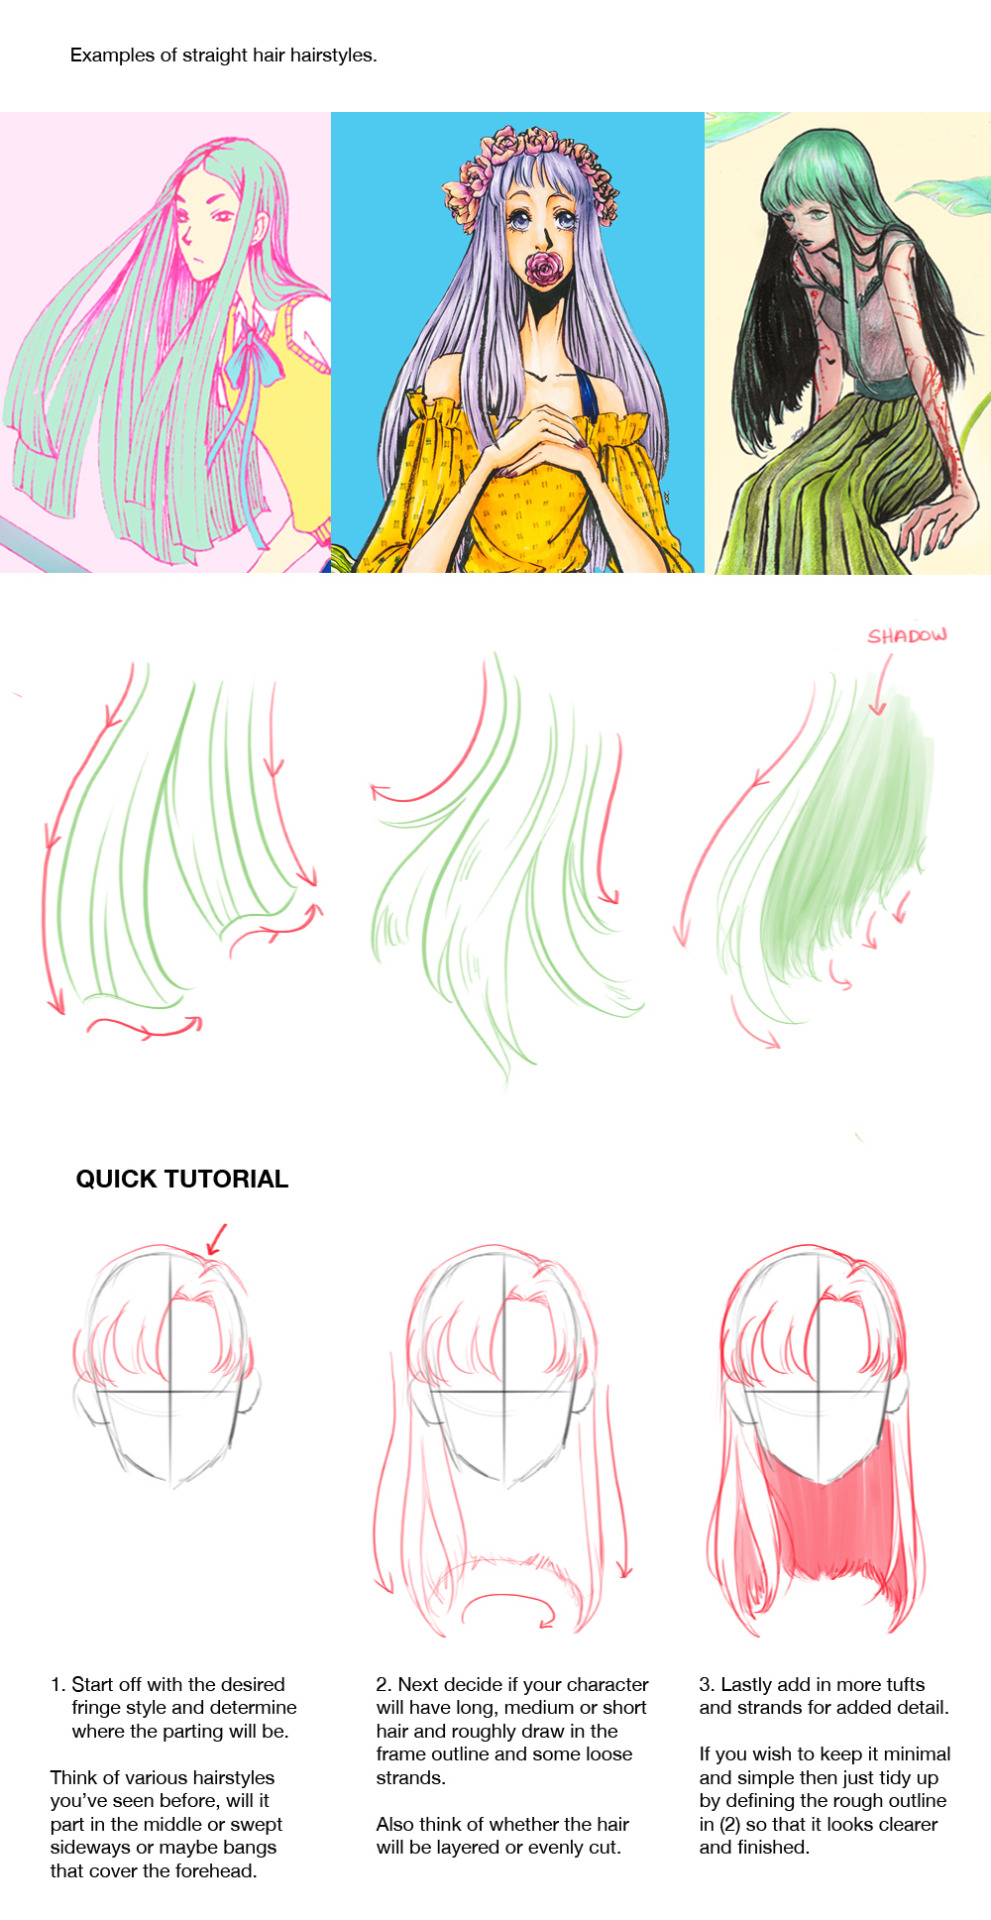


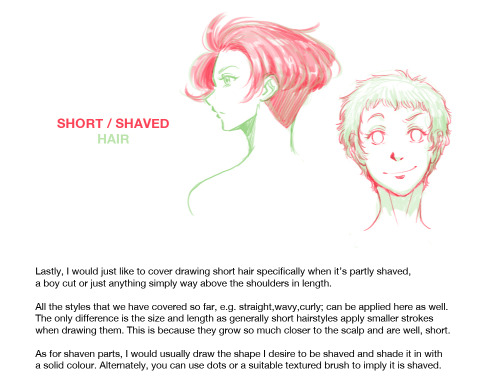


How to Draw : Hairstyles Pt. 2
Finally sat down and completed part 2 of the hair tutorial. Here I discuss how to draw hairstyles for female characters, although I think it can be applied for male characters as well. I mean..hair is hair xD I didn’t cover how to draw hairstyles that are tied or braided or styled in a special way as I thought the post would be way too long. So I’ll be saving that for another day. If you have any questions just drop me a message or leave a reply and I’ll do my best to get back to you. Hope everyone has fun learning to draw hair as much as I did putting this together :D And I just want to say a big thank you to all of those who checked out part 1. I’ll leave a link in case anyone needs it How to Draw : Hairstyles Pt. 1
-
 surfsideblondie liked this · 4 weeks ago
 -
 crunchyspositivybubble liked this · 4 weeks ago
 -
 rapturemctro liked this · 4 weeks ago
 -
 kaylaaplaf liked this · 1 month ago
 -
 corvikari liked this · 1 month ago
 -
 neebnabs reblogged this · 1 month ago
 -
neebnabs liked this · 1 month ago
-
 snakesnifter liked this · 1 month ago
 -
 salamandersorcerer reblogged this · 1 month ago
 -
 thetimbertinderbox liked this · 1 month ago
 -
 ledoggo liked this · 1 month ago
 -
 sophi-coby-art liked this · 1 month ago
 -
 shadows-fyre-fawkes reblogged this · 1 month ago
 -
shadows-fyre-fawkes liked this · 1 month ago
-
 tentativesapling liked this · 1 month ago
 -
 brave-fern reblogged this · 1 month ago
 -
brave-fern liked this · 1 month ago
-
 shockingheaven liked this · 1 month ago
 -
 washedsmudges liked this · 1 month ago
 -
 the-defiant-fluffball liked this · 1 month ago
 -
 gentenn liked this · 1 month ago
 -
 damadascoxinhas liked this · 1 month ago
 -
 thewheelsonthebusgofuckyourself liked this · 1 month ago
 -
 tiredcatboy reblogged this · 1 month ago
 -
 moonrise-illustration liked this · 1 month ago
 -
 blauequuleus reblogged this · 1 month ago
 -
blauequuleus liked this · 1 month ago
-
 xenalistair liked this · 1 month ago
 -
 ciil liked this · 1 month ago
 -
 oudkee liked this · 1 month ago
 -
 m3djed reblogged this · 1 month ago
 -
 lesbianlychee liked this · 1 month ago
 -
 somethingborrowed reblogged this · 1 month ago
 -
somethingborrowed liked this · 1 month ago
-
 trans-seraphim reblogged this · 1 month ago
 -
trans-seraphim liked this · 1 month ago
-
 gingerwolf9900 liked this · 1 month ago
 -
gingerwolf9900 reblogged this · 1 month ago
-
 indiworld liked this · 1 month ago
 -
 orcagami reblogged this · 1 month ago
 -
orcagami liked this · 1 month ago
-
 cannibalmouse reblogged this · 1 month ago
 -
 lavender-wren liked this · 1 month ago
 -
 the-moore-you-know liked this · 1 month ago
 -
 teachillvibes liked this · 1 month ago
 -
 fruitloopsfactory liked this · 1 month ago
 -
 qapleulium reblogged this · 1 month ago
 -
 qapleulia liked this · 1 month ago
 -
 yarrow-the-nightlock reblogged this · 1 month ago
