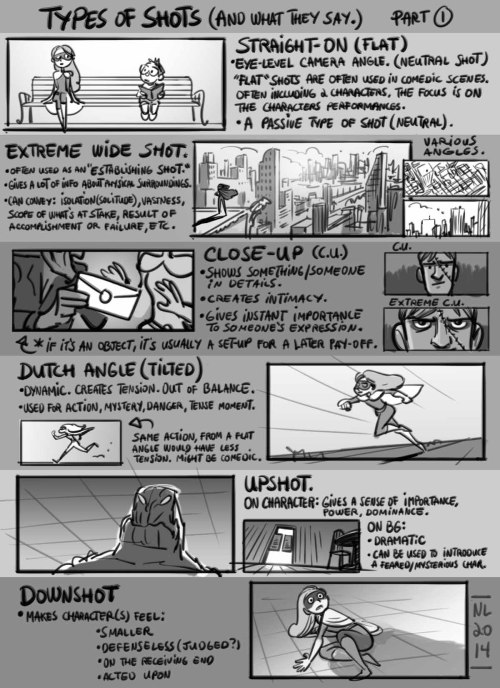
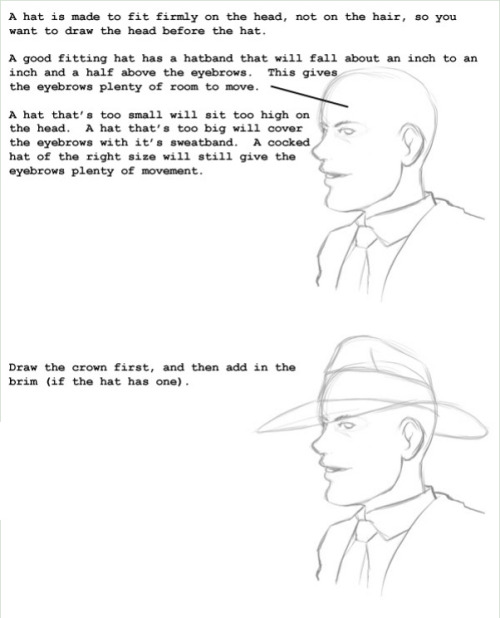
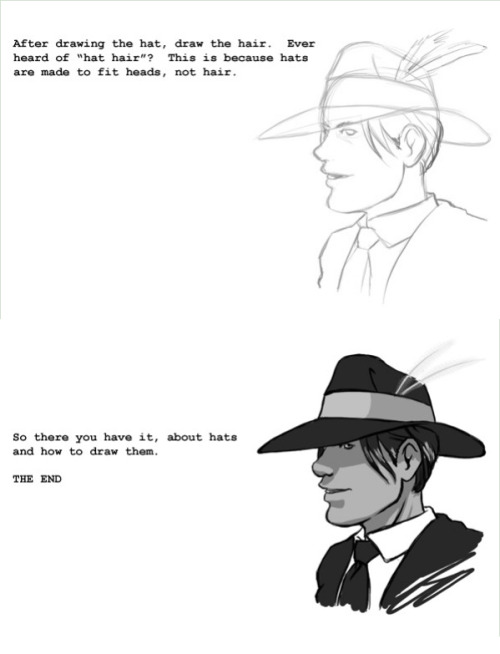
The Process Work. My Character. 1. Sketch. 2. A Detailed Sketch. 3. Line. 4. Bucket. 5. The Basic Color.


The process work. My character. 1. Sketch. 2. A detailed sketch. 3. Line. 4. Bucket. 5. The basic color. 6. The basic color. Rework. 7. Working out details. 8. Shadows. 9. The final stage.
More Posts from Arttuti and Others


So I got a lot of messages after my first post asking me to explain layers, so I have put together a cheat sheet of the different layer types. The quickest way to become awesome with layers is to know exactly what each one does. Once again, I’m no expert, and these are just my personal definitions, so please try these out for yourself! LONG POST BELOWWW THE LAYERS CHEAT SHEET PART ONE: 1. NORMAL: Aw yeah you know all about this layer its just your average layer 2 DISSOLVE: This mode “dissolves” some pixels, allowing the lower layer to show through. very pixel-y. Reducing opacity makes it dissolve more. ________ 3. DARKEN: Now the difference between darken and multiply are a little confusing, so I will explain them together. MULTIPLY is more of a glaze, while DARKEN favors the darks on all layers. So if you have a darken layer on, it tend to reduce/remove the lighter tones on the layer if there are darker tones below it, while darkening the darks. 4. MULTIPLY: A glaze that darkens the color of the layer below. It is great for shading. Reduces whites. 5. COLOR BURN: “Burns” the lower layer favoring a more saturated look. Marks made over white are not preserved. 6. LINEAR BURN: “Burns” the lower layer, with a little less saturation than color Burn. Also will preserve colors over white. 7. DARKER COLOR: I tend to avoid this puppy cause it does not darken on the RGB channel. (feel free to try him though!) ______ 8. LIGHTEN: Lightens the colors below. Favors lighter colors on lower layers. 9. SCREEN: Lightens the colors below, but much closer to the “glaze” analogy as above. Reduces blacks. 10. COLOR DODGE: Often used for magic-y effects, color dodge bumps up saturation and is very bright. 11. LINEAR DODGE: Much like color dodge, but less saturation. 12. LIGHTER COLOR: Once again, this is an outside RGB channel layer, so I don’t really use this. As you probably have noticed, the second two groups are opposites, so if you have a good handle on one, you probably know exactly what the second group does! I will do the remaining groups next week as they do not follow this pattern. Thanks! drawmaevedraw.tumblr.com EDIT: Part two here: Photoshop Layers Part Two!!


How I study by Drawing explained in a few different techniques and what they’re most useful for.
Video Version
DeviantArt
Commission Info
Could you give a tutorial on how you do hair? I just looooovvvveeee the way you did rhetts hair & beard
Hey! Thank you so much. I’m not a good teacher, but I’ll give it a shot :)
Step 1: DO NOT TRY TO DRAW EACH HAIR! Draw each bunch of hair but NEVER each hair.
Step 2: Draw a faint outline of the entire portrait using the reference photo:

Step 3: Pick one bunch of hair, and make loose, dark strokes to draw the roots of the hair. Make similar strokes at the other end of the bunch. (Remember, you’re not drawing each strand. You’re essentially drawing shadows). Don’t let them meet. This is important to render the shine in the hair. Let the pencil lift off the paper as you move towards the middle from both ends.

Step 4: Use a paper stump to smudge out the roots and the outer edge of the hair. Make loose strokes, starting from the darkest end towards the centre of the bunch. Let a few strokes run all the way through the centre to make it look like a natural shine. Then use a dark pencil to re-do smaller strokes on both ends of the bunch, to increase the contrast.

Step 5: Treat each bunch separately, and repeat till you cover the full head. To finish off, erase a few highlights from the middle of the bunches, to give a consistent shine, and smudge out the hairline for a more natural shadowed look.

I hope that was useful! Let me know if you want me to give a step by step for the rest of his face too :) - I would be completing this portrait anyway!
Sorry if someone has already asked this but can you show us a colouring tutorial please?

ya take a babi

color da babi

make a fuckin uhhh multiply/shade layer then u take ur fuckin sai marker brush
pick a shading color or something

cel shade that motherfucker
but be messy with it, literally just go fucking ham, dont be too precise and don’t make it look so clean
ysee that residue there? yea man, it looks really messy but it also kinda looks like a painting right

make a screen/luminosity layer on top of the multiply layer
then ya pick a lighting color

then u do the same thing as earlier

bam you got,,, a child
this is the simple n easy way i do it, i got more complicated ways but hewe u go
OH YEAH HERE’S MY PEN SETTINGS


-
 c-ander reblogged this · 1 year ago
 -
 darkfec liked this · 1 year ago
 -
 silentnoisemaker liked this · 1 year ago
 -
 ryandidindoom liked this · 2 years ago
 -
 somethingdowitharthere reblogged this · 2 years ago
 -
 bl00000g liked this · 3 years ago
 -
 erinbeast liked this · 3 years ago
 -
 thatdapperbastard liked this · 4 years ago
 -
 smolnsalty reblogged this · 4 years ago
 -
smolnsalty liked this · 4 years ago
-
 kajiimotojiiro liked this · 4 years ago
 -
 nezumivi liked this · 4 years ago
 -
 bollaboll reblogged this · 4 years ago
 -
bollaboll liked this · 4 years ago
-
 sharksfood liked this · 4 years ago
 -
 comraderelics liked this · 4 years ago
 -
 partlyspiders liked this · 4 years ago
 -
 atomic-rena liked this · 4 years ago
 -
 fallinforaguyfelldownfromthesky liked this · 4 years ago
 -
 tableflipapocalypse reblogged this · 4 years ago
 -
tableflipapocalypse liked this · 4 years ago
-
 wintercoffin liked this · 4 years ago
 -
 softypyro reblogged this · 4 years ago
 -
 howhmmm liked this · 5 years ago
 -
 hannibara liked this · 5 years ago
 -
 asterkn1ght liked this · 5 years ago
 -
 cyclonusngalvatron liked this · 5 years ago
 -
 raccoonshinobi reblogged this · 5 years ago
 -
 anyoning liked this · 5 years ago
 -
 bassclarineko liked this · 5 years ago
 -
 forgottenhope547 reblogged this · 5 years ago
 -
 littledirtybirdy liked this · 5 years ago
 -
 irnid reblogged this · 5 years ago
 -
 ariku98 reblogged this · 5 years ago
 -
ariku98 liked this · 5 years ago
-
 ikea-priest liked this · 5 years ago
 -
 professor-sneaky liked this · 5 years ago
 -
 hellolalalovestuff liked this · 5 years ago
 -
 countlessimpossibilities liked this · 5 years ago
 -
 superperidothomeworldthings liked this · 5 years ago
 -
 ooartsandcatsoo reblogged this · 5 years ago
 -
 michibikionmain liked this · 5 years ago
