How To Draw?
How to draw?

here, take these links
The Complete Famous Artists Course
Collection of Art Books and Resources
More Posts from Arttuti and Others


Comic Pages Storyboard Tutorial
OKAY SO! @biazerod asked me a little help on storyboarding and i decided to make this tutorial…i’m not a professionist. so don’t take these as golden rules…just advices! and as always sorry for the english FIRST THING FIRST! the storyboard part is the most important phase in a comic page ! you can spend an entire day storyboarding! because it’s the structure, the essence of the page! here’s some tips : 1- a page can start from 1 panel/frame (called splash page!) until how many f*cking panels you can fit ! (some pages , especially in french comics/bd can reach 24 panels/frames!) Exaple of splash pages:


(these are from the green lantern,DC and the newest Thor ,marvel ) Splash pages are a priority of American comics, you rarely can find them in french Bd ! they represent a scene of impact! a fight! a revelation! be careful! use it only one if two times on a range of 50 pages! cuz it cut the narration! instead in french bd you find this :


first one is from Blacksad 2# and second one is from Atar Gull see how high the number of the frames is?? the number of frames is very important in a page because it decide the narration time! :D also it all depends on the kind of ‘’direction’’ you want to use on your comic! so be really careful when you decide the number of the frame! LET’S PASS ON THE CREATION! 1- when you have a page that contains more than 3 Frames ALWAYS. ALWAYS HAVE AN ESTABLISHING SHOT!

the establishing shot is fundamental! BECAUSE READERS CAN UNDERSTAND WHERE THE CHARACTERS ARE! DON’T DO A COMIC PAGE FULL OF FACES !

DON’T DO THIS! LET THE CHARACTER BREATH! LET THE READER BREATH! PLAY WITH YOUR CAMERA! YOU HAVE THE POWER! in a comic page, is important to put the camera far away from the character most of the time! play with the different shots!

(found this on google) WATCH MOVIES AND TV SHOWS. lot of them can help you so much you have no idea! a comic artist and a director do the same job when creating a story 2- Candy eye this is a tricky trick that can help you with the audience! when a character is saying something important or you have to introduce them , USE THE CANDY EYE DUDE.

the candy eye is , basically, a bust shot where you show the character,their features , usually with a cool or a funny expression ( or of course it depends from the situation) and believe me WORKS 10/10 with the audience ;) 3- HIGHLIGHTS THE IMPORTANT SCENE IN THE PAGE!

FINAL TIPS: - when you’re doing dinamic poses try and try again! the first one isn’t always the best! -USE REFERENCES. -A STORYBOARD PAGE CAN REQUIRE EVEN 4 HRS IF NOT AN ENTIRE DAY IF NOT AN ENTIRE WEEK. REMEMBER THAT THE STORYBOARD IS THE ESSENCE. AND THE REST IS DECORATION. - IMAGINE THE SEQUENCE! NOT THE SINGLE PAGES. THINK IN SEQUENCES! imagine what would happen after the page you are creating! connect the various pages NOT THE SINGLES FRAMES ! YOU’RE CREATING A STORY! NOT A SINGLE ILLUSTRATION! -AGAIN DON’T DO PAGE OF FACES. most important thing:

if the page you’re creating it stresses you! STOP. continue it when you are in a better mood ,dude. our job requires lot of time and effort, but it should be the job we love. so don’t stress yourself and keep calm. hope this is useful. don’t take this as golden rules, this is just the way i work :)


Okay so I followed this video about foreshortening and…


Sycra. I love you so much for making this video.


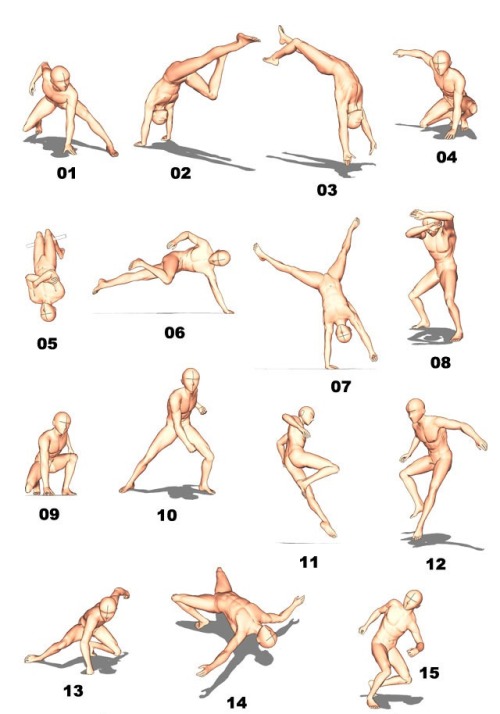
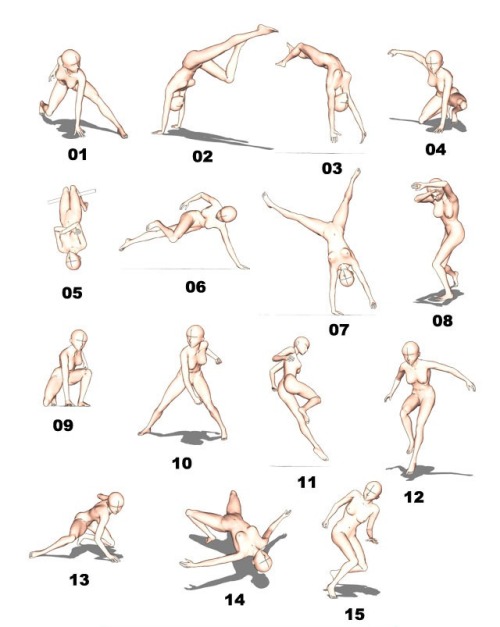
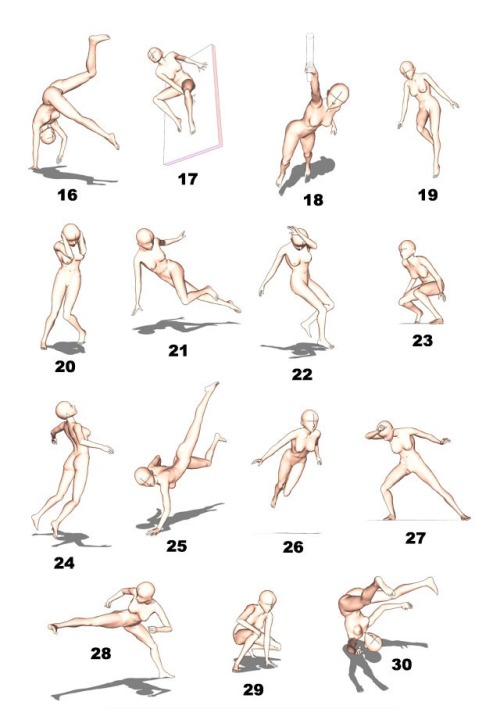
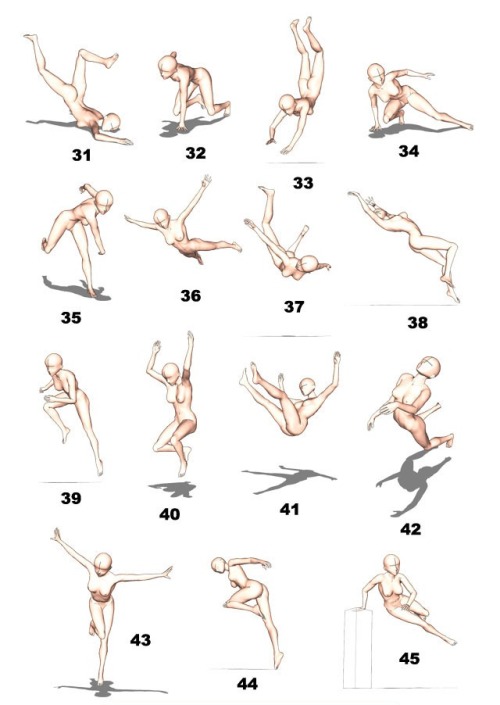
Artist Resource: Bodies in Motion
I came across this site that (if you subscribe) offers high-res frame by frame photos of people jumping, flipping, kicking, dancing, etc, so you can easily analyze each position the body goes through to complete each movement. I think this can be an excellent resource for gesture drawing and reference for all manner of artmaking. It is $49 a year for the basic plan, and that gets you access to the high-res photos and a few other features.
https://www.bodiesinmotion.photo/
Hey just thought I'd let you know you have some of the best artwork I've ever seen! Congrats! Especially Chirrut, he's amazing in your style! I was also wondering if you had any advice on how to draw heads and eyes? They're one of my two biggest struggles and I'd love it if I could get your advice. Anything helps. Thank you and I hope you have a fantastic day!
*_* Thanks a bunch askdh and thanks for taking the time to write me! I had a lot of fun working on Chirrut ;;;
Hmmm I usually think it’s not useful to explain how I make eyes or noses, since the way to draw them changes depending on the pose… My advice would be practicing with ¾ heads. That view always force you to work volumetric shapes and also give a lot more of information. Also, I think it’s much more easy since you have more landmarks to help you.
I would also say consulting anatomy to identify the landmarks on the face (zygomatic and nasal bone , superciliary arch, mandible…) and practice on photos. Using references for drawing is not bad and drawing over photos when you need information of a face is a lot of fun. Is not necessary to draw all the bones, but knowing where the volumes and principal shapes are can help you learn. I.E:

I love that photo because it’s SO SO easy to see the volumetry of the face; just the line of the jaw gives you a lot of informacion about it. And it makes it easy to identify the elements and principal shapes of the head:

(I broke his nose, I’m sorry, but I made this quickly (??)) the point is, take your time to study the lines and understand the anatomy.Also:

that triangle is very helpful too and could help you placing the principal elements. The lines that make him look like he’s crying (?) are the relation between the eyes and the mouth and are very helpful when placing it.
Again, this is only a way to learn and understand how to build a face. That is always the key, even if you use a cartoon style. Rules can be broken, but I think it’s important to understand them first. It could help you make your style more solid.
And well, once you’ve studied it from photos, trying it on your own (even if you have references, that’s ok) and practice, practice u3u
Hope this helps and hope it’s not too technical ;;;


How I draw kisses!
A quick tutorial/cheat sheet on how I draw kisses!! I’m going to assume you already know how to draw a head and how to angle it, because that’s an entire procedure in itself. I’m going to focus on mainly the lips and also try and tackle some common mistakes when you’re first starting out.
Pursing the lips

So this is boring but crucial. If you don’t purse, their is no real kiss (take notes) bc placing your lips on top of someone else’s is not how you kiss… The most important part are the corners of the mouth, especially from the side view, because that’s what changes the most.
The actual kissing yeee
Let’s start do a basic side view kiss on the lips. And believe it or not, I think this one is the hardest!

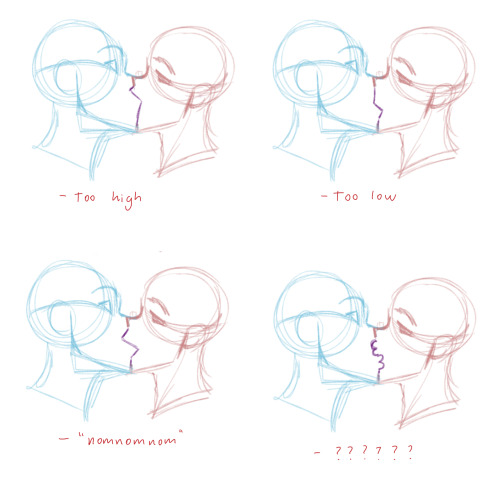
Think about which parts of the face are going to be in front of the other! This can take some time to get the hang of, but once you get that down it’s easy. Also, focus on getting the heads at the right distance and angle. A common mistake is drawing them too close.
The Lightning Shape:

Still keeping in mind which part of the line is “Red’s” upper lip and which part is “Blue’s” lower lip, play around with the shape of the lightning. Very subtle changes can have a very strong impact! I usually go by feel, so take your time, but here are some things to look out for:
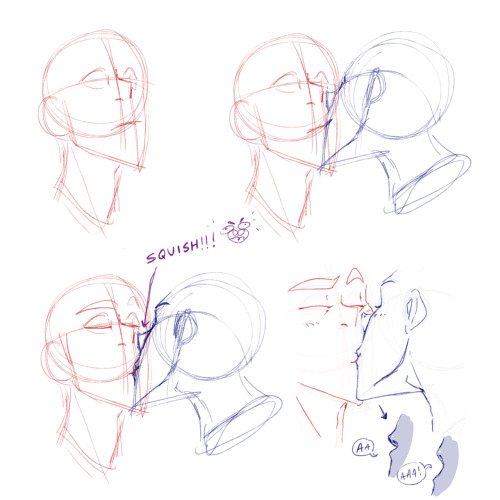
Details squishing etc.
So yeah once the lightning shape looks good, I usually add details and squish parts of the face that will touch. Which usually includes the noses, but from this angle they won’t squish unless you intend on making nice big noses <3. By now it should look something like this:

You don’t have to add the corners of the mouth! I usually do when I want to show that the character is smiling.
One technique used a lot in anime/manga + other cartoony art styles, is fading lines where two soft-ish objects press hard against each other. The picture above explains it.
Common mistakes
Getting down the crucial kissing part of fanart is hard and you will mess upp SO MANY TIIIIIIMES, but you learn from your mistakes, so don’t be discouraged. There are some things though that I frequently see when people draw kisses that makes it look awkward and stale, many of which I used to do myself. Here are some examples:
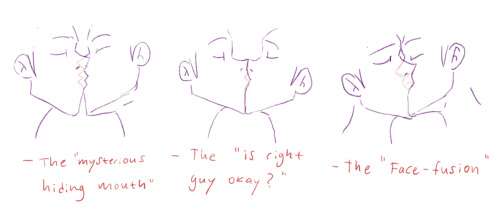
Try your best to avoid these. Most of the mistakes have little to do with the lips and more to do with the angle of the head. So getting that down before you move on to the lips is important.
¾ view Kissing
There are not a lot of angles where you actually see the lips meet (or at least not that I can draw…). Depending on how the heads are placed in relation to each other, you may or may not see the lips in a ¾ view. The way I have demonstrated is done in a way that the nose will bump into the other’s upper cheek.
Aaand that’s about it! These things will make more and more sense the more you draw them. At first it can seem very hard with so many things to keep track of, and it is, but practice makes perfect!
Rule of thumb: does the angle and position of the heads make sense? How are the lips going to align? What parts of the face are going to be in front of the other? How much will the lips purse? And finally, what is going to squish?
Thank you for reading! 😘

(☞゚∀゚)☞ now draw kisses
-
 rake-rake liked this · 2 weeks ago
 -
 thebronzehexagon liked this · 2 weeks ago
 -
 karacelsius liked this · 3 weeks ago
 -
 mondzunge liked this · 3 weeks ago
 -
 eternalparadisearchive reblogged this · 3 weeks ago
 -
 flojouno liked this · 3 weeks ago
 -
 celestialcatsworld liked this · 3 weeks ago
 -
 adorable-bookworm liked this · 3 weeks ago
 -
 creamsiclefantasy reblogged this · 1 month ago
 -
 ln-g reblogged this · 1 month ago
 -
ln-g liked this · 1 month ago
-
 kattperson reblogged this · 1 month ago
 -
 oooahooo liked this · 1 month ago
 -
 redstarpika reblogged this · 1 month ago
 -
 cruxcly liked this · 1 month ago
 -
 darkaac reblogged this · 1 month ago
 -
 4yoourinfo reblogged this · 1 month ago
 -
 makaleka31 reblogged this · 1 month ago
 -
 theveganwildflower reblogged this · 1 month ago
 -
 elianabixx liked this · 1 month ago
 -
 ccerebellumcrow liked this · 1 month ago
 -
 furfurtheferret reblogged this · 1 month ago
 -
 ishitted reblogged this · 1 month ago
 -
 weegle liked this · 1 month ago
 -
 mhittboi liked this · 1 month ago
 -
 sschmendrick reblogged this · 1 month ago
 -
sschmendrick liked this · 1 month ago
-
 prosecutors-gambit liked this · 1 month ago
 -
 likewinteritself liked this · 1 month ago
 -
 hassamkhalidsaidfuckyet reblogged this · 1 month ago
 -
hassamkhalidsaidfuckyet liked this · 1 month ago
-
 junebugzzz reblogged this · 1 month ago
 -
 adelidae reblogged this · 1 month ago
 -
theveganwildflower reblogged this · 1 month ago
-
 horsecroissant liked this · 1 month ago
 -
 drawing-refs-yippee reblogged this · 1 month ago
 -
 lovelyzanykitty liked this · 1 month ago
 -
 casualartisandeer reblogged this · 2 months ago
 -
casualartisandeer liked this · 2 months ago
-
 badlandmando reblogged this · 2 months ago
 -
badlandmando liked this · 2 months ago
-
 liztwister liked this · 2 months ago
 -
 roxygobyebye reblogged this · 2 months ago
 -
 cydrag0n liked this · 2 months ago
 -
 i-eat-vinilinum liked this · 2 months ago
 -
 prince--esque liked this · 2 months ago
 -
 savyir-genesizz-the-wizard reblogged this · 2 months ago
 -
 matt-the-second-coming reblogged this · 2 months ago
 -
 piggybankstomfoolery reblogged this · 2 months ago
 -
piggybankstomfoolery liked this · 2 months ago
