How I Animate
How I Animate

The Technique:
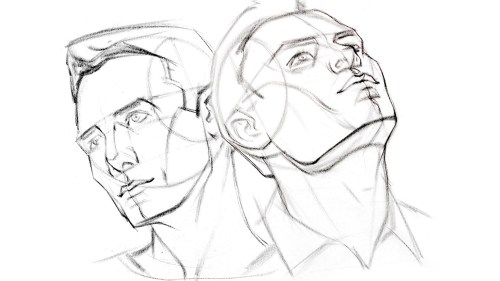
I draw the frames and then I use the liquify tool to push the lines into the next frame and redraw them where I need to. This allows me to keep the lines consistent, but gives me the control of frame by frame animation bc I am still making each frame manually! I also use 3d models as reference to help me with the angles! Super important to use reference while you animate (and with art in general), if youre no good handling 3d models then act it out and record yourself!

The Theory:
i think most people are at least loosely familiar with the 12 principles of animation (if youre not, heres a 2.5 minute video showcasing them!), but may not necessarily know how to employ them. the main 3 i tend to focus on when I animate is rhythm, telegraphing, and inertia so ill cover those there 👍
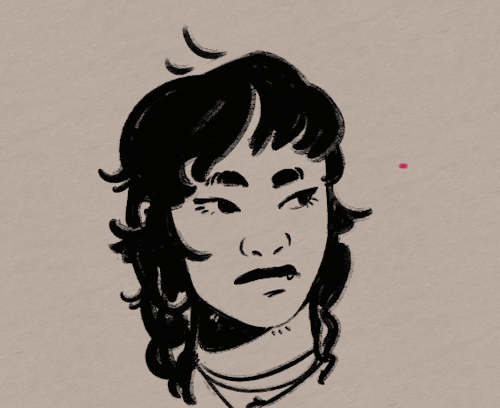
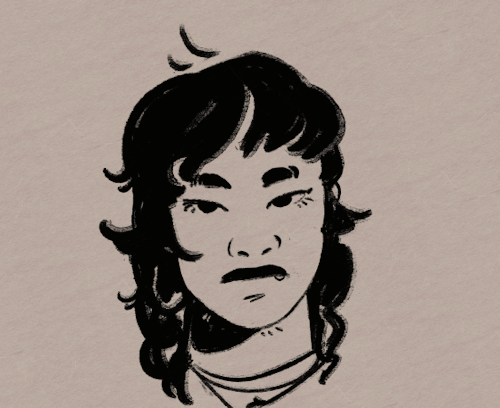
1. Timing & Rhythm
Timing is how you space out your frames both in how long an individual frame is held for, and also when you drawn an inbetween of two frames you can favour one frame slightly more than the other instead of drawing the exact average of the cels, giving the favoured cel more timing weight.

Left line has the cels evenly spaced out on the timeline, right holds the first cel for longer and the second cel slightly favours the last frame. It creates a more interesting rhythm to the animation! Rhythm is how I think of animation timing. Theres a beat like a song to every animation I make, and creating an interesting beat is what makes an animation fun to watch (for me, anyway):

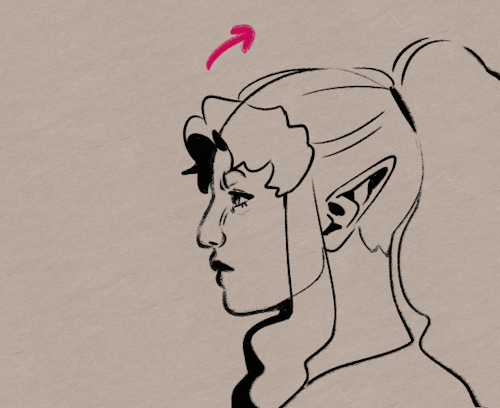
2. Anticipation / Telegraphing

Before I animate a big change in movement, I like to telegraph that its coming. Usually this is doing a little counter movement in the opposite direction, but thats not the only way to telegraph a motion, e.g. eye movement can telegraph a head turn!

3. Follow-through / Overshoot / Inertia


Unless the movement is mechanical, it wont come to a hard stop and will have some level of bounce or easing out to it. How much "bounce" you add will have a big impact on how the animation feels, but a very subtle bounce will add a natural feeling to the end of a motion.

Secondary animations will use a lot of this, note that the head and the hand have a small amount of continuous motion (primary animation), and then the hair has a lot of bounce and inertia (secondary animation which reacts to the primary animation). Note the different amounts applied to the braid vs the sideburn vs the bangs
anyway! I hope this was insightful ❤️ if you like my art you can commission me by the by :)
More Posts from Arttuti and Others

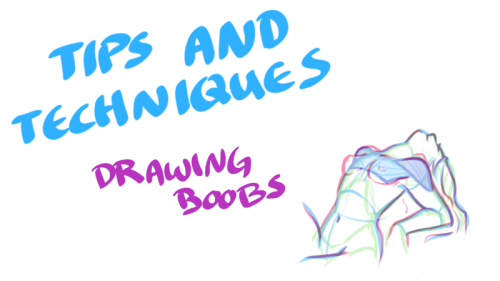
Just when you thought you knew everything about boobs… NSFW?


My darling friend Chizzi mentioned that there are a lot of booby tutorials out there are just predrawn boobs with the artist going HEY LOOK! HERE ARE SOME BOOBS! but not many that actually talk about the anatomical structure, and where to put the lines. I was like, “Hey, I can probably whip something up.“ And so I spent my thanksgiving making this.
Proportions probably aren’t exact, but I did my best. I also didn’t explore the various body types, but perhaps I could do a separate tutorial someday. I hope you find this tutorial useful :)
All photo references used in the tutorial were found on The Drawing Script. Credits to each photo belong to their respective owners.
Hi! Idk if my qn got sent before (tumblr mobile yeesh) I wanted to say i really really love your blog and art style! I was wondering if you have tips to draw Dean's and Cas's hair??
REALLY LATE REPLY BUT UM Dean’s got a hair parting on either side but his hair kinda all comes out from a spot on the back of his head. Keep the sides short but flip up the hair in the front

And here’s Cas again! Recapping: part on one side and have the hair come out from the parting and flip up in front as well. He’s got a longer fringe than Dean’s


Do you find drawing environments overwhelming? I did too, for a really long time. I started out drawing characters, and making the switch to painting environments was really hard at first! In my latest patreon tutorial, I break down the process into the most basic and essential steps, so that you don’t get lost in the details and know exactly what to focus on. Find it here for just $5: patreon.com/loish
Art Help

I redid this list because broken links 💀
General Tips
Stretch your fingers and hands
Art is for fun
Never too late to start/improve
Using a tablet
Editing software: pictures & video
Moodboard resources
Comic pacing
Watercolor
Coloring
Color Theory (not children's hospital)
Resources: coloring things a different color
Gold
Dark Skin undertones
Dark Skin in pastel art
POC Blush tones
Eyes colors
Cohesive Color Palette
Lights and Colors
Human Anatomy
POSE REFERENCES
Wizard Battle poses
Romance poses
Shoulders
Tips for practicing anatomy
Proportional Limbs
Skeletons
Hair Directions
Afro, 4C hair
Cane use
Clothing
Long skirts
Traditional Chinese Hanfu (clothing reference)
CLOTHING REFERENCE
Sewing information
Animals
Horse -> Dragon
Snouts: dogs, cats, wolves, fox
Foot, paw, hoof
More
Drawing references sources
Art tutorial Masterlist
Another art tutorial Masterlist
Inspiration: father recreates son's art
Inspiration: Lights
ART BOOKS
Plants/flowers: North America, Hawaii, Patagonia
Art Cheats
How to show expression with the mouth!
This was a request and at first I wasn’t sure if I had anything to provide with, but as it turn out it got a little longer than I expected because there were actually things I had to say!! Wow!!
Anyway, this is some guidelines I follow when I try to make the face expressfull, more specifically the mouth! It is often neglected, since it’s actually pretty hard, I’ll admit. But I’m here to help (hopefully…)! A mouth expression tutorial as per request. Enjoy and hopefully it will help some a little. ʕ•ᴥ•ʔ
Draw the teeth at the right angle.
This is super important. The upper jaw follows the angle of the head, and the lower jaw will depend on how open it is. Make sure you have a rough estimate of where the teeth are, and how much of them you’re going to see!
The lips will VERY roughly follow the same angle as the teeth. It really depends on the character, but it gives you a sense at least.

If you DON’T do this, you’re going to lose so much volume and the mouth is going to end up looking unrelatable. I showed this example in this tutorial:

It’s not just the lips!
The cheeks, chin, and tongue play a role too!

Try look at your own mouth or references! I have a very pliable and large mouth, so that’s one reason why my characters have it too lmao.
ASYMMETRYYYYY (ง ͠° ͟ل͜ ͡°)ง
I cannot emphasize how important asymmetry is when drawing expressions. It applies not only to the eyebrows to achieve the Dreamwork Face™, but also the mouth. Seriously if you draw a symmetric mouth I will deliver myself to your mailbox and then shout at you until you fix it.
Look at the difference between these two for example: which one has more “life”?

I think you get the idea.
Push and squish - give it flow
Here’s an old drawing I have but it illustrates how I think when I squish the mouth, and use folding and wrinkles to my advantage.

Look at your own face and see where skin bundles up, where it creases the most and when bumps appear on your chin. Subtle details makes all the difference!
One VERY effective detail is illustrated in the first sketch, where I pull upwards on one side, and downwards on the other. That’s a good detail to use when the character is making a skewed expression, or is extremely frustrated. I encourage you to play around with that concept bc it’s ~super effective~!
EXAMPLES:
Happy: Your entire mouth is pushed upwards, not just the corners of your mouth!

I tend to draw a :3 mouth bc I’ve been drawing Lance too much….. You don’t have to but it’s basically imprinted in my motor memory by now.
Pouting/frowning: corners are pushed down, middle pushed slightly up. Sometimes, there’s a slight dip in the middle too. It can give a sense that the character is biting their lips.

Showing frustration/intimidating/is intimidated: basically showing a lot of teeth. The corners are as open as possible and the middle sorta more squished. An extremely important detail here is showing some of the gums, and open space between the cheeks and teeth. That way it looks like the mouth it open to it’s full potential. Here is also where you basically MUST add folds and bumps, or else it’s not going to look relatable.

(Here I am again with the pulling upwards on one side and downwards on the other, as illustrated on the last sketch)
And then again, here’s just another doodle showing how important it is to show the gums. It’s the same face twice, but the second one looks slightly more frustrated doesn’t it?

(from my other tutorial on how to draw facial expressions)
As you can see, this last one is very versatile and I draw it a lot. Play around with the basic shape and see how much subtle details makes a lot of difference!
That’s it!
I hope that cleared some things up and was somewhat helpful! Enjoy drawing ✨

An anon asked me for an eye tutorial 👍🏼👍🏼👍🏼
I highly recommend looking reference photos on the internet to get used to drawing different eyes, and also to take photos of yourself to get used to drawing different angles/expressions – Don’t just blindly draw the same eye over and over again, because without a strong basis of drawing by observation, you could get into some bad habits, and all your characters will look the same. :)

-
 chuchuana reblogged this · 2 weeks ago
 -
 peggly-sus liked this · 2 weeks ago
 -
 bellascarousel reblogged this · 2 weeks ago
 -
bellascarousel liked this · 2 weeks ago
-
 unsettling-catboy liked this · 2 weeks ago
 -
 caligulynn liked this · 2 weeks ago
 -
 any-other-fandom-blog reblogged this · 2 weeks ago
 -
 cherrynotaberry reblogged this · 2 weeks ago
 -
cherrynotaberry liked this · 2 weeks ago
-
 theerdtreesnumberonewhore liked this · 2 weeks ago
 -
 rhizomehaunt liked this · 2 weeks ago
 -
 malewifepalamedes liked this · 2 weeks ago
 -
 urlocalllama liked this · 2 weeks ago
 -
 nerdsgeeksandotherdweebs reblogged this · 2 weeks ago
 -
 bubblejuices liked this · 2 weeks ago
 -
 animatedbooklover liked this · 2 weeks ago
 -
 vanarobot liked this · 2 weeks ago
 -
 cuculine liked this · 2 weeks ago
 -
 koishikomeijiofficial liked this · 2 weeks ago
 -
 marzipanpower liked this · 2 weeks ago
 -
 muspellssynir liked this · 2 weeks ago
 -
 kurooya liked this · 2 weeks ago
 -
 artistic-pineapple reblogged this · 2 weeks ago
 -
 bardnuts reblogged this · 2 weeks ago
 -
bardnuts liked this · 2 weeks ago
-
 elizmanderson reblogged this · 2 weeks ago
 -
elizmanderson liked this · 2 weeks ago
-
 frodho-slaggins liked this · 2 weeks ago
 -
 curiouscalembour liked this · 2 weeks ago
 -
 yourundead liked this · 2 weeks ago
 -
 mymaleficaria liked this · 2 weeks ago
 -
 freerunnerclementine liked this · 2 weeks ago
 -
 brightmoontrigon liked this · 2 weeks ago
 -
 alizerasong liked this · 2 weeks ago
 -
 kurgy reblogged this · 2 weeks ago
 -
 sipisttoo liked this · 2 weeks ago
 -
 anonbea reblogged this · 2 weeks ago
 -
 tyamuffins liked this · 3 weeks ago
 -
 bhujerbamage liked this · 3 weeks ago
 -
 garplatinum liked this · 3 weeks ago
 -
 solhaelan liked this · 1 month ago
 -
 random-idiots-stuff liked this · 1 month ago
 -
 noxernia reblogged this · 1 month ago
 -
 reawoo liked this · 1 month ago
 -
 tarta-de-queso liked this · 1 month ago
 -
 good-timestime liked this · 1 month ago
