269 posts
Latest Posts by arttuti - Page 3

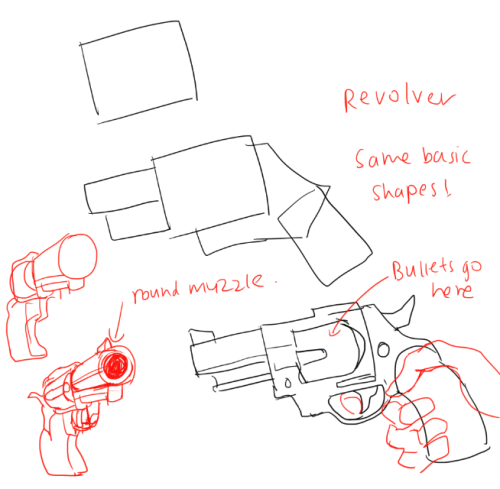
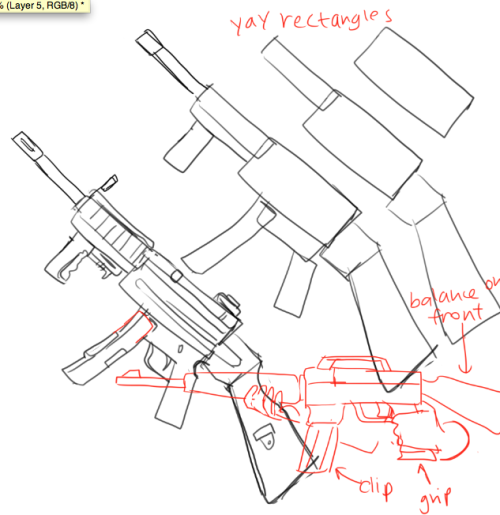
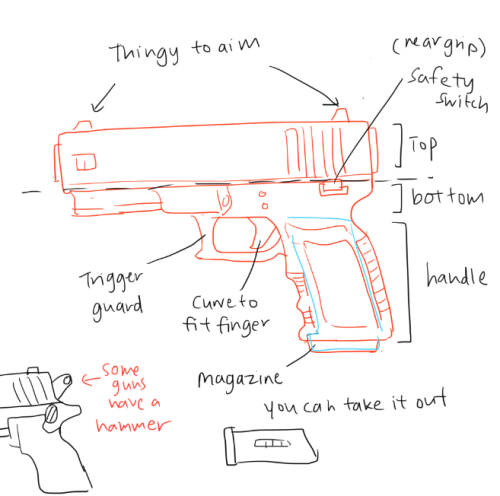
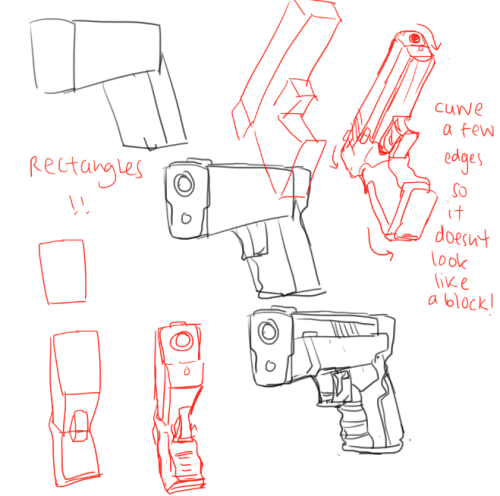
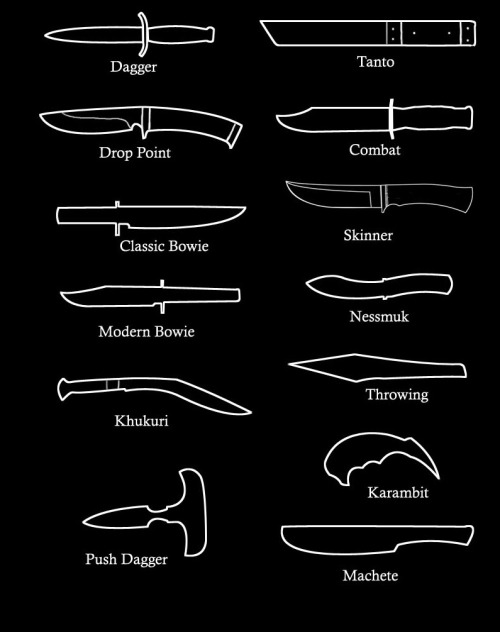
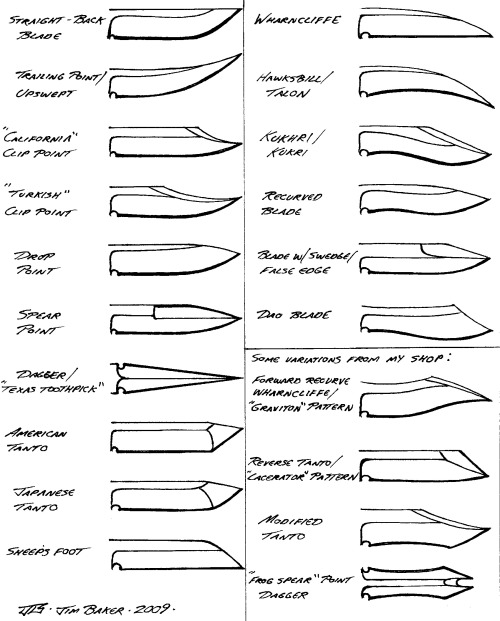
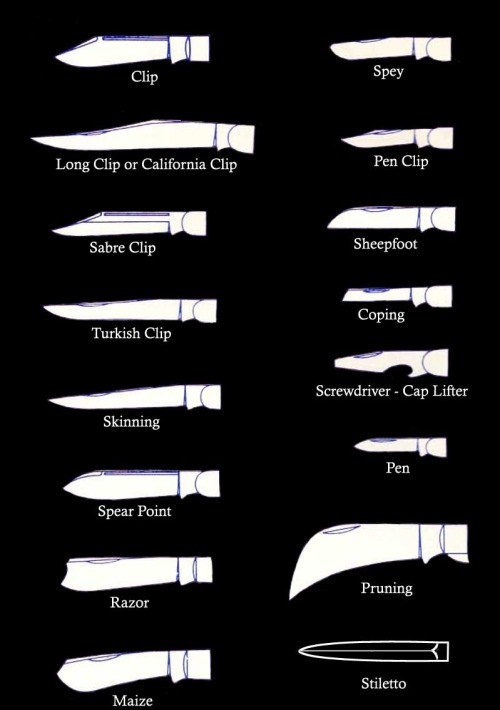
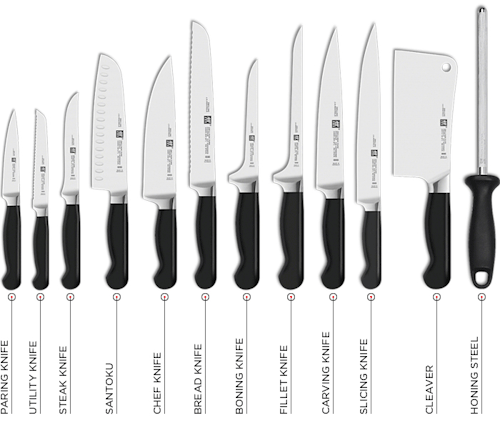
GGGUNS AND STUF i forgot who asked for it , as usual look up different refs to ;earn how to draw the amny differnt varieties of guns!!
EDIT: SORRY THIS WAS DONE W HILE AGO so there are a few mistakes
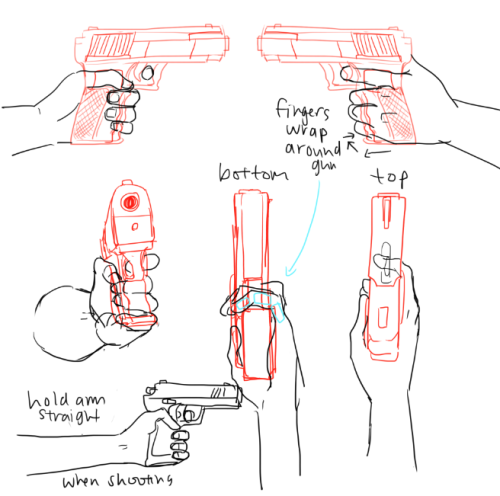
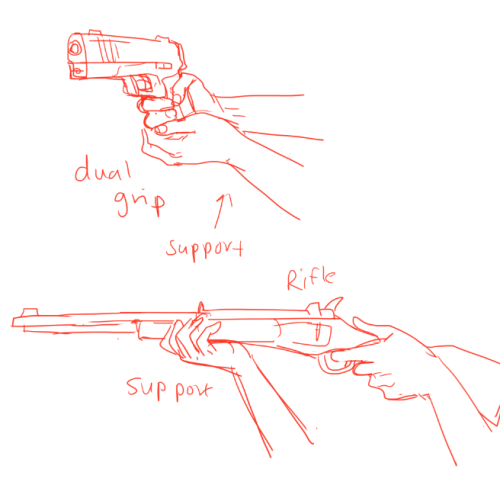
THE DUAL GRIP IS WRONG U SHOULRN"G BE DRAWING THAT U SHOULD LOOKA T THIS ALSO YOUR FINGER shouldn’t be on the trigger unless you’re about to shoot!! AND the labelling in the fourth pic isn’t very accurate so don’t rely on that for naming gun parts!
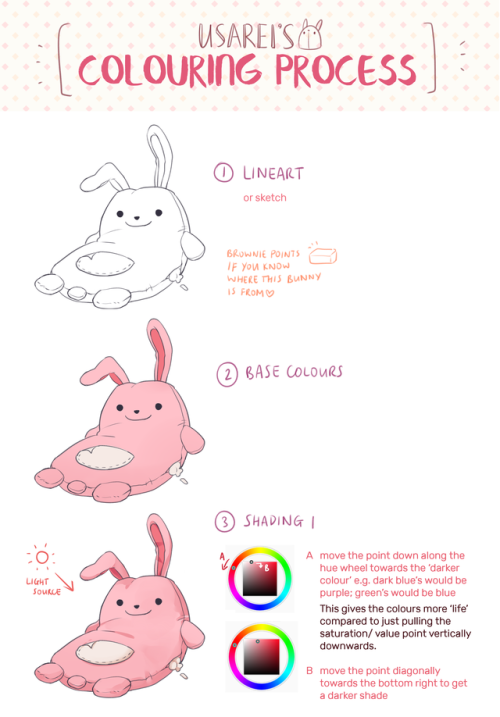
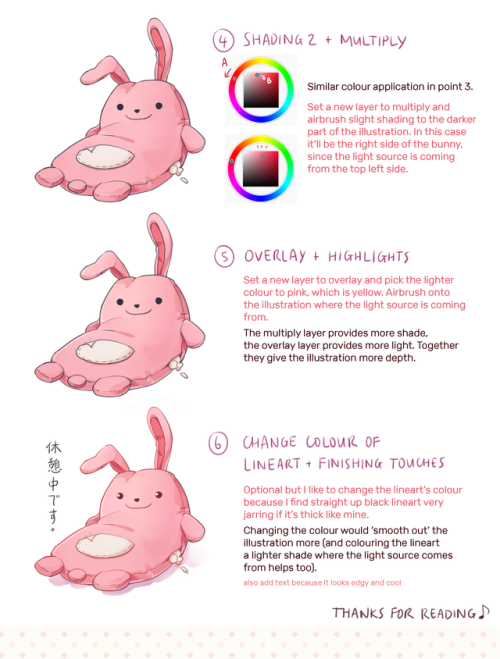

a colouring tutorial/my process of colouring because i was asked on discord for tips on how to colour things and i just farted this out ENJOY


Obviously, I’m not the best with drawing hands. But that basic shape helped me with drawing hands best. (Circle works for me too but not as good as that ‘fan shape’ my professor taught our class).
Don’t forget to keep practicing and using real life references–It’s the best way to draw good hands! Take your time drawing them! Don’t rush (unless you really wanna) It’s not a competition.
Got questions? Feel free to ask!
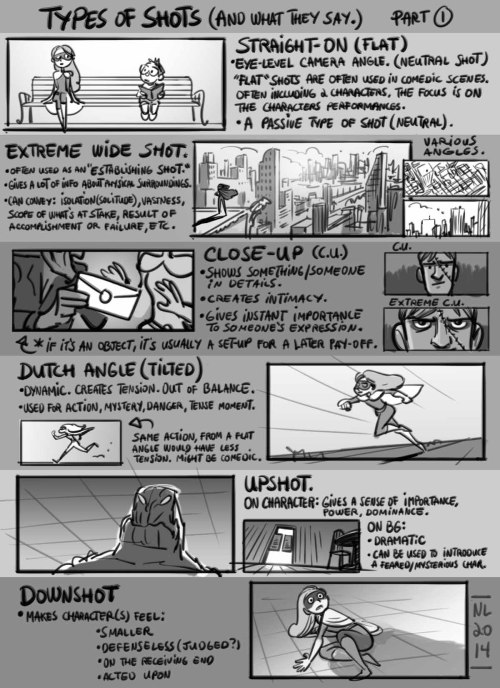
Tuesday Tips - Types of Shots (And What they Say.) Part 1 Camera angles and proximity really do convey a lot of information to your audience. Knowingly or unknowingly, your choices affect the viewers. What do you want them to feel or think at a specific moment? Norm


Some of my friends asked me to do this so I thought I’d share with you guys too!! Have fun drawing kisses <3 <3

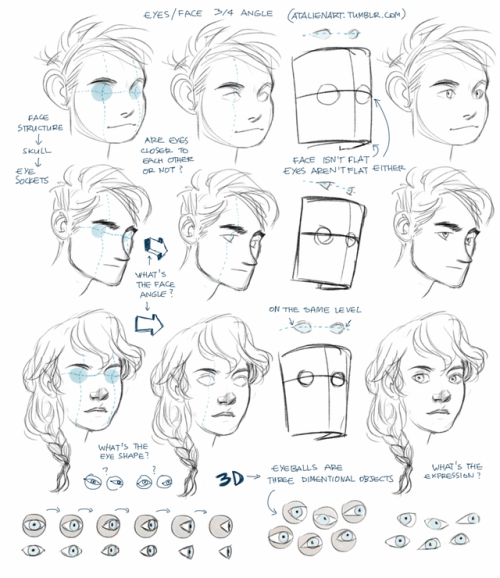
Anonymous said: I know you’ve shown how you draw faces from different angles very briefly before, but I was wondering if you’d ever go more in depth? For example, I always struggle with drawing the eyes at a ¾ angle… 😔
Ok, I get this question so many times that I decided to do something about it. I’ve already made a tutorial about drawing eyes and tbh it should help with drawing eyes from any angle, the tricky part is to understand the human face, its anatomy. If you see the face/head as a three dimentional object you’ll be able to draw it, I can’t say it enough, 3D thinking is important. Also, references are important, drawing from life is important because then you have a 3D model of the head right in a front of you. All you need to do is observe and understand.
Not sure if I've asked this, butt in regards to your last picture you uploaded and all of your drawings, how do you know where to line up the head/cranium with the rest of the spine in cases where the head is turned or posed?
well that is simple, the head ideally sits in the middle of the spine…

positioning the head is not the difficult part, in most cases ‘artists’ don’t need to make things ‘look’ right but make it ‘feel’ right. specially when drawing idealized and/or from imagination altering proportions and poses is rather common ⁽ˢᵘᵖᵉʳʰᵉʳᵒ ᶜᵒᵐᶦᶜ ᵃʳᵗᶦˢᵗˢ ᶠᵒʳ ᵉˣᵃᵐᵖᶫᵉ⁾

the easiest way⁽ᶦᶰ ᵐʸ ᵒᵖᶦᶰᶦᵒᶰ⁾ is to use the shoulders. Most of the time when drawing poses i will actually place the shoulders first and then draw the head. Maybe try ‘gesture drawing’ as exercise.


Need a bigger serving of practice? Check out the 19-paged worksheet and .psd practice file!
The difference between a beginner’s comic and an experienced artist’s comic comes down to the details, and one of the biggest “invisible” details is proportion.
How does an artist utilize page and panel layout, negative space, word balloons and composition to their best advantage? This Shingworks tutorial covers all of this information, and the 19-page supplement worksheet and comic proportion analysis template .psd takes it a step further and teaches you how to analyze real comics so that you can apply these principles to your own comics :]
My Patreon tutorials are unlocked to the public 6 months after their original publication month. You can find the full high-resolution archive of monthly tutorials at my Patreon! Thanks again to my Patrons for supporting me in the creation of my own comics, The Meek and Mare Internum.
My recent free-to-read tutorials on Tumblr:
Worldbuilding!
Understanding Patreon & Building A Patreon
Grow Your Brand
Acting for Comics
Researching for Comics
Writing for Webcomics
Coloring with Masks
This month’s Patreon tutorial: Webcomics 101
And as usual, thanks very much for not deleting my text~~
Could you give a tutorial on how you do hair? I just looooovvvveeee the way you did rhetts hair & beard
Hey! Thank you so much. I’m not a good teacher, but I’ll give it a shot :)
Step 1: DO NOT TRY TO DRAW EACH HAIR! Draw each bunch of hair but NEVER each hair.
Step 2: Draw a faint outline of the entire portrait using the reference photo:

Step 3: Pick one bunch of hair, and make loose, dark strokes to draw the roots of the hair. Make similar strokes at the other end of the bunch. (Remember, you’re not drawing each strand. You’re essentially drawing shadows). Don’t let them meet. This is important to render the shine in the hair. Let the pencil lift off the paper as you move towards the middle from both ends.

Step 4: Use a paper stump to smudge out the roots and the outer edge of the hair. Make loose strokes, starting from the darkest end towards the centre of the bunch. Let a few strokes run all the way through the centre to make it look like a natural shine. Then use a dark pencil to re-do smaller strokes on both ends of the bunch, to increase the contrast.

Step 5: Treat each bunch separately, and repeat till you cover the full head. To finish off, erase a few highlights from the middle of the bunches, to give a consistent shine, and smudge out the hairline for a more natural shadowed look.

I hope that was useful! Let me know if you want me to give a step by step for the rest of his face too :) - I would be completing this portrait anyway!


Tuesday Tips - A Matter Of Perspective: understanding the angle you’re drawing from means you can extrapolate the forms and sometimes exaggerate them. Think of your eye as a camera with a “fish-eye” lens, especially for a standing figure while you’re seating. -norm #grizandnorm #tuesdaytips #100tuesdaytips #amatterofperspective #figuredrawing #lifedrawing

Some tips about dynamism:
-Your sketches will always be dirty as fuck at the beginning. It’s normal and it’s okay. What you’re looking for is the right movement, intensity and direction, not drawing the next Mona Lisa.
-Try a lot of different posings, the first one will rarely be the right one. Some posings will feel better than others. You can then focus on the ones you like best and push/exaggerate them.
-Use!!! references!!! Analyze the action you want to draw! Look at what moves and when it moves (the hand moves faster than the elbow maybe? the hip rotate to follow the bust maybe? analyyyyze!)
Your art is so good !!! How do you color the skin its soo smooth
Thank you very much Anon ( ̄ε ̄@)hehehe!!Well I have some shots of one of my recent drawings so I’ll try to explain it a little bit hhahahah


Basically what I do is: 1. Put on base color2. Add some light shadows (They don’t even have to look very smooth, like the images above) 3. Then I start adding some darker shades of color and different skin tones to give it the correct shape, at this point I start adding some brighter tones, so yeah, they usually look very messy at this point. My brushstrokes also look like crosses or some sort on this step I think (I do it like that ‘cuz I think it’s easier to merge the colors later, at least for me hehehe) 4. Aaaand at the end, to merge the colors and make them look smoother I use a soft brush with low opacity to add some light shadows and brighter tones on bigger areas, I also try to use almost the same tones I used on the step three so it can merge nicely.So yeah, I think that’s about it (〜 ̄△ ̄)〜I hope I helped you out with that <3


in response to an ask about how i do rooms! here you go! it’s super simple and fun~!
sorry i didn’t go into a huge amount of detail, i hope it’s not too “draw the rest of the owl” lmfao
For artists who have problems with perspective (furniture etc.) in indoor scenes like me - there’s an online programm called roomsketcher where you can design a house/roon and snap pictures of it using different perspectives.
It’s got an almost endless range of furniture, doors, windows, stairs etc and is easy to use. In addition to that, you don’t have to install anything and if you create an account (which is free) you can save and return to your houses.
Examples (all done by me):


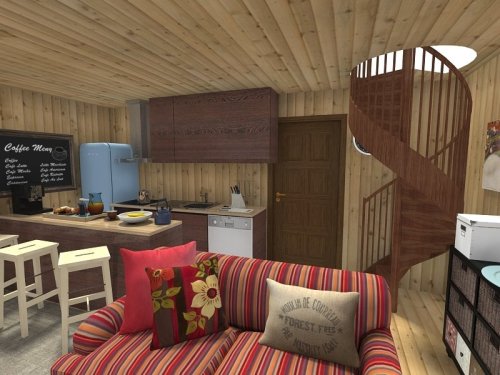

Here’s an example for how you can use it

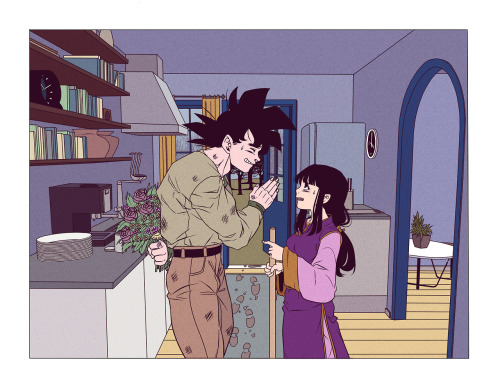
Okay so I followed this video about foreshortening and…


Sycra. I love you so much for making this video.

Mini Shading tutorial from a Curious Cat question about how I shade. (NOTE: This is not gospel. Learn how to properly shade).
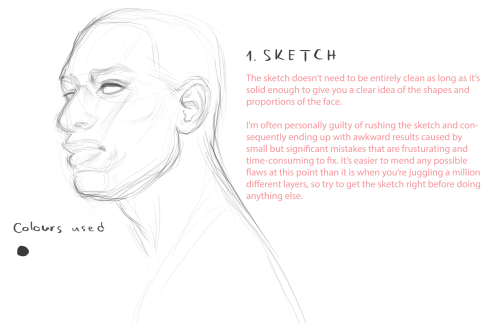

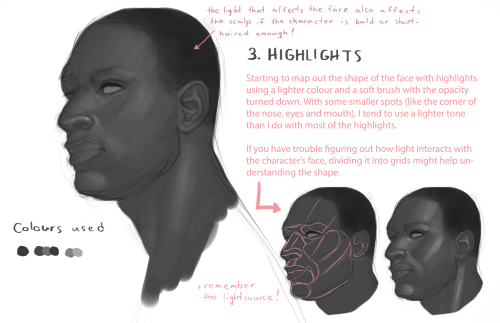


A few people have asked about this recently so I tried to break down my method of painting faces to the best of my ability. I personally like to use gritty chalky brushes, and this particular painting was mainly done with this brush by Mark Winters.

Tuesday Tips - Handling Objects — To show a character handling an object, think of merging the hand and object into one simple shape. Think of how you would wrap your fingers around it and how you would use it. Function is key! Norm #100tuesdaytipsvol2 #grizandnorm #handlingobjects #arttips #arttutorial
Webcomic tips
In the conclusion for now, some things I’d really recommend doing if you’re seriously considering making a webcomic (or really a comic in general). Some of these don’t really apply to strips or gag-a-day type of comics, but I’m not talking about those here.
1. Write down ideas\sketch stuff, LEGIBLY. “I’m gonna remember it later” NEVER works. And if you scribble it somewhere on a piece of paper, you’d better scan it or retype in one doc later, because tiny notes always get lost among other doodles in my skethbooks.

(i know it’s hard to keep everything clean and organized, but this mess is just not productive)
If your project is a collaboration, save your conversations. If you’re working alone, make a blog for your ramblings. You have no clue what tears of relief I cry when I open that blog and rememeber I don’t have to painstakingly look through my heaps of sketchbooks and folders for a tiny idea I’m not even sure I wrote down a few months ago.
2. Inspiration folders, or even better, inspo blog with tags also help with collecting and remembering ideas. Color schemes, landscapes, style inspirations, atmospheric stuff, maybe some photo references, all those neat things.

3. Basic tier: character design sheets. Top tier: common poses, expressions. God tier: outfits they wear throughout the comic. Holy cow tier: turnaround sheets for all those outfits.

(I’d die trying to find good pages for references without these)
4. If you haven’t finished detailing the plot, don’t even think about moving on to drawing the comic. You’re gonna regret it when you come up with a really cool plot element that can’t be incorporated anymore because you’ve already drawn all the parts you could’ve tweaked.
5. Don’t just define the plot, make a script. Writing down the lines and the brief description of the actions serves me fine:

(notice that I approximately divided the pages & the text that’d go to each panel on a page)
6. Hard mode: make thumbnails for all the pages, if possible. At least whenever a new chapter starts.
7. If your story involves some convoluted chronology shenanigans, you’d better write down the events of your timeline in the chronological order.
8. Backgrounds. You can’t avoid them, bro. Like half of the comics are backgrounds, especially if your story involves a lot of adventuring and looking around. I know it hurts, but you’ll have to become friends with them. Read some tutorials, practice on photos, go out and sketch some streets, use 3d programs (like Google Sketch) to understand the perspective, use sites like houseplans to visualize your buildings better, I don’t know. Just be prepared for their imminent evil.
9. If you’re drawing digitally, pick a brush size for the lines and stick with it. You don’t want your lines and detail levels to look all wonky and inconsistent in different panels. And I don’t mean the cool stylistic varying lines, I mean this:

Also, things on the background should have thinner and/or lighter lines to avoid distraction. Usually less details too, unless you’re making a busy background with a simple foreground to help it pop out. Or wanna draw the attention to an object on the bg.

10. Readable fonts. Even if you chose to ignore people with poor sight or dyslexia, the majority of your readers aren’t gonna be excited about struggling to decypher this:

Also, as much as I love my black speech bubbles, colorful text on black still kinda hurts the eyes. I wouldn’t recommend doing that for all the characters. Black speech bubbles are usually used for creepy, inhuman voices. And yes, having a colorful outline in this case helps.
11. Probably newsflash, but did you know that panels have their place, order and functions? They do! My favourite thing ever is how I used panels when I was like 12:

(comics ain’t rocket science, but this one is)
The composition of the panels and word balloons always serve for a better reading experience. They guide your eyes over the page, so that you never feel lost or confused. The images in the comic equal frames in a movie, so it’s pretty damn important in what order you look at things and how quickly you can understand what’s going on!

(Eric Shanower & Scottie Young’s Wizard of Oz)
12. One update a week is fine for testing waters. Don’t overestimate yourself, especially if you have a pretty busy life outside it. A stable comic that updates slowly, but regularly is better than an unpredictable erratic one. You can always pick up the pace later, if you feel confident enough.
13. Try to always have a buffer - a couple of pages in reserve. If you’re making the pages much faster than you’re updating, this shouldn’t be a problem. But if those paces are equally the same, it’s goddamn HARD. But on the other hand, if something happens and you skip an update, those come in handy.
If you’re looking at this list and thinking “wow that’s a LOT of work”, you’re totally right. And it’s okay to be intimidated at first! But that’s why it’s important to start with something small. Once you get the formula down, these things will be natural to you.

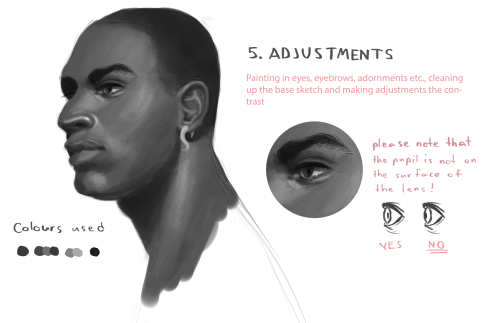
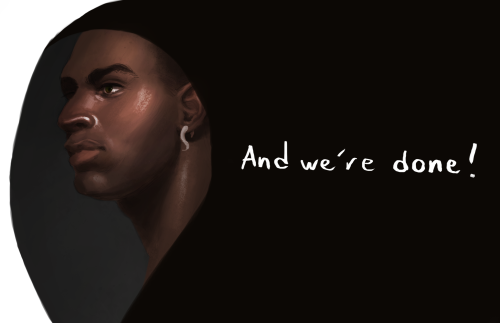
An anon asked me for an eye tutorial 👍🏼👍🏼👍🏼
I highly recommend looking reference photos on the internet to get used to drawing different eyes, and also to take photos of yourself to get used to drawing different angles/expressions – Don’t just blindly draw the same eye over and over again, because without a strong basis of drawing by observation, you could get into some bad habits, and all your characters will look the same. :)