🙇 Senpai
🙇 senpai

Lately I have received many DMs asking for advice on how to get noticed, how to get followers or advice on similar matters from people who have just a couple posts, if anything. So cheers on you guys for taking the first step, and I hope I can help you more throughout your journey! Now, onto the post: advice on how to start a studyblr.
Also, it’s going to be a long post. Therefore… Welcome to our GUIDE TO START A STUDYBLR
Keep reading
More Posts from Daisy-zam and Others

If you go to school/uni and have friends, this post is for you. Here are seven tips to help you balance school and social life. Read on.
Use social events as alarm clocks or deadlines for you to finish your homework, or any school work. If you’re going out with friends on a certain time, do everything you have to do before that certain time.
Know when you can actually do what you have to do. Don’t force yourself to finish everything because that can lead to frustrations that will mess up your work, leading to more work, which is counterproductive.
Use social events as rewards. It could be after you’ve finished exams, or if you have reached a goal. This is what me and my friends do. Even the simple act of getting ice cream after exams is a gift when done with friends.
Never go out a week before any exam. Dedicate that time to studying and reviewing. Nuh-uh. Gotta stay firm on this. You’ll thank yourself.
Use social events as a challenge to yourself. This is something I made up. I study before going out, and make flashcards or type questions. When I arrive home, I question/test myself. If I got at least 80% of the questions right, I reward myself. The reward depends on my current mood, really, but I usually reward myself with reading a certain number of pages of a book (not academic books, please, I need a break).
Make flashcards. You can review these flashcards even when going out. Just don’t overdo it. Your friends might think it’s inconsiderate. I mean, hey, you came there to have fun, put down those flashcards and actually have fun and relax. You had your time, and you’ll have more time for that later. Tip: don’t go out unless you’re done or unless you still have a lot of time on your hands. Be honest to yourself.
Commence a group study! For people who study better with people (not me), this is a great way to bond with your friends and your lessons. You can ask your friends about something you don’t understand. And, come on, if you’re with your friends, something fun/crazy is bound to happen. Just be careful not to procrastinate.

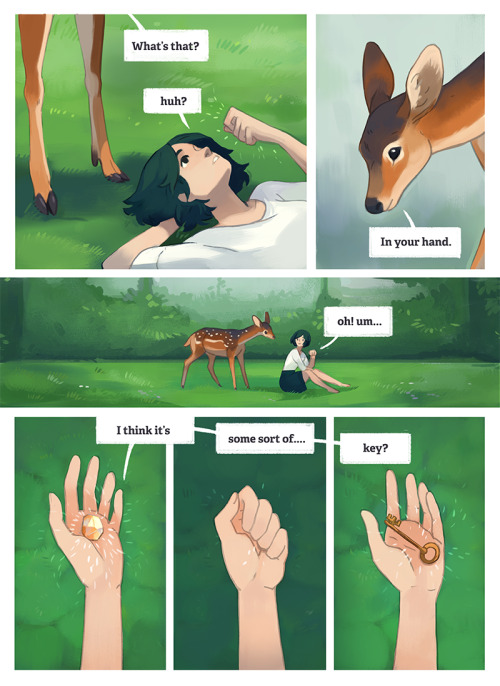
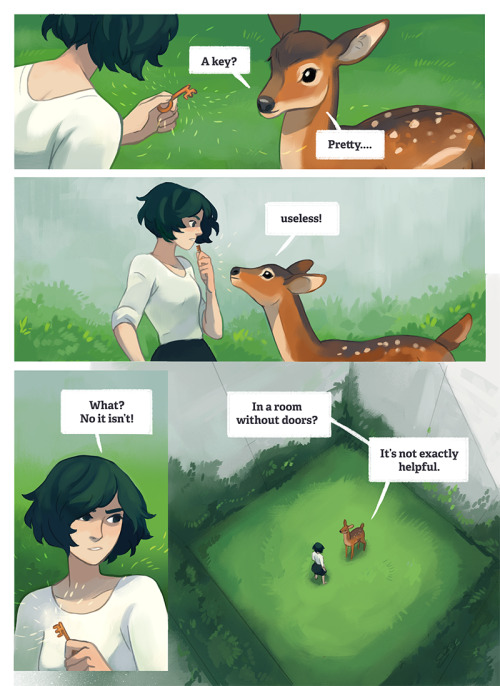
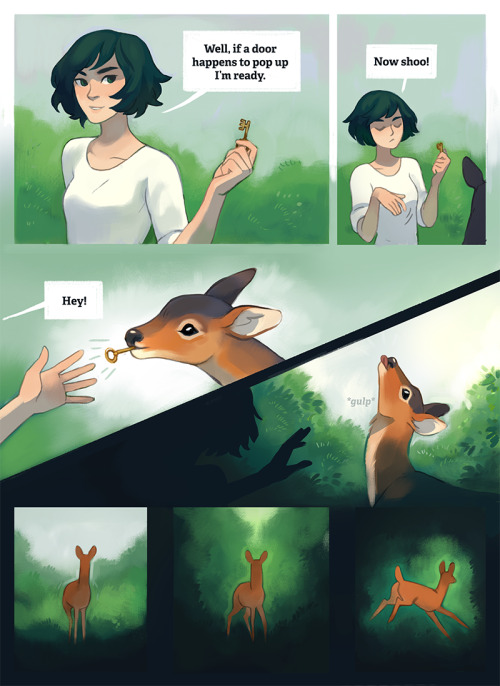
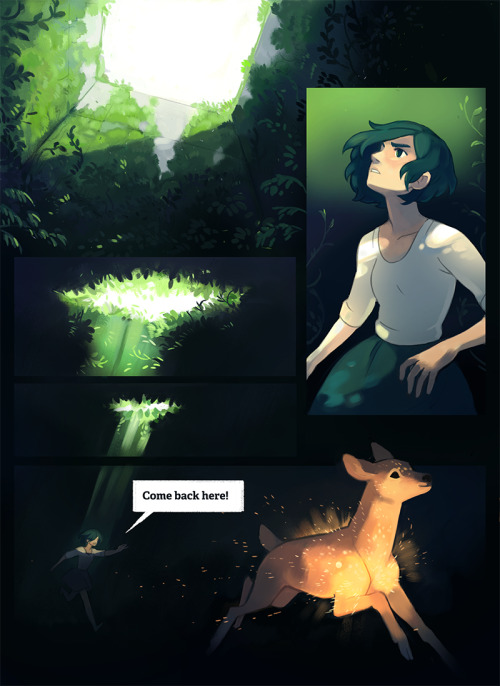
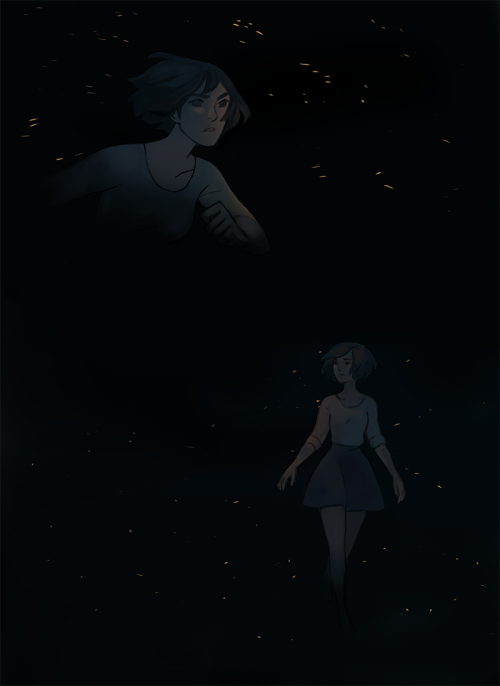


Museum of Moss
I started this comic almost a year ago, but finally got around to finishing it!
Houses During the Fall
Gryffindor: climbing trees, jumping into piles of leaves, getting lost in corn mazes, face painting, building pillow forts, ripped jeans and combat boots, laughing loudly, rolling down hills, walking barefoot on cold floors, a mischievous glint in someone’s eye, roasted marshmallows
Ravenclaw: bedheads and fuzzy socks, pumpkin flavored coffee, reading by the fire, passing out on soft pillows and warm blankets, listening to rain, old music playing on a turntable, deep conversations, crunching leaves, foreheads against cold windows
Hufflepuff: bonfires and camping with close friends, big sweaters and fluffy scarves, drinking loads of hot cocoa, pumpkin carving, warm hugs, morning walks, smiling at strangers, holding hands, blue lips and pink noses, huddling close to friends, holding a warm drink, cuddling
Slytherin: watching old movies wrapped in a fluffy blanket, hot tea on cloudy days, pink cheeks from cold wind, knitted beanies and cozy jackets, stargazing on a rooftop, long sighs, flickering candles, misty mornings, reading old poetry, writing in a cafe, tired yawns

Why I don't like talking
Other People: you should talk more!
Me: *tries to talk*
-gets ignored
-gets interrupted
-gets talked over
-no one pays attention
-no one cares

Photography: Karolina Kozłowska

Hey, there! Someone recently asked me, “How do you make a moodboard?” It’s a tough question to answer, actually, because I wasn’t sure if the person meant conceptually (the process of conceiving one) or technically (the process of putting it together on a computer). So, I thought I’d make a masterpost covering both, as well as some tips on aesthetics.
Step 1: Conceiving of your moodboard
Sometimes people will make requests, and half the work will be done for you. They’ll request “Hufflepuff, doodles, tea, INFP, Virgo, travel” and you’ll know that these are themes/motifs/images that you should try to include. Alternately, you may have a more general feeling that you are trying to evoke through images: melancholy, for example. You may also have a specific aesthetic that you’re trying to achieve. ~Aesthetic~ is a tricky word and can mean several different things in varying contexts. “Brooding sad girl lyfe” could be an aesthetic, a cohesive visual goal. In this case, all the components of the moodboard would be contributing to this notion of a brooding sad girl and her lyfe.
Step 2: Finding pictures
Once you have an idea of where you want to go with your moodboard, it’s time to hunt for images! I like to surf the tags on Tumblr, and if I can’t find something that suits my needs there, I’ll turn to Google images. Remember to keep track of where you find your pics so you can give credit later (or even better: ask permission to use them).
Step 3: Making the thing
You can compose a moodboard by simply uploading photos to Tumblr and moving them around, or you could use graphic design software. I like to use Canva because it’s easy and free. It also allows you to save the moodboard as a single image. I’ll briefly go through making a moodboard with Canva.
First choose a size by clicking “Use Custom Dimensions”: 900 x 900 pixels is standard for square moodboards. You can also set the size using inches instead of pixels.

Then you choose a layout from the lefthand menu.

Next, load your pictures by clicking “Upload” in the lefthand menu. Once they’re uploaded, you can begin dragging them over to the cells. Double clicking a picture allows you to adjust its positioning in the cell.

When positioning the photos, I always like to keep in mind balance: of light and dark, of colors, of subject matter. I wouldn’t want two pictures of teacups next to each other. I wouldn’t want two pictures of text next to each other either. Balance is key. Glancing over it quickly, you should get a sense of a flow of images, with nothing too jarring or standing out. This will make for a cohesive moodboard.

My personal style is a little busier than most, meaning the images are more crowded and cramped. I find this gives the moodboard more texture and makes it more visually interesting. This is just my opinion. I still find minimal moodboards to be beautiful, too.
Step 4: Posting the thing
Always give credit where and when you can. And the more credit you give the better: if you know the photographer’s name–awesome! If not, then the blog where you found it should suffice. Some people believe you should ask permission before posting a photo to a moodboard, but often this won’t work in the interest of time. It’s actually a little bit of a controversial subject; many people practice crediting in different ways. This is just my suggestion. I also usually offer to take down a photo if the owner objects. I used all my own images for this masterpost and blurred out others to save myself the trouble :) You really should credit the owners, though.
I hope this was helpful. Message me with any questions or feel free to add on!

Free DIY Flashcards Printable Pack
I’ve been meaning to organise these for aaaages but thought I’d finally spend the time on them :-) These flashcards are DIY - so you double-side print them so they line up, then cut them out to use! If you struggle to align them you can stick two pages together instead. You can also scale them up or down to bigger or smaller sizes. I also added in some front covers to help organise them! Hope they’re useful :-)
Free download link is below:
DIY Flashcard folder on Google Drive (also added in dotted versions!)
Other free printables you might like: 2018-19 yearly printables, Back to School Student Pack, 2018 Monthly Printables, Weekly Study Schedule, Week at a Glance, Exam Pack, and Notetaking Printables :-)
I hope you enjoy using and customising these printables! If you upload a photo featuring it, I’d love to see. Please tag me on Tumblr with #emmastudies or on Instagram with @emmastudiess. You can see other people using my printables by visiting the #esprintables tag on my blog!
If you want to find more organisational printables and support me, please check out my Etsy shop with lots of downloads dedicated to students. You can use ‘student10′ to get 10% off any purchase! :-)
Other posts | Printables | Instagram | Youtube | Pinterest | Etsy Shop

-
 straydogstudies reblogged this · 3 months ago
 -
 meshiitsukaii reblogged this · 3 months ago
 -
 ginkgoleif liked this · 2 years ago
 -
 lunarbunniesss-blog reblogged this · 6 years ago
 -
 melaniestudiesastronomy liked this · 6 years ago
 -
 that-dnd-life liked this · 7 years ago
 -
 lenzami liked this · 7 years ago
 -
 ibaisblr reblogged this · 7 years ago
 -
 blxckbexrz liked this · 7 years ago
 -
 academicallydisoriented-blog liked this · 7 years ago
 -
 cinnamonelizastudies-blog liked this · 7 years ago
 -
 reblogabled reblogged this · 7 years ago
 -
 cryptidfang liked this · 7 years ago
 -
 altruistic-and-apathetic liked this · 7 years ago
 -
 lilbookreader liked this · 7 years ago
 -
 getsbitter-blog liked this · 7 years ago
 -
 adembenemende reblogged this · 7 years ago
 -
 unistvdyblr reblogged this · 7 years ago
 -
 of-the-elves liked this · 7 years ago
 -
 snxpe liked this · 7 years ago
 -
 petracolliins liked this · 7 years ago
 -
 faeriegardenz reblogged this · 7 years ago
 -
faeriegardenz liked this · 7 years ago
-
 taanleintozhis-blog liked this · 7 years ago
 -
 sarahlorien reblogged this · 7 years ago
 -
sarahlorien liked this · 7 years ago
-
 nxrlywxtch liked this · 7 years ago
 -
 luna-recovers liked this · 7 years ago
 -
 its-sassypotato liked this · 7 years ago
 -
 caffeinated-weirdo liked this · 7 years ago
 -
 youshouldbeestudying reblogged this · 7 years ago
 -
 midnight19sunrise liked this · 7 years ago
 -
 ayeeefutureengineer liked this · 7 years ago
 -
 werewolfrock17-blog liked this · 7 years ago