NIER AUTOMATA
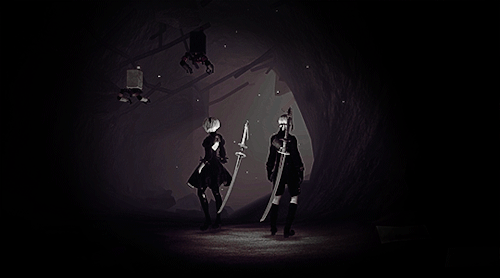


NIER AUTOMATA
More Posts from L-adystardust and Others


2001: A Space Odyssey (1968), directed by Stanley Kubrick Mr. Robot (2015-2019), created by Sam Esmail


Bisexual hacker queen Darlene Alderson in every episode of Mr. Robot (Season 2).


“I’m happy to have Leon. Wherever he came from. He keeps me sane.” - Mr. Robot: Red Wheelbarrow Book, by Sam Esmail & Courtney Looney
Voice Training Through Singing:
This one’s for the girls
All right, so you want to sound like the girl you are, right? Well, you already do, seeing as your voice sounds like you, and you’re a girl, but most people don’t understand that. I never could find a single, comprehensive guide for vocal feminization that included a step-by-step process (though I never paid for any of those programs either, so they may be there) but I did find some that gave me important information on certain sections and stumbled through the rest myself.
By “stumbled through” I mean that I tried to do everything at once instead of one step at a time, and took a lot longer than I should have to see any results. I also nearly caused serious damage to my voice a few times, at one point losing it entirely for a day. As I’ve thought about the different aspects of what I’ve done though, I was able to easily separate them into steps that build on each other instead of throwing everything into a blender and hoping that what comes out is what you want.
I won’t be adding any before/after clips to this, for privacy reasons as well as lack of a decent sound setup at the moment, but I have been correctly gendered every time I am on the phone or going through a drive-through for the past few months, and I’ve been doing this for about a year. Most of the things I do heavily involve matching the voice of various singers, which I can do easily thanks to nearly a decade of music training. If you have trouble with this, I would recommend using headphones to start with; they make it much easier to tell if you are at least harmonizing well. Eventually your ear will probably get better and you can pay more attention to your voice instead of the singer’s, at which point you can quit using the headphones if you want.
You might also end up getting really good at matching voices, and that’s not even the coolest part. Do you like singing right now, and have some male artists you like to sing along with? You won’t lose that with this! All it will do will make your range increase, and eventually raise your “normal” voice in that range. Here’s a good example of the sort of thing we’re going for (I can’t hit the highest notes yet, but I can hit most!)
Step 0. Self-care – Don’t overdo it!
Before we get started, it’s important to note that going too high before you’re ready (or warmed up), or doing too much too fast can really hurt your voice. I’m trying to get into a more responsible schedule for the last bits of mine, but I tend to do most of my training in the car, which means I end up with days at a time of not doing anything beyond using my feminine speaking voice, followed by 2-3 hours in a single day of nonstop training. Needless to say, that tends to push my voice a bit harder than I like if I’m not careful.
Most people already know what it feels like when you start to lose your voice, and definitely pay attention to those symptoms, but a new one that I noticed after starting this training caught me off guard. Often the first warning sign that I’m pushing too hard is that I start coughing and feeling like I’ve got something stuck in my throat. Nothing’s actually there, but that doesn’t change the fact that the coughing happens. Just be aware of your body, and try to stop if you notice signs of strain. After all, any voice is better than none!
If you do end up pushing things a bit, hot drinks like tea or coffee can do wonders to relax everything again. My personal treatment is freshly brewed black tea with about 2 tablespoons of honey in it. It won’t make everything magically better so you can go right back to it, but it will make it so you have a voice the next day.
Another trick to help with a strained voice, though it may bother you, is to talk as low as you can. Not deep (you don’t need to try singing bass opera parts!), but low and smooth (like you’re pretending to be a guy trying to seduce someone quietly). Do that for a few minutes and it should loosen everything up again, at least enough to get back a normal speaking pitch.
Step 1. Basic Anatomy – Your Apple is your friend
Normally this section would be a boring, basic section with odd pictures that have long names of things we don’t care about. As you’ve probably guessed, I don’t care for that approach much, and I’m also very impatient. So, here’s a quick rundown of what you need to know, and at the end you’ll be able to see just a bit of progress too!
Now I know most of us don’t like our Adam’s apples (me too!), but the technical name for what it covers is the larynx, so I’m going to call it that instead. You can feel where it is, right? Touch it, then swallow. Feel how it moved? Now try doing that without swallowing. Chances are that you can’t right now, but that’s okay! Swallow again, but this time hold your larynx at the highest point, where it feels like it pulls back slightly, then let go when you need to breathe.
Doing that exercise a few times a day will get you to the point that you can move your larynx up at will, which will help out with resonance and tone later on. You may even notice a difference if you try talking with your larynx up instead of relaxed, though it’ll probably be a bit difficult at first. This part took me about two weeks to get right, but since I haven’t met anyone who’s tried the same thing I don’t know if that’s fast or slow. If you want to, feel free to send me some feedback on how long it took you (On any of the sections, for that matter)!
Step 2. The Voice – Raise the Voice, not the Pitch
Now you can move your larynx up and down. Great! But you’re only halfway through the basics right now. Go ahead and try to keep your larynx up for the rest of the training, but if you can’t don’t worry; this part can be done without that.
I’d like to point out here that, while I was trained musically, it was not in singing (I was a tuba player), so some of the terms I’m using are probably not correct in that sense. I’m going to use them anyhow though, because it makes sense to me and I’m pretty stubborn, so just roll with it.
Sing a note in the comfortable part of your range. Doesn’t matter how loud, but hold it for a bit. Feel where the vibration is? I’m going to guess that it’s right around your collarbone, at the base of your neck. That’s called “Chest Voice,” and it’s almost always a masculine thing. This next part is kinda tricky to explain, so bear with me.
Now try to picture your voice as a light or an orb or something that’s in that area. It doesn’t matter what, so long as you do it. Raise that light/orb/whatever up slowly while you hold the tone. The sound will probably shift up as you do; that’s fine. The important thing is to note the different feeling of where the vibration is. As it reaches the halfway point in your throat you might feel a sudden change. That change over is what I call the “Throat Voice” and is probably where your voice will want to go for a while during training.
Once you get past Throat Voice and visualize the light/orb/whatever entering your mouth you’re officially using “Head Voice,” a.k.a. where most women talk from. Congrats! Now go even higher, till you have to pull your larynx back almost to where it goes when you swallow. You probably sound like a really bad Mickey Mouse or chipmunk now, but that’s normal. This is the upper range of your voice, what I call the “Falsetto.” Once you’ve got the hang of moving between these (and moving your larynx up during them as well) you can move on. I think this part took me about six weeks to really get down.
Step 3. First Steps – a.k.a. Why I do this in the car
This is where we begin the real training! Quick question: Do you like My Little Pony? If so, that makes this step a lot easier. If not, then you’ll have to use “chipmunk” songs or go look up “nightcore” on Youtube and find some songs you like. Actually, I’d do that last one anyhow, especially if you find some that the originals feature a male singer.
Either way, the point of this step is to find some songs you like that force you to use that “falsetto” range you discovered last step. At first you won’t be able to do much in that range that doesn’t sound like a squeaky wheel that somehow learned to talk, but as you keep at it you’ll start to get a little more flexibility up there. Remember though, you’re not going for a “good” sound right now; you’re trying to match the song as best you can.
There really isn’t too much else to this step. You just have to keep at it till you are able to match the songs, or at the very least are able to move around the range without sounding like a Disney character anymore. I use songs from MLP and some nightcore songs as well for this, in particular any songs that have multiple singers to maximize the flexibility and control (yup, I’m still working on this part a bit, but I reached what I’m saying here in about two months). Once you are happy, onto the next step!
Step 4. Pitch – Removing the Turtle Shell
You know that part in the original Dragon Ball anime where Master Roshi had Goku doing a bunch of weird tasks while wearing that really heavy turtle shell? Then he got to take it off at the tournament, only to find he’d gotten a ton faster and stronger without noticing it? Yeah, that’s kinda what the last step was for us, and now it’s time to see the results! Unless you’ve been skipping ahead (can’t judge here!) this will be the first step where a real, usable feminine voice starts to take shape. Excited yet? I hope so, because this is also the second longest step, and the one with the least guidance.
All you need to do in this step is find songs that aren’t in the “falsetto” range and learn to match them while using Head Voice. As you start singing, you may notice that you revert to Chest Voice, or that your larynx drops again, or any number of things. One positive thing you should notice, however, is that you are much better at being aware of how your throat and larynx feel as you speak and sing, which translates to being better at imitating a singer. It really comes down to trial and error at this point.
One recommendation I would have is start with Queen songs, then move into your chosen artists. Queen’s songs are pitched perfectly as a jumping off point for raising said pitch, as most are right where the masculine and feminine ranges overlap, without worrying too much about tone or resonance. Those can come a bit later, especially resonance (which gets its own step later). Disney songs are another excellent choice, though you have to be careful at first. The male parts also make for a good vocal warm-up, to help avoid straining anything.
As for other artists with women singers that work well for beginners, go for someone with a “husky” voice. My personal starting band (after Queen) was Blackmore’s Night, and I moved into LeAnn Rimes, Trick Pony, and a few video game songs once I got more advanced (If you are curious, I recently moved into singing a few Jordin Sparks and P!nk songs, as well as only having a little trouble with some of the more famous Disney songs like “Part of Your World” and “A Whole New World”).
One thing to watch out for here, especially as you start moving into higher pitches and approach the alto range, is a tightness or fatigue in your jaw after singing. That comes from using your jaw muscles to force control over a pitch above your current non-falsetto range, and that can actually hold you back considerably.
I looked this up after hitting a plateau for nearly two months and found a singing coach that referred to the fix as “lazy jaw.” Basically you should be able to hold a note while moving your head around (even if it is slowly) or moving your jaw with a hand. Once you work that in your tone will improve as well, so double win!
Once you start to get the raw pitch down you’ll probably notice that there’s still something different between yourself and the singer, which is where the next part comes in. There isn’t really a point where you are “done” with this step, but I reached a decent point in around six months with the original songs.
Step 5. Resonance – Why a Choker Can Actually Help
I don’t wear a choker, mainly because I can’t find any that are affordable and fit me, but the title does not lie. This step is all about the little shifts in vibration and position of the larynx that I, at least, couldn’t feel without something touching it constantly, hence why a choker would help. I just use a free hand and lightly touch just above and below the larynx occasionally.
This part is a little iffy, and I’m still working on the fine-tuning of my own voice, so the guide might go a different way than your voice wants to. I would strongly recommend recording your voice every now and again during this step, or possibly getting someone’s advice, especially if you have trouble recognizing perfect harmony while singing (for me that’s where I can’t hear any difference at all between the singer and my voice). I can offer a few pointers though.
First, you should have enough control of your larynx by now to have some sense of how far “forward” or “back” your voice is as well as the “up” and “down” of Chest/Throat/Head. If you want to sound airy or breathy, then move your voice “forward” and “up.” If you want to sound husky of earthy, “Back” and slightly “down” are the directions to go. Don’t forget that where your larynx and voice are will affect your pitch a bit, but with practice you can go lower in pitch while still maintaining Head Voice.
Second, try to only vibrate half of your throat. Sounds confusing, I know, but the most feminine voice I can use right now only vibrates below my larynx, not above. I have heard other people discussing the exact opposite, but I do know that masculine voices use both above and below, so as long as half is still I think it’ll be fine. Just use your ears (or a friend’s!) to figure out which one works for you, and try not to stress too much about it. I still have issues with this a lot on certain songs and artists, and I’ve been working on this step for 8 months now. Remember, your goal isn’t actually to be a perfect singer (at least, not for this guide), it’s to develop a feminine speaking voice.
Third, add some heart! I know it sounds corny and cliché, but if you can feel the singer’s emotions and add that to your singing it can make a lot of this automatic. Masculine resonance mainly uses volume for emphasis, but feminine resonance tends to use pitch and emotional emphasis instead. There is a big difference, even if it doesn’t make sense at first why.
Lastly, if you are still using headphones or earbuds, take advantage of that to really match the singer! If you think you are close, but it sounds really bad and wavy, that actually means you’re really close (within a half-step, to use proper music terminology) so keep moving up and down to get it. Very few things are as satisfying as singing in perfect harmony with a feminine singer for the first time.
Ending – You’re Still Here?
As I mentioned in the last step, this is about as far as I’ve gotten in my own training, so I can’t share anymore tips. Basically you take all the skills and awareness you got learning to sing (which is its own useful skill, I might add) and apply them to your normal speaking voice as well. In my case the pitch of my voice started raising without me even thinking about it, so I only had to train myself to automatically use the correct resonance and Head Voice before I had a convincing, feminine voice.
The only other thing I have done that is not in the steps above is try to sing parts of the Broadway musical Wicked to improve my volume in my voice, but all that seems to have done so far is shred my voice whenever I try. I can’t say I recommend that, and if you follow the steps above instead of trying to do it all at once like I did you may not even need it!
Once again I would like to mention that this guide is based on my own experiments and trial and error, so Your Mileage May Vary is definitely applicable here. Feel free to contact me @twilightdreamersmith on Tumblr if you need something clarified, or if you have any suggestions as to something I missed.
Happy training!


Gris edits (23/?)
Bookmarking now and forever (x)


Paddington (2014)


I sit down next to my friend.

DO IT NOW: Guide to Proper Bra Fit and Measuring because Victoria Secret and La Senza and whatever are full of shit and you are definitely wearing the wrong size ok? ok
Hi guys I’m obsessed with this shit lately because I don’t want anyone to have unhappy, unsupported boobs like I did. Even if you think your boobs and bras are fine, try it. It will make a big difference in comfort, support, and shape, even if you have small boobs or big boobs. A proper fitting bra can fix back, shoulder, and neck pain, along with breast soreness - and it can help you look 10lbs lighter, and your breasts a hell of a lot perkier. This guide also works for proper-sized bikinis and bathing suits (many online stores linked to below sell both- sometimes for as low as 10$!)
Don’t just like this, REBLOG IT. EVERYBODY WITH BOOBS DESERVES A PROPER FIT. Even if you don’t wear bras yourself, spread it around to tumblr or with your friends or family.
Grab a soft tape measurer (use inches) and get nekkid - don’t wear a bra or shirt please, you don’t wear a bra or shirt underneath your bra, do you? This part is fast and easy, and will help you find your ‘Starting Point’ bra size - you may not end up in this exact size, but it will get you in the right ballpark.
How to Measure:
Measure your underbust - go right underneath the root of your breasts, but make sure the tape is straight/parallel to the floor. Take a firm, snug measurement - if you have chub, take it tighter.
Measure your bust bent over - bend forward so your back is parallel to the floor and your boobs are hanging so you have access to all that beautiful breast tissue that is now brought forward. Measure very loosely around the nipples, keeping tape straight/horizontal/perpendicular to the floor.
If your breasts are kind of empty and/or have a lot of sag, this method may overestimate your cup size. Instead, take your bust measurement bent over, standing, and lying flat on your back, and take an average of those three measurements and use that for your calculations.
How to Use These Measurements to find your ‘Starting Size’:
Round up your underbust measurement to the nearest even number. If you are only half an inch or less away from being a lower size, use that instead (unless you have a bony ribcage). This is automatically your band size. No BS. There is no adding imaginary inches here.
The difference between your underbust measurement and your bust measurement dictates your cup size. Every 1 inch in difference represents a cup size, so 1 inch = A, 2 = B, 3 = C, 4 = D. As you can see here, a true D or DD cup is actually pretty fucking small.
CUP SIZES ARE NOT STANDARD, UNLIKE COMMONLY THOUGHT (AND TOLD TO US BY ASSHOLES LIKE VS). They are TOTALLY relative to band size. The cup on a 30D has 4 inches less volume than the cup on a 34D. A 30D is actually the same cup size as a 34B!
No one has their shit together on the lettering for each cup size, so here’s a handy dandy chart. Remember to go with UK measurement as they somewhat have their shit together (and because American companies do not make much above DD, so there’s literally no point in knowing it, but the European sizing may come in handy)
I DON’T CARE IF YOU LIVE IN THE USA, DO NOT USE THE AMERICAN MEASUREMENTS, FFS. YOU’LL ONLY MAKE THINGS HARDER AND MORE CONFUSING FOR YOURSELF. ANY BOUTIQUE IN NORTH AMERICA WORTH GOING TO, AND 99% OF ONLINE STORES, IS GOING TO SELL PRIMARILY BRITISH OR EUROPEAN BRANDS AND WILL GO BY THEIR SIZING. THERE IS LITERALLY NO POINT IN KNOWING AMERICAN SIZING
DO NOT USE AMERICAN SIZING
DO NOT USE AMERICAN FUCKING SIZING
EVEN IF YOU ARE AMERICAN
AND LIVE IN THE US
USE THE BRITISH SIZING

For example, I have a 29.5 inch underbust and a 38 inch bust when bent over. So, I should take a 30 band and then there’s an 8 inch difference. So I am a 30FF in UK sizing. This is just my starting point when looking for bras, and I may not always end up with this exact size
Do not pull the ‘omg no I’m not a G cup my boobs aren’t that big you’re more stupid that the idea of vegetable bread’ shit with me ok? You drank the Kool-Aid and now you need to piss it out. CUP SIZES ARE NOT STANDARD. A 34D IS BIGGER IN THE CUPS THAN A 30E. Here, take a look at a chart of cup volumes and see what I mean.
Also… not all ‘big cup’ bras are ugly and granny-like. Just check out brands like Freya or Gossard or Gorteks or Panache or Cleo! They are gorgeous!
Trying it on: What a proper fit is like

ALWAYS SCOOP AND SWOOP BEFORE ASSESSING WHETHER IT FITS OR NOT. What does this mean? This means bend over, hike up your bra so that it sits right under the root of your breasts. Then, start smooshing all your back fat and armpit rolls or any loose tissue thats underneath or to the side of the cup, INTO the cup. All that stuff is breast tissue that got pushed around from your shitty bras, no I am not bullshitting - after a few months of wearing better bras, many people end up having to get a bigger cup and sometimes even a smaller band too, as all the smooshed breast tissue migrates back to the boob, where it should be. Not kidding. So get everything in there and make sure the wire is positioned perfectly under your boobs. Then stand up and assess the fit. If it seemed to fit before scooping, it won’t fit now.
THIS IS JUST A STARTING POINT. Try on your starting size and work from there. You may need to go up or down a band size, or up or down many cup sizes. Not all brands or even models in that brand are made the same way, and the shape of your boobs also helps determine the size and fit, so don’t try on JUST the size you calculated, say “it doesn’t fit”, and then give up and go back to your 36Cs. You aren’t doing yourself any favours. If you don’t feel comfortable in your ‘starting point size’, go ahead and try a size up or down in bands and/or a size or two or even three up or down in cups as needed.
ALWAYS start on the loosest hook. If you need to start on the tightest hook, go down a band size. The point of hooks is simple - as your bra gets used, it gradually loses its elasticity and gets loose. So, you use your hooks to bring it in, and when you reach the last hook, well, be prepared to get rid of your bra in a few months (unless you invest in a band tightener like the Rixie Clip)
A proper fit means the bra band is straight and parallel to the floor. If it isn’t, and seems to be getting pulled up, its too big and isn’t supporting you. Get a smaller band. You shouldn’t be able to stretch it more than a couple inches off your back. It may feel tight at first, but bras do need ‘breaking in’ and you are used to wearing things that do not fit correctly, so give it a chance. Of course, it should not hurt either!
A proper fit means your bra straps are not digging in.
A proper fit means the gore (the little centerpiece of the bra where the wires sort of meet) MUST tack/sit firmly against your chest. If it doesn’t, then the wires are not truly fully underneath your boobs and so are not giving you the proper support.
A proper fit means your boobs must fit smoothly into the entire cup (after scooping and swooping). The wire should totally encase all your breast tissue (this includes armpit fat and stuff). There should be no empty space at the bottom or top of the cup. Your boobs should not be overflowing from the top of the cup. If there’s overflowing or uncontained tissue after scooping, or of it feels tight, get a bigger cup.
A proper fit means you should be able to lift your arms over your head and jump around without the band or underwire budging or exposing underboob.
Size Tweaks/Troubleshooting (make sure you scoop and swoop first):
The band feels tight: Is the gore tacking or not? If not, go up a cup size or two (or maybe even three or four). Even if the gore is tacking, try this first. The band may be tight because the cups are too small, so your boobs are stretching the band out too much to overcompensate for lack of cup depth, making it feel tighter. If after trying larger cups, it still feels uncomfortably tight, go up a band size (and down a cup size if the first size fit well in the cups - remember, cup is relative to band, a 32DD is the same in the cups as a 34D). Remember though that it takes a few days to break a bra in, so it may feel tight or perfect at first, and then comfortable or too loose later.
The band feels loose/band is riding up and not remaining parallel to the floor: Go down a band size (and up a cup size or two because blablah relativity).
The gore is not tacking, but band is not tight: Band size is too big, or maybe fits just right - but the cups are too small. You know what to do.
Boobs spilling over: Go up a cup size. Check first though that the bottom of the cup is not empty, and hike it up if it is!
Empty space at bottom of cup: Hike that shit up so it gets right to the roots of your breasts. This may fix bulging/spillage. If you can’t get it higher, then you need a smaller cup or this make of bra is just not suited to your shape.
Empty space at top of cup: You need a smaller cup, or this shape of bra just does not suit you your breasts, especially if your breasts are not very full on top. Or you need to scoop and swoop!
Straps digging in: Loosen them. If your boobs suddenly sag, then the band is not supportive enough, and you need a tighter band.
Armpit rolls: Bigger cup and/or scoop and swoop that shit. The cut of bra may also just not be for you (for now anyway - your armpit rolls may migrate back into the boobs and disappear eventually!)
They don’t even make my size!!: If you’re in a 28-48 D-KK (UK sizing) cup, you will find your size online easily enough. however, if you have a smaller band than that or need smaller cups, they are hard to find - message me and I’ll try to help you with a solution!
So, for example, my starting size may be 30FF, but I may end up wearing a 28G or H if the band of that model is too loose and the gore not tacking. Or the band may be fine and I may need a bigger cup so I’ll get a 30G. Or The band may be good but the cups too big, so I’ll get a 30F or E. Or the band may be too small to be comfortable and I’ll wear a 32F or E (same cupsize-ish as 30FF!).
What Not to Do:
NEVER PUT YOUR BRA IN THE DRYER. AND PREFERABLY, WASH IT BY HAND. The heat and twisting ruins the elasticity of the bra and reduces its life! This is the best way to ruin bras, don’t do it.
Do not add 3 or 4 or 5 inches or whatever to your band measurement. That is BS that American companies use so that they don’t have to manufacture a larger range of sizes - they use it to fit you into their stock, not their stock onto you. The band will be too big and unsupportive. Those 4 inches they add to the band are 4 inches that should be in the cup size, so no wonder people think anything over DD should be huge.
Do not measure your ‘overbust’ cause really what the fuck does that have to do with how large you are underneath your boobs, come on
Do not do the above because 80% of the support comes from the band, which needs to be firm against you and not be sliding or moving around.Would you wear underwear 4 inches bigger than your hips? No, so why would you wear a bra band 4 inches bigger than your ribcage that gets pulled up and stuff and would fall off if not for the straps, while expecting it to support the boobies at the same time?
Do not go down a band size and then forget to go up a cup size or two. Again, cup sizes are not static. A 30FF is the same cup volume as a 32F or E. If you don’t do this, no shit the bra will fit badly or feel tight.
Do not go straight to Victoria’s Secret or La Senza or whatever, even if you are lucky enough to fit in their small range of sizes - they don’t seem to follow sizing very well. Still, try, by all means, but be aware that their bras may be odd compared to others.
"But where do I get these Bras? I’ve never even seen these sizes!“
Luckily, the internet makes this shit really easy. Buying bras online is nearly always way cheaper, even with shipping, and even if coming from somewhere in Europe! But of course, its best to try on stuff first, to avoid the hassle of return shipping (even though its still not that expensive - just annoying). So what I advise is to find a store near you, try stuff on there, note down the Brand, Model, and Size, and then buy it online for up to a quarter of of the in-store price.
If you can’t find a store near you, online ordering is still extremely cheap, even with return shipping. Instead of getting a whole bunch of bras in only 1 size each, pick out a few models and order a few sizes of each. Ex: one with a bigger or smaller band if your measurements are close to needing a bigger or smaller band size, and then some up or down a couple cup sizes so you can compare the fit. When you have the perfect fit in one bra, it will be easier to go on Bratabase or r/ABraThatFits and have them suggest bras that give similar shape or suggest a different size to you as a model you’re interested in may run large or small.
So, Where to Find:
Note: You can find proper-sized bras as low as 10$ US online (particularly from ebay or brastop.com) and most average 30-45$.
List of Online Retailers from BustyResourcesWiki: A complete list of online retailers around da world. Many ship internationally so take a look at all of them (particularly the UK ones)
Ebay, Etsy, and Amazon all have bras inexpensively.
List of Offline Retailers from BustyResourcesWiki: List of chain-stores (not of privately owned stores)
If in Canada, look for a Change Lingerie near you to try on bras. Note that they only carry their own brand.
If in the USA, look for a Nordstrom or Nordstrom Rack near you to try on bras. They carry all sorts of brands and have an online store as well (and also ship to Canada!)
Use a store locator from the webpage of a bra brand company to find non-chain, privately owned stores - if they have one of these brands, they’ll have others. Here’s the locator for Freya, Curvy Kate, Fantasie, Chantelle, Panache, and Affinitas. There are more than just these of course.
If you are small in the band AND in the cup (under a D cup) look at the Little Bra Company.
Ask around on Bratabase or r/ABraThatFits for stores near you.
WOMAN, YOU HAVE THE INTERNET! GOOGLE! YELP!
WARNING: There are many chain stores (Nordstrom, Lane Bryant, Mark and Spencer, Change etc) that do bra fittings and have a good reputation. However, each store is different - some measure correctly, and some use the stupid VS method. Every store has a different team of employees and knowledge. DO NOT GO IN WITHOUT HAVING MEASURED YOURSELF FIRST, JUST IN CASE THEY ARE ONE OF THE BAD STORES. DO NOT TRUST ALL BRA FITTERS, EVEN IF SOMEONE RECOMMENDED THEM TO YOU. If your fitter gives you a measurement different from this one, be mentally prepared to have a difficult time getting them to help you find the right bra.
I had the fitter at Change help me, and when I mentioned that the gore did not tack, she said “Oh, the gore never touches the chest with these bras”. I was like HAHA NOPE BRING ME A LARGER CUP WOMAN. And lo and behold, 2 extra cup sizes later, the gore tacked (and my boobs stopped spilling out). She was very nice otherwise but if I hadn’t known better that could have been bad.
Resources:
r/ABraThatFits: forum for bras, they will help you with sizing, fitting, and finding the right model for your breast shape - they have links to a lot of resources, such as online stores, used bra listings, etc.
Busty Resources Wiki: Great resource for fitting tips, diagrams, explanations, styles.
Bra Band Project: an online gallery of what various sizes look like! Dump your disbelief!
List of Online Retailers: Online is MUCH cheaper and shipping is usually cheap too, even from Europe. Try bras in a store near you , pick out what you like, and order them online instead.
Bratabase: Database of bras, with user inputted measurements of each bra model in its size - bras may be marked the same size, but with this you can see which may have bigger or smaller bands or cups, or what style may suit what shape of breast, all of which helps find the perfect fit for you!
Great Youtube Video on Bra Fitting: This is one of the few people on Youtube who knows their shit about bras. Great for the visuals to help you understand what a bad fit and proper fit look like.
Venusian Glow is a great bra blog - SO MUCH INFO. Suggests bras based on your boob shape amongst other things.
-
 chobts reblogged this · 3 weeks ago
 -
 bnny liked this · 3 weeks ago
 -
 full-cowlings reblogged this · 4 months ago
 -
full-cowlings liked this · 4 months ago
-
 horologiust reblogged this · 6 months ago
 -
 joeb91 reblogged this · 6 months ago
 -
joeb91 liked this · 7 months ago
-
 ephemerle liked this · 11 months ago
 -
 thingskuhdejuhlikes liked this · 11 months ago
 -
 xevyrah liked this · 1 year ago
 -
 podsupport reblogged this · 1 year ago
 -
 noctiphilias liked this · 1 year ago
 -
 betheluckyones reblogged this · 1 year ago
 -
 dichloro-methane reblogged this · 1 year ago
 -
dichloro-methane liked this · 1 year ago
-
 shadesofablacksun liked this · 1 year ago
 -
 dyketower liked this · 1 year ago
 -
 infiernoletal liked this · 1 year ago
 -
 lovenoddles reblogged this · 1 year ago
 -
lovenoddles liked this · 1 year ago
-
 pobkdkd liked this · 1 year ago
 -
 gloomxdecay reblogged this · 1 year ago
 -
 sttinkky liked this · 1 year ago
 -
 avampbite reblogged this · 1 year ago
 -
avampbite liked this · 1 year ago
-
shadesofablacksun reblogged this · 1 year ago
-
thissongstoslityourwristby liked this · 1 year ago
-
 sunshineflames liked this · 1 year ago
 -
betheluckyones reblogged this · 1 year ago
-
vauseht liked this · 1 year ago
-
 frillvelation liked this · 1 year ago
 -
 cyberpunkgrl liked this · 2 years ago
 -
 ruby-seadragon liked this · 2 years ago
 -
 xeno-fantasy liked this · 2 years ago
 -
 odeshe reblogged this · 2 years ago
 -
 singlelamb liked this · 2 years ago
 -
 hitchdy liked this · 2 years ago
 -
 tommysdj reblogged this · 2 years ago
 -
tommysdj liked this · 2 years ago
-
 cherrycake6 reblogged this · 2 years ago
 -
cherrycake6 liked this · 2 years ago
-
 butchdimension liked this · 2 years ago
 -
 faize liked this · 2 years ago
