
Latest Posts by thefurbenthusiast - Page 4
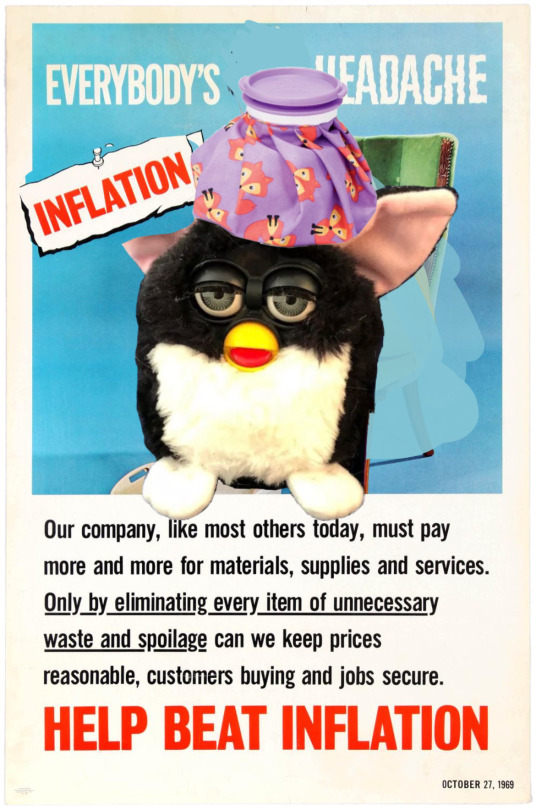
 let’s stop furby inflation

recently, I’ve noticed people selling normal Furbys for over $100 contributing to the trend that Furbies are very rare in any condition and are worth hundreds of dollars I’m sorry but your old crusty, dusty smelly Furby sitting in your basement is not hidden gem at most. It’s probably $30. this is a PSA to all the middle-aged women selling their Furbies for hundreds of dollars on Facebook marketplace 


Here are some prices that are good but just remember if your Furby is in rough condition, it’s probably gonna be lower things like a missing tag or missing, eyelash or not working can contribute to them being lower
update I made some propaganda posters feel free to upload these wherever you want


nothing and nobody shows such raw emotions better than a furby
the autism mood of never knowing when its “your turn” in a convo so you say the first word of your sentence about 5 times before you actually get to speak

Gen 6 my little pony about to be seriously cursed 😬

Here’s a furby buddy pattern! I modified @pocket-furbs super awesome pattern (you can find it right here!) there were a couple of minor errors in the pattern pieces (that were addressed in the post) so i thought i’d draw up my own thing with some slight edits!
photos of assembly instructions under the cut!
Keep reading

cracking up over this goodwill listing photo
me and my annoying grandchild that I hate

This is what furby hunting on eBay feels like
they got bread rolls here man. bread with butter init. a handfull of bread. for me
HELP GRL MY TUMBLRS ARE LAGGING VEEY MUCH
verhesding PHONE OVERHEATING HOT IN NY NHAND


Furby Resources!
Last updated 9/30/2024 | All new additions are labeled "New!“ + broken links are fixed
I added/removed a lot of things since originally posting, so you may want to delete your last reblog and replace it!
Please suggest additions & corrections!!
Incredible Google Drive folder with a huge variety of Furby content and history
Guide to Furby Fandom Tags
Tips For Buying Furbies
Adult Furby Price Guide | Furby Value Guide For Dummies
Archived Furby content on archive.org
Colorful Google Doc to track Furby projects and collections
Furby Certificate Of Adoption | Furby Adoption Certificate
Images ripped from flash games
Official Furby Tiled Backgrounds
Furby Carrier Pattern | If that doesn’t work patterns are sold on Etsy
All Official Furbys
Eye colors on official models | Common 2005 Furby Eye Colors
Differences between Curly Furby Babies and Sheep Furby Babies
High Quality Transparent Furby Masks
Furbtober Prompts
Pixel Furby Page Dividers
Furby Sticker Scans
THE FURBY ORGAN, A MUSICAL INSTRUMENT MADE FROM FURBIES
New! FURBY SITES (See also the tabs linked on the left)
New! Furby Junction Discord Server (ACTIVE)
New! Furby OCs + Resources World on Toyhou.se (open for submissions)
New! Furby Subreddits
Lore
Furby Paradise Manga - 1 chapter scanned and translated
Desktop Furby - 2005 Burger King Freeware
A Deep Dive Into The Furby Fandom
Furby Island Movie Free On YouTube
Printable furbish-english dictionary | Official PDF Dictionary | All Known Furbish Words
Official Furby trainer’s guide
Furby Songs YouTube Playlist
Dancing Furby Gameplay & Interacting with Furby - Game Boy Color Japan
Unofficial Guide To Furby Species And Biology
Furby Lore Zine
Every printable from Big Fun In Furbyland (contains lore, Furbish words, phrases, coloring pages and photos)
Make A (non-plush) Furby
Furby Bases Collection on deviantART | Extra Furby Base | Furby Bases on Toyhou.se
Design A Furby Shockwave Game (pictured above , also has a few old Furby mini games) | Can be played through Flashpoint which archives old web games
Official Coloring Pages
AdoptAFurby.com Coloring Pages | List Of Official Coloring Books
Color A Furby Online (pictured above)
Furby’s Design-o-Matic (pictured above) | Works with Ruffle’s browser extension
Make A Furb Game (pictured above) | Preview Video
Furby Creator Games on Picrew
Origami Furby Tutorial
Big Fun In Furby Land CD-ROM has a very limited Furby maker pictured in a gif above (works with Windows 10, just right click, click “Mount”, then open Furby.exe it’s an application file)
Furby Patterns on Etsy
New! PRINTABLE FURBY BABIES ‼️‼️‼️ Set 1 | Set 2 | Set 3
New! Furby Boom Paper Crafts Orange | Lightning Bolts | Colorable
New! Cursed Furby Paper Craft
Real Life Furby Mods
FURBY TUTORIAL MASTERPOST
3D Printable Face Plates and Furbys
1998 Furby Pattern
Long Furby Pattern
How to Long Furb | Longifying Your Furby
How To Skin A 1998 Furby
Eye Chip Tutorial
How To Make Accurate 1998 Eye Chips
Furby Buddy Pattern
replacing a 1998 furby’s speaker
~ furby beret - crochet pattern ~
Curing Me Sleep Again (when you’re Furby won’t stay awake)
How To Skin A Shelby
How To Dye Furby Fur
Real Life Furby Care
How To Find Your Furby’s Birthday
Furby Name Generator | Another Furby Name Generator
How To Brush Your Furby In Depth Guide
How To Clean A Tilt Sensor
Sync Screw Adjustment


I made a guide for designing your own furby name inspired by Brian David Gilbert!

A little bit of Concept Unification & 2.0 angst
(commission work)
Furby Tutorial Masterpost
If you want anything deleted, added, or fixed let me know and I’ll be more than willing to do so! If you use any of the tumblr tutorials, or find them helpful, please consider reblogging them from the source! Good luck with your furbs :))
Last Update: 13-Oct-24
Keep reading
Megalist of Unique Furby Names 2.0 - New Furby Fansite!
Bigger. Badder. Furby-er. Welcome to Unique Furby Names 2.0.

(Link to 1.0 can found here)
Highlights: 60+ brand new categories, over 1,000 new names, website dedicated exclusively to names, requests being taken for new categories.
Six months ago, I posted a list of over 900 names specifically to help people in the Furby fandom name their new friends. It received over three hundred notes with all sorts of thanks. People messaged to tell me the names that they had chosen off of the list. I was called a god on multiple occasions. I even referenced it from time to time for myself - that’s where Party Favor got his name from.
And yet, I knew I had more names to contribute yet.
I’m back, and with a vengeance. The drill is the same as last time: below the cut are over nine hundred Furby names, organized by category. But this time, I have a more systematic approach to the lists. Instead of copy-pasting them into a single, slow-loading Tumblr text post, I have put them all on a new website called “The Furby Name Horde”. The original unique names post had 58 categories and over 900 names. This new one has 67 categories and over 1,000 new names. What are you waiting for?
Click on the link if you’d like to jump right into the new names (or you can click here if you want a brief summary of the site). Read below the cut if you want to learn more about the site.
Keep reading
How to tell your Furby's datecode
1998s, 1999 Babies, Furby Friends, Shelbies:

2005s/2005 Babies: Look at the tag. There should be a stamp with the datecode on it. From 2005 Furbys onward, the datecode should be read with the year number first. (For example, this Furby who I pulled the image of from eBay was made on the 221st day of 2005.)

2012s/Booms:
Unscrew the battery compartment and look at the plastic panel under the tail. I used my Boom Seaspray for this.

Connects:
On the bottom right side of the Furby near the battery compartment there should be a list of numbers and codes stamped. The first set of numbers is the datecode. This image is of my Connect Kee-Dah, who is sadly no longer part of my Furby family.

2023s:
Unfortunately I wasn't able to take a picture of Jankus Puffball Nanaimo Bar IV's datecode, but 2023s should have their datecode in the battery compartment somewhere. Here's the datecode on the back of the box:

hot glue faceplate mold (with pics!!)
lately i've been thinking of making oddbodies since I got a sewing machine but getting faceplates from etsy or depop is not really accesible for me so I made a faeplate mold out of hot glue and thought it may be useful for someone out there :D
MATERIALS:
- glue sticks (I needed 2 for a mcdonald's keychain size faceplate)
-a pot
-water
-a furby
-paper tape
-flour, baby powder or anything you have to demold
STEPS:
~select the furby you want to replicate the face from.
~once you have your furby cover around its face with paper tape so the fur won't get stuck to the hot glue.

~cover the furby's face with something to make the demolding easier (I used flour because it's what I found)

~now, heat up water in the pot (it's not necessary to boil it) and melt the glue sticks there until they are maleable enough. I used this video as a guide
~once the glue is maleable (careful bc it's hot) cover the furby's face with it pressing enough for it to reach all the nooks and crevices.
-let it cool for a couple minutes

~take the mold out of the furby face and that's it.


now you have a mold to make vegan furby creations :))
I hope this is helpful and understandable (english is not my first language sorry for any mistake :C ) my asks are open if you have any questions :)
i know this thing from model painting and stuff but it’d come in handy for anyone whos having trouble with repainting furby beaks/eyes too! if you’re using acrylics and don’t want to get those streaky brush stroke marks on your finished thing, here’s what to do:
water your paint down! get it nice and runny. this may seem counterproductive because then it’s all thin and drippy but you gotta believe!!
it takes some patience, but just put on one really thin layer at a time. its ok if it looks too wet and is only pooling in the cracks right now.
it is extremely crucial that you let it dry between each layer! i know it’s hard but just be patient, ok? i promise its gonna be great!
keep adding layers until it looks good! once you’re happy with the coverage you should have a really nice and smooth paint job! congrats!
How did you make mewt2's pouch The wallaby furb is incredibly cute <3
I drew a diagram/sort of pseudo tutorial to show! It’s really not that hard


I can do a proper tutorial when I’m not tired from work if anyone wants it? I’ve been wanting to make another wallurby out of my Crew of Fubbies. Maybe Steve Irwin!
Edit: and if anyone wants me to expound on anything here, please let me know! nwn
How to carve eyelids!

I wanna preface this with I have no idea how to write tutorials so this isn't really a tutorial and more of a how i do it!!!
But carving eyelids is pretty simple process! But actually cutting them can be a little tricky!
While carving eyelids can really enhance a custom, there are cons the carving the kids being they won’t be able to fully close them after and there may be risk of a slip and cutting too deep into them, if you do don’t fear, I’ve seen lots of people fix slips with air dry clay and then paint over them to hide the clay!
But onto the tutorial!
So I start off by taking off the furbies shell and removing the eye pins and pulling out the eyelids. You can find how to get them out in a lot of tutorials on how to remove the faces for long furbies but Here you will be screwing it back together so be careful not to lose screws!
Once they’re out I draw out the guide lines, Be it angry or sad or whatever you wish!

These ones are Brie’s so they were angry!
Then using some nail cutters like these

I cut from the start of each edge, making sure to not cut off or through the holes on the side that thread the eyelids on the pin!
Then after the entry cuts are made I go through them following the guide line with a scalpel. a dremel tool is also very good and probably better but sadly I don’t own one so be careful it’s very tough and can be a little dangerous so make sure to cut away from you!
After you’ve cut them they should look something like this!

then it’s just a matter of smoothing them out with sandpaper or a nailfile, making sure they’re even and putting them back together!

This was the finished result of this baby!

🌟 1998 Furby Re-Lashing Guide 🌟
A visual step-by-step guide to my own process for giving 1998 Furbies lashes that retain the classic look. There may be other guides and methods out there, this is just my own way to do it!
MATERIALS NEEDED:
Detached Eyelids ( guide for removal: CLICK HERE )
13mm D-Curl Lash Extensions ( see photo )*
Mod Podge
Tacky Glue
X-Acto Knife
Small Paint Brush
Q-tip
Lightweight Paper
SHARP Scissors
Clean Water
Washcloth or Paper Towel
Optional, Ruler with cm/mm marks & Marker or Pen * 13mm will be closest to original length, I would not recommend anything longer than 15mm unless you want the lashes to really look insanely long.

I will put all of the steps under the readmore! 👇
Step 1:
Use the x-acto knife to gently peel up an eyelash foil strip, and be careful not to disturb the lashes. Go slowly and only handle the strip by the sticky foil. You will only need one strip for a pair of lashes!


Step 2:
Place the sticky strip on the lightweight paper, I put it close to the edge because it'll be easier to cut out later. Paint a thin layer of Mod Podge over the base of the lashes on the strip to secure them. This is an important step, there isn't much else keeping them in place, otherwise!


It's hard to wait, but let the glue dry before handling the strip again, I suggest a good 30 minutes or so.
Step 3:
Now that the glue has dried, cut out the paper around the strip and very carefully trim the foil and paper at the sides and underneath the curl of the lashes. Do this slowly, so you don't accidentally snip the lashes, you ONLY want to trim back the paper+foil. This will make them appear more flush with the eyelid when glued in.


Step 4:
Optionally, use a ruler to find the center of the strip and mark it with a marker, I used a Sharpie because it dries instantly. It's possible to eyeball this, but I like them to be as even as possible.
Snip the strip in half, very sharp scissors will prevent the foil from bending or warping. Again, be careful not to snip the lashes themselves! It's ok if you lose one or two in this process, as long as they still look relatively clean and even once split.


Step 5:
Apply a drop of tacky glue to the back of each eyelid and use the Q-tip to spread it in a thin, sticky layer. The eyelids have a little trench you can use as a guide for placement.
You can repeat this process if you wish with the top of the lash strip where it will be applied, as well, to make it stick better. I haven't tried this myself, yet.
Place the base of the lash strip over the tacky glue and press it into position, I use the backs of my thumb nails to hold them firmly while the glue sets. It make take some effort and patience to get them to stay in the curve, just try not to slide them around.


Step 6 (Final):
After the tacky glue has had some time to dry, I like to apply a final coat of Mod Podge over the paper and underside of the eyelids to seal and protect everything. Give this 30 minutes to an hour to fully dry before re-assembling your Furby!


✨ Voila! Fresh new eyelashes! ✨
They won't look exactly like the original, but close enough for me. I'm sure the process can be improved in some ways, so if you have any feedback please share it in comments or tags!
Good luck with your projects and thank you for reading! 🌟

so i made some cute lil iridescent soda-bubble-aesthetic / starry-sky lookin eyes n decided to make a post explainin how in case any of yall wanna try it / smthin similar! c:
what u need:
blank eye chip(s)
clear command hook stickies
craft tape (i used color-shifting / iridescent tape, but u can use w/e color / pattern u want!)
paper towel
scissors
tutorial below!
Keep reading
Bean’s way to create an OwO beak.
So you may have seen my furbies like Pongo or Salem or even the fake furby Furbish which has a reverse owo. I hope you enjoy this tutorial and it helps you! If you have any other questions, please let me know! Also please excuse my bandaids I jabbed myself while sewing.

The tools that will be needed to complete the owo task include:
A sharp implement
An implement that can poke things out from tiny places
Something that has the ability to grab
A colored pencil
Sandpaper
and the furby beak of course!
Other tools like hot water, hair dryer, dust mask, and protective gloves are optional, but all safety precautions are suggested.
Here are the tools I used

You will need to begin by skinning the furby then removing its beak. Using your poking implement poke out the rod that holds the beak together.


After the rod is poked out, you are easily able to remove the top and lower beak as well as the tongue that easily pop out. Please place all these pieces in a place where you will not lose them. I try and lay them out in a way so that I remember how they will go back in. The top beak part is always the one with the hooks on the outermost sides.

Take the top beak and using your colored pencil ( a colored pencil easily rubs off when everything is done) draw a line down the middle of the beak and then from that line create a triangle for how big you want your owo mouth to be. Keeping in mind you will be sanding some later.

Before this step for ease of carving it may be helpful to place to the beak in hot water or to use a blowdryer on the warm setting to soften up to plastic to make it easier to cut. I use a boxcutter because it is a little safer and easier to control and grasp. Using your sharp implement and wearing gloves or having an adult do so for you, with sawing motions begin to cut your triangle out.

Using a method with heat makes this process go a little quicker and sometimes smoother. But using the sawing motion go deeper and remember to saw the edges of the beak where your triangle ends. I put a little pressure in the cuts as I go to see where the cut is on the other side.

Keep in mind these photos are positioned in a way to show whoever is using the tutorial on how it is done. It is best to use both hands at all times. You will make your way through the beak and be able to take out the rest with your gripping implement. You may need to twist a bit to have it release.

After this has been accomplished, using sandpaper round out the edges to how much you want the owo curved. It is also helpful to sand the cut edges and the top of the triangle as well to give it a softer look.

When all this is complete, you now have an owo mouth! Congrats! I am so proud of you! If you want, you can paint or decorate the beak as well. To put the beak back in it is best to put the bottom beak, then the tongue, then the top beak on the furby. Then lastly slide the rod back in!

I hope you enjoyed this tutorial and I cannot wait to see all the cute creatures you create! Have fun and be safe! If you need any help, please let me know!
Question for people who have made furby skins for custom
What measurement of fur do you need? Fur tends to be expensive so i don’t want to get more then i need. Also suggestions on places to buy cheap fur is very welcome! Oo and patterns suggestions please! Here is the ref for the colors and stuff.
(this is for 1998 furbs btw) https://imgur.com/a/NPeCjqw
who the fuck would want to buy an advent calendar for $599.95 (600) whopping clams


![Furb Doodles! Send Me An Ask And A Photo Of Your Furb And I’ll Draw Them If You Want! :]](https://64.media.tumblr.com/1d86c32a6a7ff019b3094fd109a13f03/c9731ed7d037abf6-a6/s500x750/1a336a491a4147829ee3ec94e43fb8fc307620a7.jpg)
![Furb Doodles! Send Me An Ask And A Photo Of Your Furb And I’ll Draw Them If You Want! :]](https://64.media.tumblr.com/a5091f1c630f4ebd6f65b96e8c51ae2c/c9731ed7d037abf6-0e/s500x750/03c60c82a0f5cc16819e3cb560a359cb02b4022c.jpg)
![Furb Doodles! Send Me An Ask And A Photo Of Your Furb And I’ll Draw Them If You Want! :]](https://64.media.tumblr.com/5e768b495c86d8433753b930f2172a41/c9731ed7d037abf6-fa/s500x750/37c889df9bcf881e4170ea18e2ccbe843f07df18.jpg)
![Furb Doodles! Send Me An Ask And A Photo Of Your Furb And I’ll Draw Them If You Want! :]](https://64.media.tumblr.com/b66974cd4d17c54ff7fb435907bcecf9/c9731ed7d037abf6-ed/s500x750/47d4edfe3a4f1953b08189fed388b2913587de2f.jpg)
![Furb Doodles! Send Me An Ask And A Photo Of Your Furb And I’ll Draw Them If You Want! :]](https://64.media.tumblr.com/78061cb827fb895acfcdde4ac47af720/c9731ed7d037abf6-38/s500x750/16b623081f2d2d8c712c69694e91ad6dd2059a3d.jpg)
Furb doodles! send me an ask and a photo of your furb and I’ll draw them if you want! :]
NOT AARON DROPPING ANOTHER SLUR IN THE NEWEST VIDEO
Do you know where I can get the 2005 Furby that works?

All I find are very expensive and non working, please let me know

a group of furblets encounter a fearsome beast. kinda like a scaled-down version of this
patreon ☆ ko-fi