Face Tutorial - Blog Posts
Hi! I love your tutorial on how to draw a character, it's really useful. However, I can't get the eyes right for Dean Winchester and Castiel. I draw them too elongated. What shape would you advise me?
Something like this probably haha;; Dean’s is rounder/wider and Cas’ is more angular and droopy

Hi! Idk if my qn got sent before (tumblr mobile yeesh) I wanted to say i really really love your blog and art style! I was wondering if you have tips to draw Dean's and Cas's hair??
REALLY LATE REPLY BUT UM Dean’s got a hair parting on either side but his hair kinda all comes out from a spot on the back of his head. Keep the sides short but flip up the hair in the front

And here’s Cas again! Recapping: part on one side and have the hair come out from the parting and flip up in front as well. He’s got a longer fringe than Dean’s

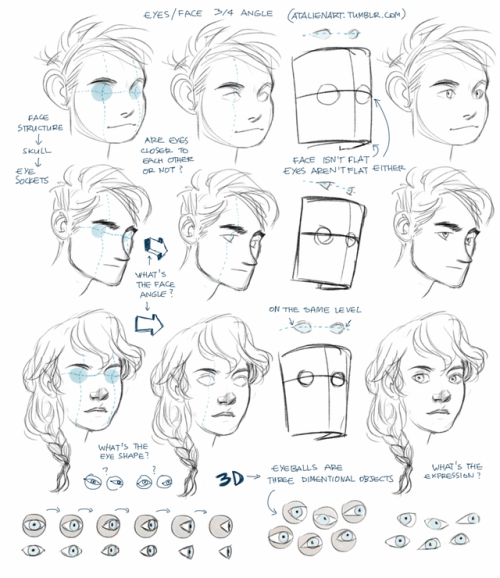
Anonymous said: I know you’ve shown how you draw faces from different angles very briefly before, but I was wondering if you’d ever go more in depth? For example, I always struggle with drawing the eyes at a ¾ angle… 😔
Ok, I get this question so many times that I decided to do something about it. I’ve already made a tutorial about drawing eyes and tbh it should help with drawing eyes from any angle, the tricky part is to understand the human face, its anatomy. If you see the face/head as a three dimentional object you’ll be able to draw it, I can’t say it enough, 3D thinking is important. Also, references are important, drawing from life is important because then you have a 3D model of the head right in a front of you. All you need to do is observe and understand.


Hey just thought I'd let you know you have some of the best artwork I've ever seen! Congrats! Especially Chirrut, he's amazing in your style! I was also wondering if you had any advice on how to draw heads and eyes? They're one of my two biggest struggles and I'd love it if I could get your advice. Anything helps. Thank you and I hope you have a fantastic day!
*_* Thanks a bunch askdh and thanks for taking the time to write me! I had a lot of fun working on Chirrut ;;;
Hmmm I usually think it’s not useful to explain how I make eyes or noses, since the way to draw them changes depending on the pose… My advice would be practicing with ¾ heads. That view always force you to work volumetric shapes and also give a lot more of information. Also, I think it’s much more easy since you have more landmarks to help you.
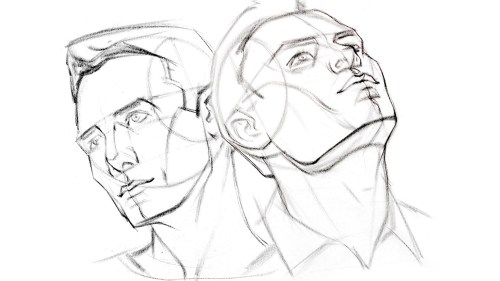
I would also say consulting anatomy to identify the landmarks on the face (zygomatic and nasal bone , superciliary arch, mandible…) and practice on photos. Using references for drawing is not bad and drawing over photos when you need information of a face is a lot of fun. Is not necessary to draw all the bones, but knowing where the volumes and principal shapes are can help you learn. I.E:

I love that photo because it’s SO SO easy to see the volumetry of the face; just the line of the jaw gives you a lot of informacion about it. And it makes it easy to identify the elements and principal shapes of the head:

(I broke his nose, I’m sorry, but I made this quickly (??)) the point is, take your time to study the lines and understand the anatomy.Also:

that triangle is very helpful too and could help you placing the principal elements. The lines that make him look like he’s crying (?) are the relation between the eyes and the mouth and are very helpful when placing it.
Again, this is only a way to learn and understand how to build a face. That is always the key, even if you use a cartoon style. Rules can be broken, but I think it’s important to understand them first. It could help you make your style more solid.
And well, once you’ve studied it from photos, trying it on your own (even if you have references, that’s ok) and practice, practice u3u
Hope this helps and hope it’s not too technical ;;;


for the anon that wanted more head angles. It’s not explained well, I apologize for that but maybe this will help a little bit.


I absolutely adore your art style I was wondering if you could explain how you draw faces and like heads cause I have a lot of difficulty with constructing the face without having it look like an utter disaster sorry if your busy you don't have to do this but I was just wondering if you could help a young artist out thanks :D
Aww, thanks, anon. I’m pretty haphazard with things, but I’ll try to help.
This is your new best friend!!

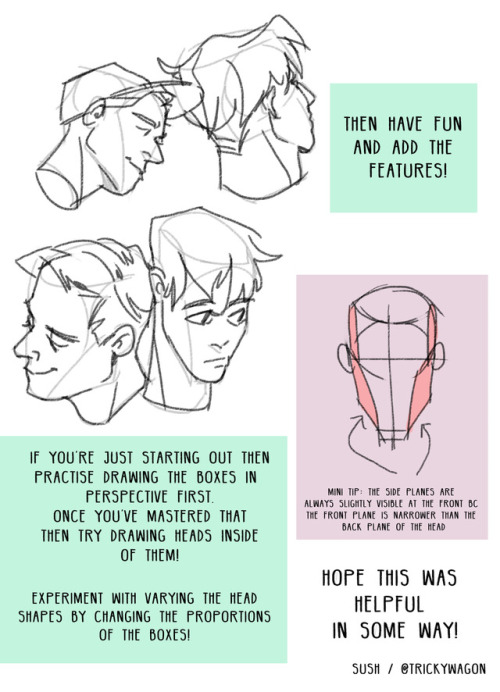
The friendly neighborhood scribbly circle here is your foundation for drawing heads from any angle.

Like, any angle.

Because even when viewed in perspective, the head still has the same amount of volume.
As for actually constructing a face and placement of features, you can see that when jotting down a face, I generally lay down those guidelines [here in green] so I have something to work off of when I’m expanding upon a sketch. I would mostly recommend being aware of the underlying structure of the face.

If you’re going for super-anatomically-correct, you can see that facial features line up in specific, symmetrical ways. For real though, nobody’s symmetrical and sometimes noses are long or ears are small and faces are asymmetrical or just plain different. So this is a foundation but not a cast iron rule.
I will say that the more you do it, the easier it will become! It all just takes practice. And I totally tried to screen record a sketch, but my computer is being hella slow and it keeps freezing up, so I give up. In lieu of something new, here’s an older process gif that I think shows things pretty well:

YUP. Hope this helps. o/


Hey there! Your Dean, Cas, Sam hair tutorials were extremely helpful; thank you! If it isn't too much trouble, do you mind making a similar tutorial for their face structures and eyes? Thanks!
No problem!! For eyes Dean’s is sort of a rounded parallelogram, Cas’ is more angled/droopy and Sam’s is pretty almond shaped. If you keep these shapes in mind you can stylize their eyes while still keeping it recognizable.

For facial structures, generally Dean has more rounded features, Cas’ is more square and Sam’s is more angular/sharp.
Dean’s face is pretty standard, the kind you’ll see in art book examples and stuff haha. I think one thing to look out for is the dip under his bottom lip in profile view. And his forehead’s a bit slanted too!

Cas’ face appears wider/blockier and from the side it’s pretty much just a straight line down. His nose is pretty sharp though

Sam’s got a stronger jaw and his cheeks are more hollow. From the side you can see he’s got a pretty prominent brow and sharp nose on an otherwise flat plane.

Hope this helps!
So I have found your tutorials super helpful, would you mind doing one on how to balance the proportions of the back of the head/ear/jaw area?
ITS REALLY EASY

Back of head follows the circle, jaw lines up with the centerline, and ear is in the bottom right quadrant in between the brow and nose
hey i was wondering how you draw female faces? drawing guys im like hell yeah, but ladies im like hell neh. would you be able to give an example with rey?
Ahhh I’m not the best person to ask for drawing females but um I think generally you just have to be a little more careful with your marks. Everything should be a little softer, more curves, etc. Rey’s a little difficult bc she has a pretty boxy/angular face but her facial features are more delicate.

Of course these are just suggestions and stuff I noticed and not set rules ;;;; but I hope it helps a bit!!
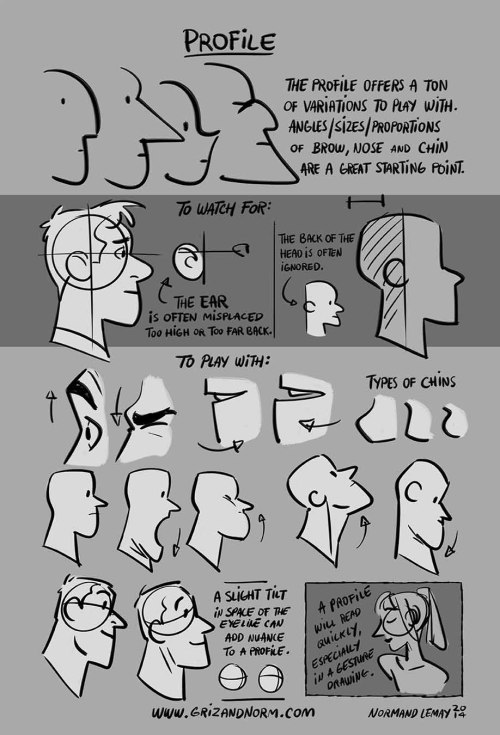
Tuesday Tips - The Face Profile Something I use all the time when I storyboard. The profile is simple, direct, and conveys a lot of information about a character. A great deal of facial features are easier to define in a profile, such as the nose and mouth shapes. Use it to your advantage! It’s really useful when thumbnailing or doing gesture drawing. -Norm
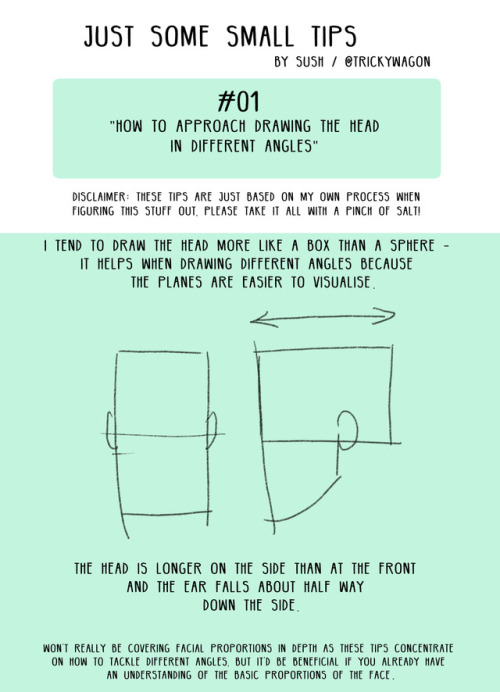
Starting a mini drawing tips series! Feel free to suggest some topics you’d like covered// Hope you find this useful!
Also on: twitter / instagram
Starting a mini drawing tips series! Feel free to suggest some topics you’d like covered// Hope you find this useful!
Also on: twitter / instagram
How to do “extra” facial expressions!
Drawing basic facial expressions is not the hardest. Most people can draw a sad face, a happy face, angry etc., but making more multidimensional expressions is more of a challenge. I have gotten a lot of compliments on how I draw facial expressions, (specifically “angsty ones”) telling me that they are very dramatic and well… expressive! And there are actually only a few things I think about when I draw faces that take them to the next level, so I thought i’d illustrate them all here!
SUPER IMPORTANT TIP BEFORE WE START: Look at your own face when you draw faces. Even making the face when you are drawing (you don’t even have to look at it), will give you some sense of how the face muscles pull and where things fold and stretch, because you can feel it. You are the best reference when it comes to facial expressions!
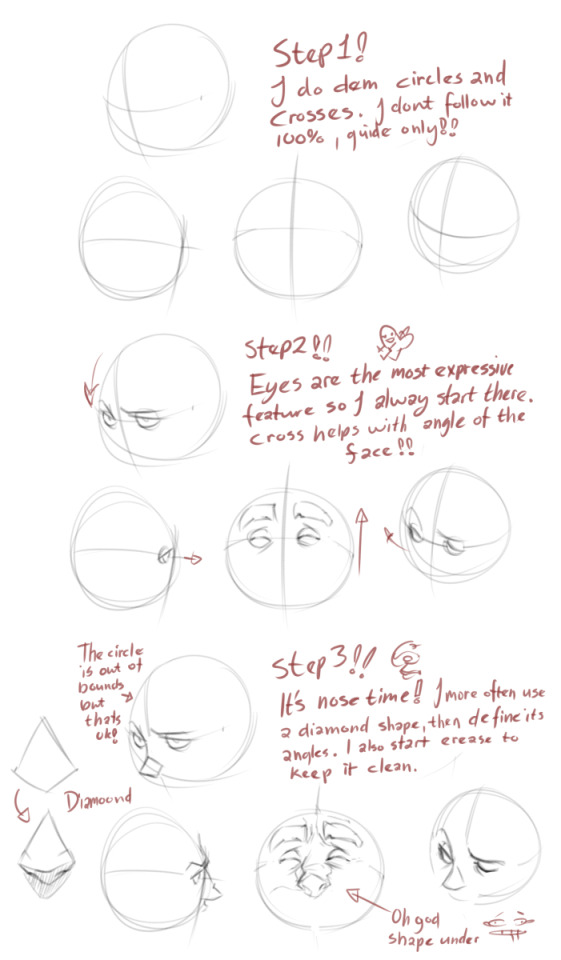
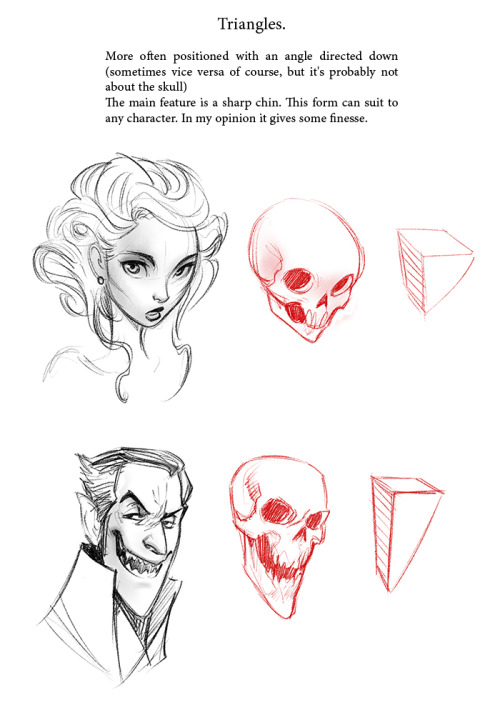
Angles
Draw the head in an angle that matches the expressions you want to make. It is not a requirement, but is going to add to the effect.

Symmetry vs asymmetry
A face is rarely symmetric. Unless the face the character is making is 100 % relaxed or even dissociating, the eyebrows, mouth and facial muscles will have different placements of their respective side. This image shows the dramatic impact asymmetry has on a face:

That’s the difference between a smile and a smirk!

The first one’s like “oh yeah?” and the second is like “oH YEAH??”
The “balloon squishing principle”
This is something I did subconsciously, and I didn’t know about until I made this tutorial. And this principle goes hand in hand with an asymmetric face. Basically, if you squish one part of the face, you need to even out the empty space by “inflating” the other part of the face so that it doesn’t appear shrunken. The picture hopefully explains it:

Teeth
Don’t forget to add the gum when the mouth is open to its full potential!

Squinting and folding
Adding folds around the eyes when a character is squinting makes a HUGE difference. It makes a smile more genuine and a growl more intimidating. Adding folds to the face in general makes your characters more lifelike and ‘visually relatable’. Like, they look human, and less plastic or fake.


and so on..
Pupils and irises
The placement of the iris and pupil in relation to the eyelids is very important! The less of the white you see, the more relaxed the character is.

And then of course eyebrows and eyes go hand in hand!


Gestures, spitting, sweating…
Adding more elements than just a face is key to making the character actually look like they are feeling what you want them to feel. Just the tiniest sweat drop adds to their anxiety, spitting adds frustration to their rage, slouching shoulders, waving hands, a double chin, extreme angles, the list goes on! Add whatever and see what kind of impact it makes! Does it do the trick? Great! Add it!
Over exaggeration!!
Remember that you can almost always exaggerate more. Don’t be afraid to do draw “too much” because you’re just experimenting. See what works and what doesn’t. What do you like to exaggerate?


Now that you know some theory, it’s time to practice!
Practicing!!
The 25 Essential Expressions (a classic! I’ve done it multiple times)

And the one I do when I’m bored:
Fill a page with circles and fill them in with different expressions. Try and exaggerate as much as you can!


This is mostly for experimenting. They are quicker to draw than complete faces, but the same rules should apply!
And that’s about it!
I don’t know if I covered everything in this tutorial, since some things might be obvious for me, and this post perhaps only scratches the surface. So feel free to send me a message if you want an explanation about something more in depth! Thank you for reading! And now DRAW!!! ✨🎨

I see a lot of beginner artists missing the mark on drawing profile views, particularly on eyebrows & eyes—I hope this helps! 💖 Obviously you can stylize things however you want, but it’s important to reference & understand how things work in real life before attempting style if you’re concerned at all about believability.
