Reshade - Blog Posts


CLEAR BLOOM – ReShade for TS4 by amoebae
Clear Bloom was initially created to take advantage of my Full Bloom MultiLUT atlas, and to provide a clear and colourful, but soft, preset that looks good in all worlds.
Album of screenshots using Clear Bloom.
Since the release of Seasons, it is quite difficult to create stylised ReShade presets that look good at all times in all worlds in all weathers, because the lighting can vary so dramatically.
Clear Bloom is intended to be a hands-on preset. I have set up quite a few different effects that can be turned on or off in different locations to get the most out of just one preset. If you don’t like opening the ReShade GUI and turning effects on and off (or using the provided keybinds) this may not be for you.
A list of tips & tricks on how to use Clear Bloom is included in the download in a Read Me file.
The most important thing to note is that there are 4 LUTs from the Full Bloom MultiLUT atlas that I have used in my screenshots and built the preset around. They are: Capella, Catria, Gorgon, and mPhantom. I list some examples of which I prefer in which world in the Read Me file, but you can of course experiment and use any you like.
THINGS TO DOWNLOAD
amoebae - Clear Bloom ReShade (includes preset ini file, as well as several modified or unavailable shaders)
ReShade 3.4.1
Official Shaders for ReShade 3.4.1
qUINT Shaders for ReShade 3.4.1
INSTALLATION
Please follow these steps precisely in this order (note: if you already have ReShade 3.4.1 installed you can skip to step 3):
Install ReShade 3.4.1 by running the ReShade_Setup_3.4.1.exe and following the instructions. Say ‘Yes’ to download the current shaders so it sets up the correct paths for you (we will overwrite them with the shaders for 3.4.1 in the next step)
Place the reshade-shaders folder from the main 3.4.1 shaders you downloaded above
Place the Shaders folder from the qUINT shaders you downloaded above into your reshade-shaders folder that is now in your Bin folder
Place the reshade-shaders folders from my Clear Bloom download into your Bin folder
Place amoe - Clear Bloom.ini in your Bin folder
Say ‘Yes’ whenever prompted to merge any folders and replace any files (some are modified versions of official shaders, which is why you need to install in this order).
If you have any problems, either with installation or using Clear Bloom, please let me know via Ask or Message.
If you see an error regarding the MagicBloom shader, go into your reshade-shaders>Shaders folder and delete it because Clear Bloom doesn’t use it.
I would love to see your screenshots using Clear Bloom, so feel free to tag me @pictureamoebae.


🍪 ・ : *✧・゚:* ɴᴇᴡ ᴄᴏᴏᴋɪᴇꜱ ʀᴇꜱʜᴀᴅᴇ ᴘʀᴇꜱᴇᴛ *:・゚✧*:・ 🍪
-
🍪 ・ : *✧・゚:* ɪɴꜰᴏ *:・゚✧*:・ 🍪
the name is inspired by : NewJeans - Cookie
The attached video is for you to see that the preset is not copied from anyone :))
-
🍪 ✧・゚: *✧・゚:* ᴍʏ ʟɪɢʜᴛɪɴɢ ᴍᴏᴅꜱ *:・゚✧*:・゚✧ 🍪
- ♡ Sunblind - a world lighting
- ♡ Ghibli clouds
- ♡ Terrain Mod
-
🍪 ✧・゚: *✧・゚:* ʜᴏᴡ ᴛᴏ ɪɴꜱᴛᴀʟʟ *:・゚✧*:・゚✧ 🍪
Download the ini file
once you have the ini file copy or paste and move it to:
C:\Program Files\EA Games\The Sims 4\Game\Bin
-
🍪 ✧・゚: *✧・゚:* ᴅᴏᴡɴʟᴏᴀᴅ *:・゚✧*:・゚✧ 🍪
♡ ꜱɪᴍꜰɪʟᴇꜱʜᴀʀᴇ: ♡
♡ ᴍᴇᴅɪᴀꜰɪʀᴇ: ♡


gameplay pics with ocs


i did buy a new laptop finally and i'm playing the evil corporate game, but i did install ts2 as well and everything works fine (aside from UI not scaling properly on this laptop's resolution)
athough i did have to spend several hours solving a CC issue that was caused by me having folders with names such as "please sort this" in my Downloads lol


some time ago, i'd sent these old pics to a friend, who then told me to watch Severance... so i did.
i remember feeling anxious about doing so, bc it seemed like i'd get too attached to this show – the stills from it looked like my maladaptive daydreams projected onto the screen. but it turned out being not what i expected it to be (still great tho). yeah. & i did get engrossed in that world for a while lol.
anyways (⊙_⊙;) good show i recommend

Dunder Mifflin this is Pam

this picture is dedicated to flip phones (and kitchens)
tutorial: hide all UI in ts2 hood view tab mode
if you're like me and you love taking screenshots in hood view, especially with ReShade, you've probably been annoyed by that one UI panel at the top that never disappears in tab mode (aka cameraman mode)...
...but it turns out that if you modify one game file, you'll be able to bring up a window called Sims2 UI Browser, which allows you to hide/unhide any UI elements. no more cropping neighborhood view screenshots!
you can find out how to turn on Sims2 UI Browser here.
the process requires modifying the GlobalProps.xml file, and it's basically the same thing you'd do to use the allMenus cheat, but Sims2 UI Browser isn't related to that. the cheat will become available to you after this though, but you don't need to turn it on in the console, so it won't affect your gameplay.
after modifying GlobalProps.xml your game will automatically start with boolprop testingcheatsenabled on, so be sure to disable them if you're forcing errors on everything with the batbox.
another thing: when testingcheats are on, you get that game version number in the right upper corner of the screen, which might be a problem for screenshots as well. i'm using RPC, which i believe (correct me if i'm wrong) hides that text, because i currently don't have it in my game. but i think you might be able to hide it with Sims2 UI Browser as well.
but anyway, here is the UI element you actually need to hide:

after that, it's gone until you turn it back on, or load a lot and come back to the neighborhood view. here's an unedited (but reshaded) screenshot, taken in hood view tab mode:

have fun! but be careful with modifying game files 😉

...a sleep-deprived interior from yesterday.
preset under the cut ↓
ElusivePerspective.ini
download: SFS or GDrive
i'll add the list of effects later, sorry. this preset uses RTGI, but will look pretty cool without it too. i also suggest turning on PD80_04_Technicolor.fx:

[made with ReShade 4.9.1]


random edit. decided to give clay hairs a try (this one is here btw)
might as well share this preset ↓
NightBokeh.ini
download: SFS or GDrive

[made with ReShade 4.9.1]
NightBokeh.ini has two types of DOF – CinematicDOF and ADOF.
CinematicDOF creates elliptical bokeh, ADOF creates hexagonal bokeh, and there are some other differences between them too. choose the one you like more, not sure how they look together. ADOF is disabled by default.
also, the effects highlighted in green might get doubled (if you have every available shader installed); if that happens – disable the second instance of each of these (cuz the effects will look too strong).
psst, if you're looking for my other presets i've shared before ("CityPortrait.ini" and "DesertHood.ini"), they're here (SFS) or here (GDrive).
an Art Deco/Streamline Moderne attempt (4k image here)

no backstory or residents yet, i'm open to suggestions
some trivia nobody asked for:
this is the first time i'm using SRWE and RTGI, exciting
the pic is still heavily edited in Photoshop; i tried to give the windows fake reflections, but they came out meh
these pictures actually show the interior of this building, only i changed it up a bit for the exterior edit
maybe i should rebuild this lot to actually share it... it's kind of embarrassing that all i do is post pictures lol
loaded the game with a nearly empty downloads folder to test something but got distracted and made this :/

at least in this case i can quickly list all the content used (bc it's great and why not!) ↓
neon mug & vertical neons
fallout 4 walls & floors
brick walls, cornices, window
wine bottle
paper grocery bag
thank you~♡
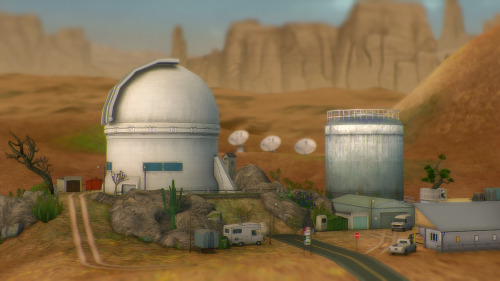
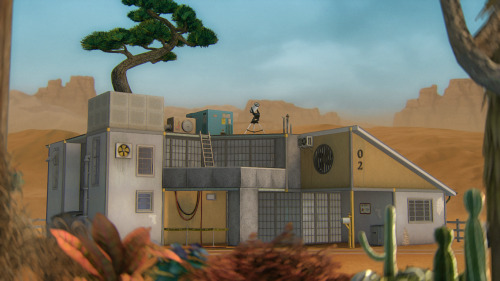
some inconsistent images of The Curious Hill. inspired by this observatory (pics: 1, 2)
the house went through SO many transformations... i really wanted to keep at least one tower, but it looked bad in hood view, so i swapped it out for an unrealistically planted tree to simulate that feeling of height. what kind of style this is? no idea. ts2 brutalism? or just a bunch of boxes. as i tried to make the area look similar to that observatory, i wanted the actual lot to blend in with the hood deco, while still looking as absurd as the original house. those improved lot impostors available with RPC are such a blessing! (even if the pic is still retouched lol)
bonus close-up:


2 Cover Up Road’s living room. had to snatch that pizza slice out of Lazlo’s hands


2 Cover Up Road's (Vidcund's?) indoor garden


Sumahama like the beach boys song Wilderbees
A soft and bright fuji film like ReShade inspired by Japanese film photography
To install put this file in : C:\Program Files (x86)\Origin Games\The Sims 4\Game\Bin
Not Recommended for gameplay
Made with ReShade 3.0.08 You can find the old ReShade DLs here if you have any trouble
ReShade Installation Guide // Troubleshooting


