In Depth Motorcycle Tutorial Part 1

In Depth Motorcycle Tutorial Part 1
Artist: Florian Lecuyer
More Posts from Arttuti and Others


An anon asked me for an eye tutorial 👍🏼👍🏼👍🏼
I highly recommend looking reference photos on the internet to get used to drawing different eyes, and also to take photos of yourself to get used to drawing different angles/expressions – Don’t just blindly draw the same eye over and over again, because without a strong basis of drawing by observation, you could get into some bad habits, and all your characters will look the same. :)
Hoi!! I saw a little bit of the process on your Instagram, but could you explain how you go about making a pattern? I absolutely love how that neato cactus/desert one you did turned out!
Alrighty!
So to make a repeating pattern:

1. Open a canvas and draw in the center WITHOUT touching any of the edges.

2. [Below: Light cyan lines] Divide your canvas into four equal parts.
Make four guides framing the canvas, and two across the middle.
For the ones in the middle, View > New Guide > Horizontal or Vertical for needed orientation > type in 50% to get the exact middle of your canvas. These are photoshop shortcuts, may be different on your programs.

3. [Above: Yellow arrows] Make sureyou have ‘Snap’ checked under View > Snap, then select each quarter of your piece > layer via cut > move diagonally to the other side.
After you’re done moving things diagonally, you can either turn off Snap so your doodling won’t stick to the center lines, or toggle the guide visibility off (Ctrl+;). Merge the layers back together.

4. Draw in the middle without touching the borders, color the entire thing if you plan on doing that.

5. Setting your image as a pattern After your image is done, merge all layers into one > select the entire canvas (Ctrl+A) > Edit > Define Pattern
Open a new canvas bigger than the one you made the pattern on, and paint bucket it in! (Instead of the Foreground button at the top when paint bucket is active, select Pattern then your pattern)
If you aren’t using a program that lets you define patterns, merge everything into one layer and duplicate & tile them manually.

Cheers!
Heres a google drive folder filled with art book pdfs, if anyone has some others that you'd like me to add to it thats missing, please let me know and send me the link
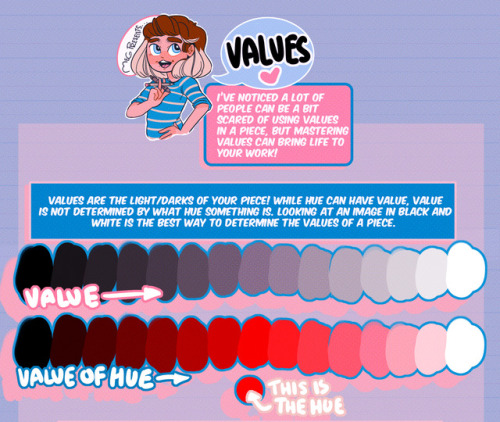

Hey friends, Meg here for WOOPS IT’S WEDNESDAY! Today we’re taking a look at how to study values and the importance of knowing how to use them! It’s not all about color, you know. If you have any tutorial recommendations send ‘em in here or my personal. Now go forth and I’ll see you next week!
Hands
As I do with most things, I draw hands from a series of gesture strokes that insinuate the pose and shape I want. Something I personally find very appealing about hands are all the joints, bends, and crooked bits so I start with those and build the rounder, meaty bits from there.

In the first two steps here if you just look at the individual strokes I’ve drawn, you can see they’re just some curves, really, that sketch out the shape of the hand, and I’m focusing on the joints and knuckles. (The fingertips in the second one are actually rly unnecessary and ugly to me haha – that’s usually the kind of thing I’d just throw down in step 3.)
And again below, just starting w/ some curves and squigglies to show the joints and knuckles:


These hands are by no means realistic or fully proportional but drawing’s supposed to be fun and these are really fun! I’m like, really not about that whole “draw a box and then the little tubes and those are the fingers” thing. It’s too technical and so much life gets lost when you sketch that way. Maybe it’s helpful for a pose you’re uncertain about but then just look at a photo or your own hand to see how things work, y’know?
Something else I’m really about is using shading and line to emphasize the bends and stuff even after I’ve got the hand down:

The first image here you can tell the fingers are bent, but they also look lumpy imo. To stylize further, I add some thin lines for the joints and fingernails, and then shade for some extra depth + to pronounce the foreshortening etc. (Fingers are so ugly from this angle! But we gotta draw them like this sometimes…)
Some examples where these extra lines assist in conveying the shape:

And shading:

(Bottom right is the same pose as a previous example which I didn’t realize till now sorry haha)
Some general tips:
- Use asymmetry!!! When the joints don’t line up exactly right, or you’ve drawn two hands doing the same thing but idk one’s curled a little bit more or the right pinky sticks out but the left doesn’t – these little touches make the drawing more dynamic, even if the general pose/concept is flat.
- Thumbs are really cool? They’re like trapezoidal. The same tapering thing kinda happens where the hand meets the wrist. A hand is like a big thumb
- Two things that a lot of beginner artists get wrong: which side the thumb is on (…always double-check…I still double-check sometimes too), and drawing the fingers straight instead of slightly bent when trying to draw a relaxed hand. Relaxed fingers curl! And this is much easier to draw imo than perfectly tense fingers
- Study your own hands and think about their shape. Part of developing a style + comfort with drawing a particular thing is how you choose to simplify the form thru line. I explained above that I focus on the joints and knuckles and seek to simplify those with curves and squiggles but maybe you’re more interested in a different aspect. (Like, you can see I don’t draw palms v much…that’s cuz I like knuckles haha)
Hope this is helpful/feel free to ask followup questions!


Art Help

I redid this list because broken links 💀
General Tips
Stretch your fingers and hands
Art is for fun
Never too late to start/improve
Using a tablet
Editing software: pictures & video
Moodboard resources
Comic pacing
Watercolor
Coloring
Color Theory (not children's hospital)
Resources: coloring things a different color
Gold
Dark Skin undertones
Dark Skin in pastel art
POC Blush tones
Eyes colors
Cohesive Color Palette
Lights and Colors
Human Anatomy
POSE REFERENCES
Wizard Battle poses
Romance poses
Shoulders
Tips for practicing anatomy
Proportional Limbs
Skeletons
Hair Directions
Afro, 4C hair
Cane use
Clothing
Long skirts
Traditional Chinese Hanfu (clothing reference)
CLOTHING REFERENCE
Sewing information
Animals
Horse -> Dragon
Snouts: dogs, cats, wolves, fox
Foot, paw, hoof
More
Drawing references sources
Art tutorial Masterlist
Another art tutorial Masterlist
Inspiration: father recreates son's art
Inspiration: Lights
ART BOOKS
Plants/flowers: North America, Hawaii, Patagonia
Art Cheats
-
 hiimsuperawkwarddontmindme liked this · 10 months ago
 -
 ninjafox-love liked this · 6 years ago
 -
 petite-instrictableu reblogged this · 7 years ago
 -
 screaminglamps liked this · 7 years ago
 -
 pivotmasterecho liked this · 7 years ago
 -
 tanpoyo liked this · 7 years ago
 -
 ghost-in-my-box liked this · 7 years ago
 -
 skittles1016 liked this · 7 years ago
 -
 sinisterbud liked this · 7 years ago
 -
 novaraining-blog liked this · 7 years ago
 -
 jg2758 liked this · 7 years ago
 -
 spawnofhades liked this · 7 years ago
 -
 artcheatcode reblogged this · 7 years ago
 -
 rubixpsyche liked this · 7 years ago
 -
 arttuti reblogged this · 7 years ago
 -
 meglayn liked this · 7 years ago
 -
 thedearestalicorn liked this · 7 years ago
 -
 toon-torial reblogged this · 8 years ago
 -
 chessbunny liked this · 8 years ago
 -
 shiraae liked this · 8 years ago
 -
 i-am-a-disorganized-mess reblogged this · 8 years ago
 -
 shadowlink-44 liked this · 8 years ago
 -
 galacticpunk00 liked this · 8 years ago
 -
 stardust-speedway6 liked this · 8 years ago
 -
 seedafuturemusic liked this · 8 years ago
 -
 giga-men liked this · 8 years ago
 -
 tomanloyle liked this · 8 years ago
 -
 blueskies258 liked this · 8 years ago
 -
 lexcyphersbasket liked this · 8 years ago
 -
 the-nai reblogged this · 8 years ago
 -
the-nai liked this · 8 years ago
-
 yonezoh liked this · 8 years ago
 -
 supaluilu liked this · 8 years ago
 -
 frenchtoastee reblogged this · 8 years ago
 -
 cleopatra-ivxx reblogged this · 8 years ago
 -
cleopatra-ivxx liked this · 8 years ago
-
 spreaditlikeavirus911 liked this · 8 years ago
 -
azulplanta liked this · 8 years ago
-
darklucian1221 reblogged this · 8 years ago
-
takemyheartbeforeyouleave liked this · 9 years ago
-
 shitsburg-usa-blog liked this · 9 years ago
 -
 cyberlights liked this · 9 years ago
 -
 yourfavegrandpa liked this · 9 years ago
