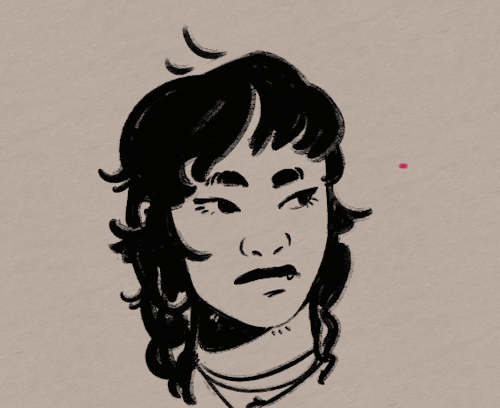
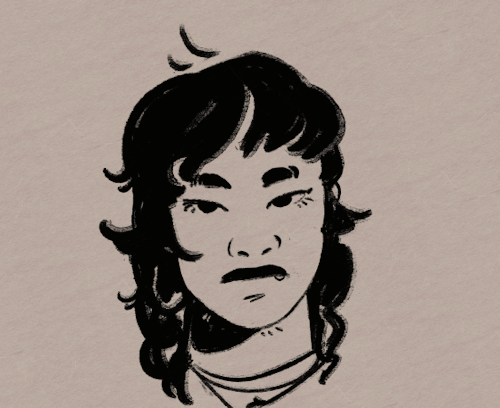
Hell Yeah' More Shitpost Drawing Studies'

Hell yeah' more shitpost drawing studies'
I mostly to these scribbles/notes for myself, but sharing is caring and my brain simple won't acknowledge and comprehend how light works.
It's actually so simple doing shadows ( in theory ), still' i wanna rip and tear at my hair whenever i actaully have draw dynamic ones.
More Posts from Arttuti and Others
How I Animate

The Technique:
I draw the frames and then I use the liquify tool to push the lines into the next frame and redraw them where I need to. This allows me to keep the lines consistent, but gives me the control of frame by frame animation bc I am still making each frame manually! I also use 3d models as reference to help me with the angles! Super important to use reference while you animate (and with art in general), if youre no good handling 3d models then act it out and record yourself!

The Theory:
i think most people are at least loosely familiar with the 12 principles of animation (if youre not, heres a 2.5 minute video showcasing them!), but may not necessarily know how to employ them. the main 3 i tend to focus on when I animate is rhythm, telegraphing, and inertia so ill cover those there 👍
1. Timing & Rhythm
Timing is how you space out your frames both in how long an individual frame is held for, and also when you drawn an inbetween of two frames you can favour one frame slightly more than the other instead of drawing the exact average of the cels, giving the favoured cel more timing weight.

Left line has the cels evenly spaced out on the timeline, right holds the first cel for longer and the second cel slightly favours the last frame. It creates a more interesting rhythm to the animation! Rhythm is how I think of animation timing. Theres a beat like a song to every animation I make, and creating an interesting beat is what makes an animation fun to watch (for me, anyway):

2. Anticipation / Telegraphing

Before I animate a big change in movement, I like to telegraph that its coming. Usually this is doing a little counter movement in the opposite direction, but thats not the only way to telegraph a motion, e.g. eye movement can telegraph a head turn!

3. Follow-through / Overshoot / Inertia


Unless the movement is mechanical, it wont come to a hard stop and will have some level of bounce or easing out to it. How much "bounce" you add will have a big impact on how the animation feels, but a very subtle bounce will add a natural feeling to the end of a motion.

Secondary animations will use a lot of this, note that the head and the hand have a small amount of continuous motion (primary animation), and then the hair has a lot of bounce and inertia (secondary animation which reacts to the primary animation). Note the different amounts applied to the braid vs the sideburn vs the bangs
anyway! I hope this was insightful ❤️ if you like my art you can commission me by the by :)
How to do “extra” facial expressions!
Drawing basic facial expressions is not the hardest. Most people can draw a sad face, a happy face, angry etc., but making more multidimensional expressions is more of a challenge. I have gotten a lot of compliments on how I draw facial expressions, (specifically “angsty ones”) telling me that they are very dramatic and well… expressive! And there are actually only a few things I think about when I draw faces that take them to the next level, so I thought i’d illustrate them all here!
SUPER IMPORTANT TIP BEFORE WE START: Look at your own face when you draw faces. Even making the face when you are drawing (you don’t even have to look at it), will give you some sense of how the face muscles pull and where things fold and stretch, because you can feel it. You are the best reference when it comes to facial expressions!
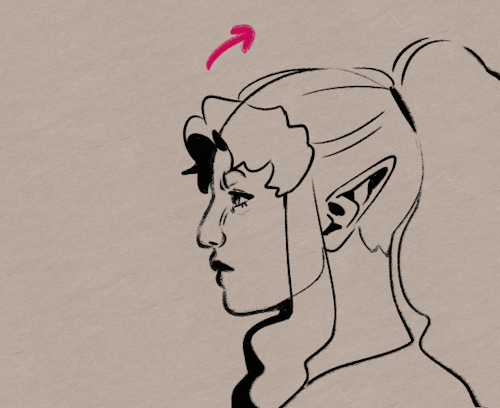
Angles
Draw the head in an angle that matches the expressions you want to make. It is not a requirement, but is going to add to the effect.

Symmetry vs asymmetry
A face is rarely symmetric. Unless the face the character is making is 100 % relaxed or even dissociating, the eyebrows, mouth and facial muscles will have different placements of their respective side. This image shows the dramatic impact asymmetry has on a face:

That’s the difference between a smile and a smirk!

The first one’s like “oh yeah?” and the second is like “oH YEAH??”
The “balloon squishing principle”
This is something I did subconsciously, and I didn’t know about until I made this tutorial. And this principle goes hand in hand with an asymmetric face. Basically, if you squish one part of the face, you need to even out the empty space by “inflating” the other part of the face so that it doesn’t appear shrunken. The picture hopefully explains it:

Teeth
Don’t forget to add the gum when the mouth is open to its full potential!

Squinting and folding
Adding folds around the eyes when a character is squinting makes a HUGE difference. It makes a smile more genuine and a growl more intimidating. Adding folds to the face in general makes your characters more lifelike and ‘visually relatable’. Like, they look human, and less plastic or fake.


and so on..
Pupils and irises
The placement of the iris and pupil in relation to the eyelids is very important! The less of the white you see, the more relaxed the character is.

And then of course eyebrows and eyes go hand in hand!


Gestures, spitting, sweating…
Adding more elements than just a face is key to making the character actually look like they are feeling what you want them to feel. Just the tiniest sweat drop adds to their anxiety, spitting adds frustration to their rage, slouching shoulders, waving hands, a double chin, extreme angles, the list goes on! Add whatever and see what kind of impact it makes! Does it do the trick? Great! Add it!
Over exaggeration!!
Remember that you can almost always exaggerate more. Don’t be afraid to do draw “too much” because you’re just experimenting. See what works and what doesn’t. What do you like to exaggerate?


Now that you know some theory, it’s time to practice!
Practicing!!
The 25 Essential Expressions (a classic! I’ve done it multiple times)

And the one I do when I’m bored:
Fill a page with circles and fill them in with different expressions. Try and exaggerate as much as you can!


This is mostly for experimenting. They are quicker to draw than complete faces, but the same rules should apply!
And that’s about it!
I don’t know if I covered everything in this tutorial, since some things might be obvious for me, and this post perhaps only scratches the surface. So feel free to send me a message if you want an explanation about something more in depth! Thank you for reading! And now DRAW!!! ✨🎨
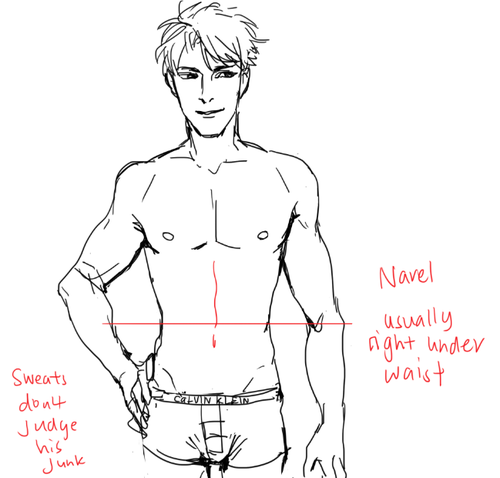
Hi Fer! I simply love your blog and tutorials so much, but I was wondering on how you draw masculine bodies? My drawings have been female and slender men, and when I try... it just doesn't look right. So any tips can be really helpful because I want to try and draw different body shapes. Thank you so much! <3
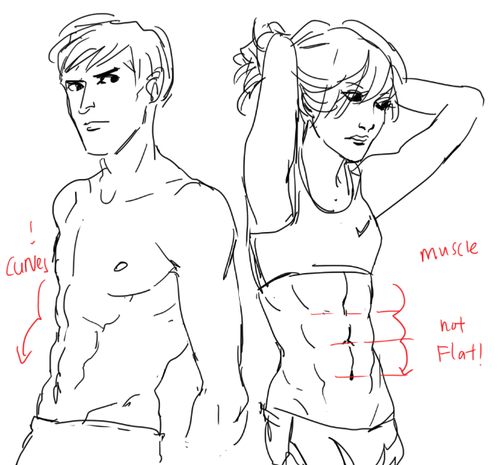
easiest thing is probably to widen the shoulders and up the muscle mass! it really helps to study anatomy so you know which areas to exaggerate. a more muscular/masculine person will have a more defined sternocleidomastoid (in blue) and bigger traps (green); basically a thicker neck. playing with the shoulder to hip ratio will help as well. i guess if you want a super manly man just make him look like a dorito


im sorry to ask, but i was wondering if you may show us how to draw abs please?
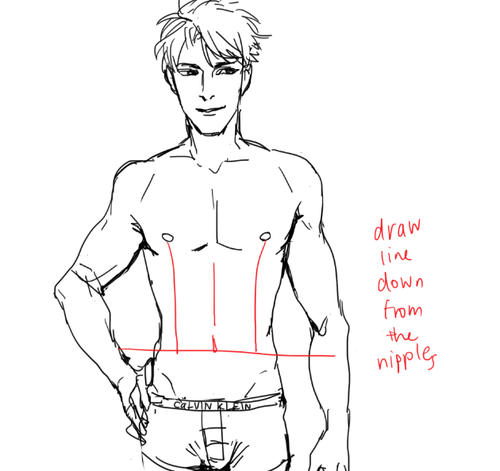
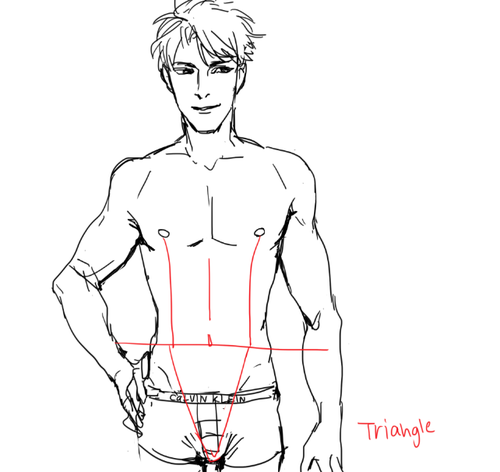
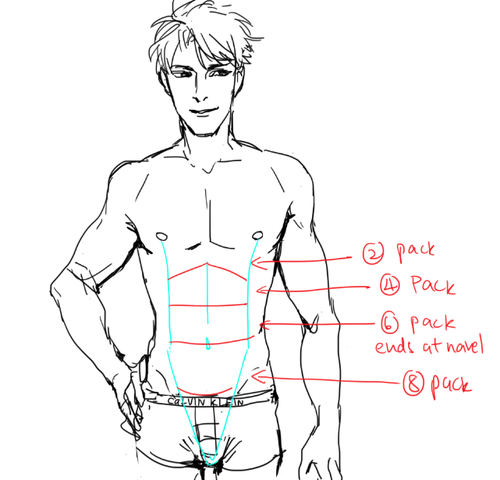
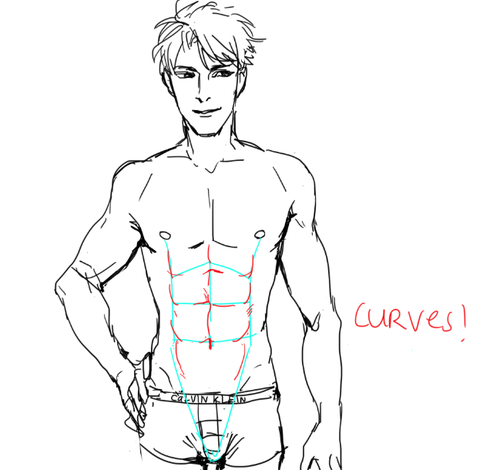
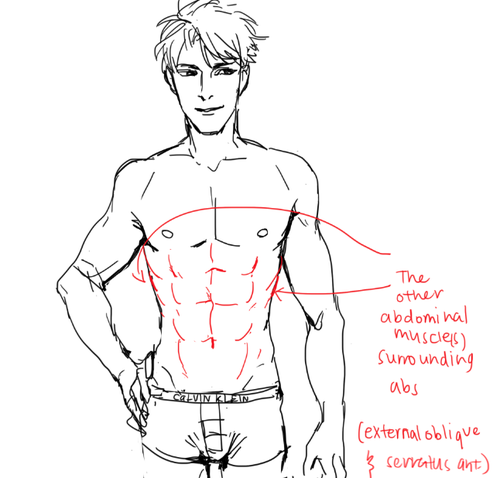

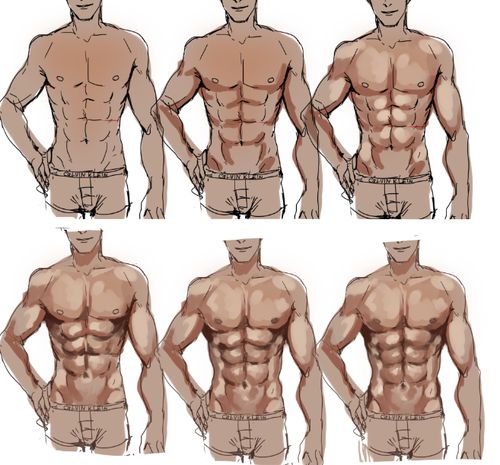
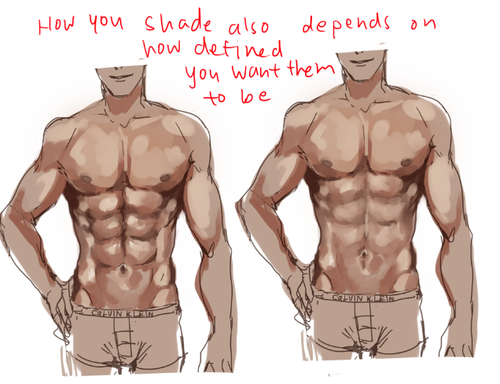
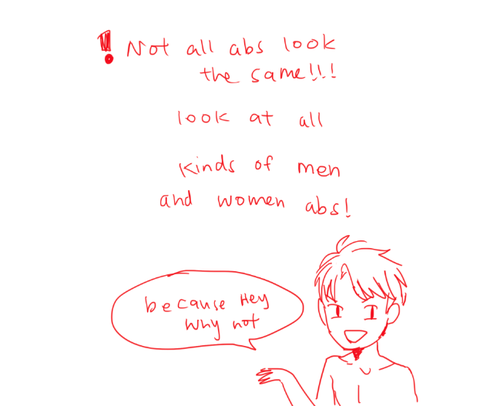
I STILL TAKE A LONG TIME TO DRAW OK looking abs HHahA SOBS AND LIES DOWN but yeah!! GO LOOK AND Some real life abs i promise you it’ll be ten times more helpful than my crude doodles!!
PLS TAKE THIS WITH A GRAIN OF ASALT AND Hope this helps u out a little!!


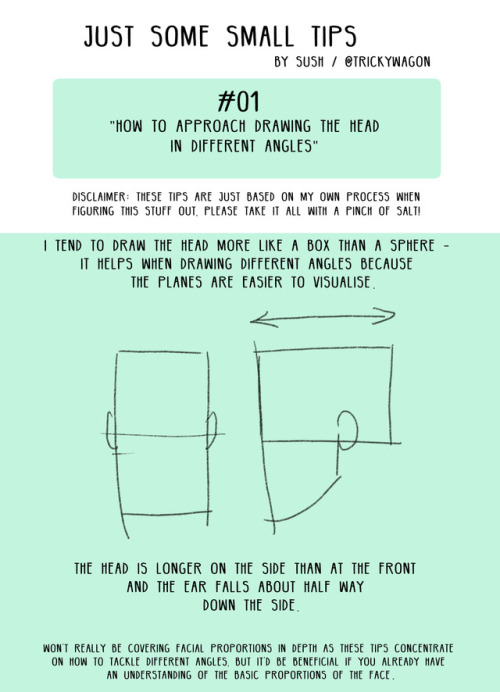
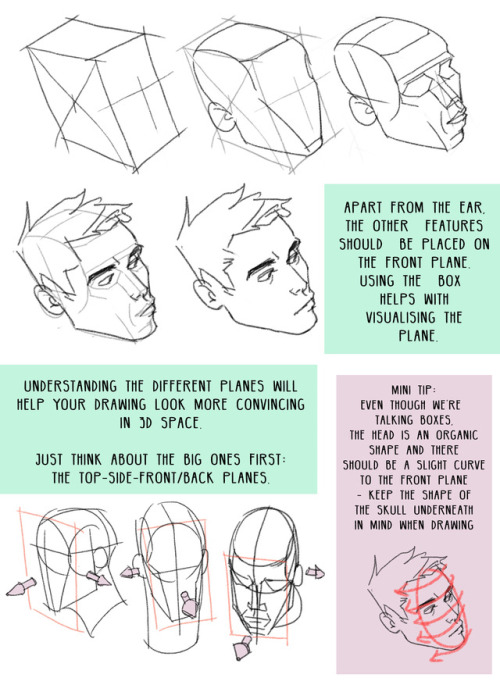
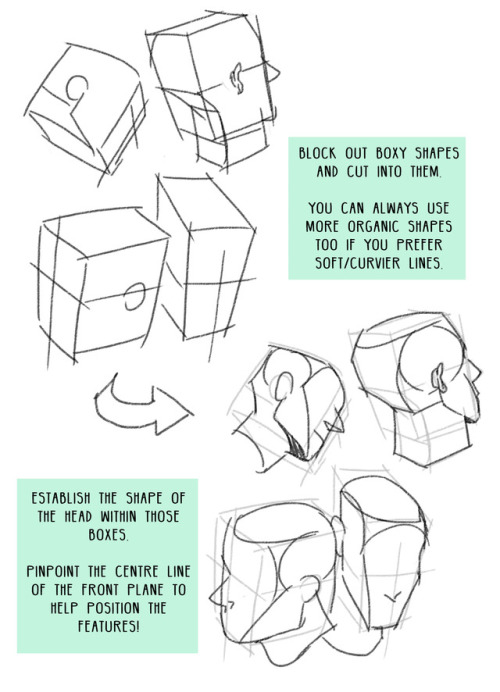
Starting a mini drawing tips series! Feel free to suggest some topics you’d like covered// Hope you find this useful!
Also on: twitter / instagram


-
 bloosrefblog reblogged this · 2 weeks ago
 -
 its-phiaa liked this · 2 weeks ago
 -
 vampmaidenslair reblogged this · 3 weeks ago
 -
vampmaidenslair liked this · 3 weeks ago
-
 pigeonbubblebuddy liked this · 3 weeks ago
 -
 sand-scarred-hour liked this · 3 weeks ago
 -
 rachelwritesstories liked this · 1 month ago
 -
 mocacheezy liked this · 1 month ago
 -
 candroidsftrek liked this · 1 month ago
 -
 pleasantlyhotgarbage liked this · 1 month ago
 -
 eluxurex liked this · 1 month ago
 -
justaladyiguess liked this · 1 month ago
-
 tintasdeluna reblogged this · 2 months ago
 -
 holyfuckthisfishcandrive liked this · 2 months ago
 -
 waywardreviewtale liked this · 2 months ago
 -
 luxicorde liked this · 2 months ago
 -
 thenoeyedgirl liked this · 2 months ago
 -
mavisthemae liked this · 2 months ago
-
 annoyingdumb liked this · 2 months ago
 -
 nichetide liked this · 2 months ago
 -
 empyratrix liked this · 2 months ago
 -
 anarchyspider liked this · 3 months ago
 -
 dawbling reblogged this · 3 months ago
 -
 maxi177 liked this · 3 months ago
 -
 addictwithadabpen reblogged this · 3 months ago
 -
 iocassandra liked this · 3 months ago
 -
 wildbeingwild reblogged this · 4 months ago
 -
wildbeingwild liked this · 4 months ago
-
 naaaaaahpls liked this · 4 months ago
 -
 dontworryaboutitbae liked this · 4 months ago
 -
 bhaalmychildren liked this · 4 months ago
 -
 nervecrawler liked this · 4 months ago
 -
 cloudydaffodil reblogged this · 4 months ago
 -
 arcaneinsomniac liked this · 4 months ago
 -
 it-is-evie-lee-darling liked this · 4 months ago
 -
 lonely-space-egg liked this · 4 months ago
 -
 rookjack liked this · 4 months ago
 -
 thirstyokapi liked this · 4 months ago
 -
 solarvirescence liked this · 4 months ago
 -
 rastoaster reblogged this · 4 months ago
 -
 rasinterestingwaffle liked this · 4 months ago
 -
 aztr0punk liked this · 4 months ago
 -
 stormbluestories reblogged this · 4 months ago
 -
 piratejenna reblogged this · 4 months ago
 -
 fictionalfan-atic reblogged this · 4 months ago
 -
 pikapokepixel reblogged this · 4 months ago
