You Don’t Suck At Lineart, You’re Just Not Familiar With Line Weight👍🏼!


You don’t suck at Lineart, you’re just not familiar with line weight👍🏼!
More Posts from Arttuti and Others
Hey just thought I'd let you know you have some of the best artwork I've ever seen! Congrats! Especially Chirrut, he's amazing in your style! I was also wondering if you had any advice on how to draw heads and eyes? They're one of my two biggest struggles and I'd love it if I could get your advice. Anything helps. Thank you and I hope you have a fantastic day!
*_* Thanks a bunch askdh and thanks for taking the time to write me! I had a lot of fun working on Chirrut ;;;
Hmmm I usually think it’s not useful to explain how I make eyes or noses, since the way to draw them changes depending on the pose… My advice would be practicing with ¾ heads. That view always force you to work volumetric shapes and also give a lot more of information. Also, I think it’s much more easy since you have more landmarks to help you.
I would also say consulting anatomy to identify the landmarks on the face (zygomatic and nasal bone , superciliary arch, mandible…) and practice on photos. Using references for drawing is not bad and drawing over photos when you need information of a face is a lot of fun. Is not necessary to draw all the bones, but knowing where the volumes and principal shapes are can help you learn. I.E:

I love that photo because it’s SO SO easy to see the volumetry of the face; just the line of the jaw gives you a lot of informacion about it. And it makes it easy to identify the elements and principal shapes of the head:

(I broke his nose, I’m sorry, but I made this quickly (??)) the point is, take your time to study the lines and understand the anatomy.Also:

that triangle is very helpful too and could help you placing the principal elements. The lines that make him look like he’s crying (?) are the relation between the eyes and the mouth and are very helpful when placing it.
Again, this is only a way to learn and understand how to build a face. That is always the key, even if you use a cartoon style. Rules can be broken, but I think it’s important to understand them first. It could help you make your style more solid.
And well, once you’ve studied it from photos, trying it on your own (even if you have references, that’s ok) and practice, practice u3u
Hope this helps and hope it’s not too technical ;;;
well I just got here and all but I'd sort of like a tutorial on how you do shading and highlights? yours is really good, and I can't really shade or anything, so if you could explain how you do that, that might be cool? no pressure of course!
It’s been forever but I did this ajshaj
Quick notes:- I use Paint Tool SAI 2- some of the tools and layer names are in Russian but it all should still be understandable I hope
So here’s a tutorial on I do my simple coloring
There’s not much to it but maybe this can help someone


disclaimer: these are all based on my body. I know there are a ton of different body shapes out there. It’s important to study all sorts of body shapes but I’ve only ever use mine as a reference.
I’ve never actually studied arms so I had to google what muscles are what while drawing this so don’t quote me on any of this. I’ll make a head tutorial later


Whoo, super long nose tutorial! I’m sure there’s heaps I didn’t mention in this but this is generally how I approach it - the main thing is to check out references and try and draw different noses, it’ll help you create more diverse characters and have fun with it without being afraid of drawing the nose (since it’s genuinely one of my favourite things to draw).
Other tutorials: X
you're really good at painting clothes so! i was wondering if its not too much to ask, if you could do some quick tips/tricks or a short tutorial!! thank u and god bless
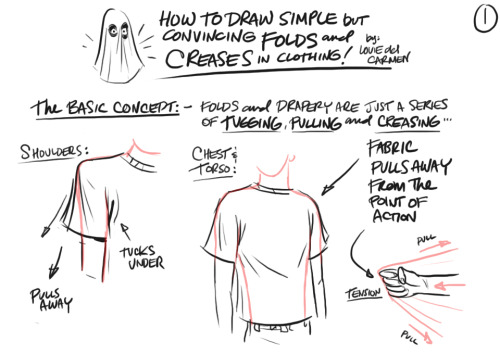
Aaah thank you! Well, first things first; learn from reference! You can google fabric reference or even just outfits and pay attention to the way the fabric swoops and curls around the form that its surrounding.

Here the fabric sweeps downwards, but comes up at a much tighter, sharper angle into his hand and bunches up within his palm. The material layers overtop of each other

This fabric is very loose and shimmery, and within the overlapping folds your shadows will be most prevalent to give it dimension of being layered.

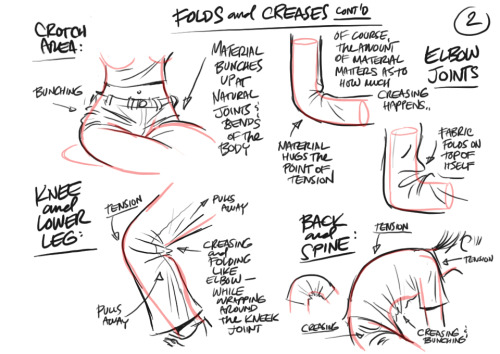
Even with skin tight fabric there will always be creased, wrinkles, and layers where the material is pushed together. It is important to capture that! Whether the fabric is tight, or very loose. The tighter, the less wrinkle typically if it is pulled taught, while looser fabric will have more swooping lines of flow and tend to be thickly “banded” with spread out areas.

here is our mannequin torso for the purpose of visualization of the render process!

I start with the basic shape of what I want my clothes to be, and then i go from there to decide which way my fabric will be sweeping

now I block in colors, I always use a middle tone of the shade i want instead of the pure shade that I’m aiming for. The shade I’m aiming for I will use as a highlight to be where my lightsource is casting

I typically merge down at this point as I prefer to paint on one layer, and i start to blend and loosely figure out the way i’m going to further express the drape of my fabric

I refine and increase my brightness and darkness according to what i feel is needed to achieve my chosen contrast

refine, blend, and adjust as you need and to your personal preference!

that is how i usually go about painting fabric


-
 uptowntwunk liked this · 1 week ago
 -
 hogsbane liked this · 1 week ago
 -
 skcirthinq reblogged this · 2 weeks ago
 -
 shadow-king-club reblogged this · 2 weeks ago
 -
shadow-king-club liked this · 2 weeks ago
-
 soupremeartressources reblogged this · 2 weeks ago
 -
 exactlyyounggladiator liked this · 2 weeks ago
 -
 likethehotsauce liked this · 3 weeks ago
 -
 tigersharktheautisticseawing reblogged this · 3 weeks ago
 -
tigersharktheautisticseawing liked this · 3 weeks ago
-
 tedret reblogged this · 3 weeks ago
 -
 lysluna liked this · 3 weeks ago
 -
 bitch-what-in-the-ass reblogged this · 3 weeks ago
 -
 softypyro liked this · 3 weeks ago
 -
 ryesmind reblogged this · 4 weeks ago
 -
 hitoriinthecorner reblogged this · 4 weeks ago
 -
hitoriinthecorner liked this · 4 weeks ago
-
 nonsensisystem reblogged this · 4 weeks ago
 -
 the-marshmallow liked this · 4 weeks ago
 -
 noxernia reblogged this · 4 weeks ago
 -
 savedartthings reblogged this · 4 weeks ago
 -
 slay123qwe liked this · 1 month ago
 -
 lambsoul liked this · 1 month ago
 -
 arcticfoxdrawsuniverse liked this · 1 month ago
 -
 c0ffee-mag3 liked this · 1 month ago
 -
 undeadbutstillhasahead liked this · 1 month ago
 -
 aeroliteghost liked this · 1 month ago
 -
 leedlee reblogged this · 1 month ago
 -
 uknowwhatelseismassive liked this · 1 month ago
 -
 lemonthecichlid liked this · 1 month ago
 -
 whistling-inthe-dark reblogged this · 1 month ago
 -
 10moonymhrivertam reblogged this · 1 month ago
 -
 fanby-fckry reblogged this · 1 month ago
 -
 pikawarrior liked this · 1 month ago
 -
 strife-and-discord reblogged this · 1 month ago
 -
 colorfulpuppychaos liked this · 1 month ago
 -
 creampiebutter liked this · 1 month ago
 -
 aperiwinklee liked this · 1 month ago
 -
 brxkenpisces liked this · 1 month ago
 -
 pap-ri-ka reblogged this · 1 month ago
 -
 monstro-abominavel liked this · 1 month ago
 -
 topainttheclouds reblogged this · 1 month ago
 -
 stiffcorpse liked this · 1 month ago
 -
 kokocactus liked this · 1 month ago
 -
 trojan-horse-plinko liked this · 1 month ago
 -
 ramiesie liked this · 1 month ago
 -
 dragon-girl-thagomizers reblogged this · 1 month ago
 -
 silenttnights reblogged this · 1 month ago
 -
 skygirl999 liked this · 1 month ago
