
269 posts
Latest Posts by arttuti - Page 7


How I study by Drawing explained in a few different techniques and what they’re most useful for.
Video Version
DeviantArt
Commission Info
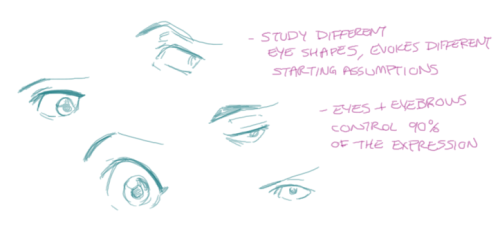

Notes on what goes into how I do expressions/faces.
I felt bad I pretty much did a “draw a circle NOW DRAW THE REST OF THE OWL” for this question so I thought to expand a bit.


sure thing! ill throw something together quick (I should really be doing my homework but screw it)

Tuesday Tips - The Mask Helps to figure out the shape of eyes in perspective by thinking of its surrounding area instead of guessing it. -Norm #tuesdaytips #100tuesdaytips #grizandnorm #themask #drawingtutorial #drawingtips #arttutorial
hi! i love your art, it's so pretty ♥ and you draw feet really well, do you have any tips?
thank you a lot anon!! ( /)w(\) here, i made a few notes about the steps i follow while drawing feet:

^ that’s assuming you’re not drawing from a low perspective, as if the camera was on the floor or something like that!


SORRY MY HANDWRITING SUCKS and i’m not really good at explaining things bc i don’t really follow a guide and stuff so yeah BUT I HOPE IT WAS HELPFUL TO YOU!!
Can you help me out with drawing feet from different perspectives? I cant even with feet, thank you!
oh dang feet are one of my weaker points so this will be brief.
first i start out with the main shape of the foot (simplify it into a wedge or triangle just to maintain proportions) note: toes are weird

and then start filling in the finer details. At this point, its up to the drawing gods to decide your fate idk just a;sldkfjAKDLFJS

*sweats* and there ya go
can you give a run down on skintones?
PART ONE: COLOR SELECTION.
In painting skin tones, a lot of the time I see people choose colors that are over-saturated or unbalanced. There isn’t really an exact art to this that I can explain—you just need to get a feel for what saturation balance you need for that particular skintone. Here are some examples of what I usually pick.

As you can see, I used different base colors (orange, reddish, yellow) for the skin shades in all three examples. The reason for this is because all skin tones have a different base color besides just Light, Medium, and dark. Some people divide them into categories of “warm” and “cool.” Pantone has some really good examples and references for this.

PART TWO: COLOR VARIATION.
Another big part about drawing and painting skin tones that a lot of people forget is how skin thickness affects color variation. The presence of bone, blood, and muscle underneath the skin affects its colors. This is especially noticeable on the face.

The colors here are a little exaggerated to show my point, but with a little adjusting and blending…

Voila! Subtle, but more realistic.
PART THREE: DETAILS.
Our skin is the largest organ on our body, and as our body’s first line of defense against the outside world, it’ll be covered with tiny details and imperfections. Things like sunburns, tans, freckles, scars, and facial hair all add character to your subject matter. Here are some examples!
TANS: Everyone tans differently, depending on your ethnicity and skin tone. Fair skinned folks tend to burn more than tan, which means you’ll need a more startling, eye-catching red.If you have a skin type that tends to tan more, the color will be more brown than red. For black skin tones, the tan is less red. (And while we’re on the subject: black people DO tan, so it’s important for you to put on sunscreen and be careful in the sun, too.)

Those are the areas that the sun tends to hit the most—and things like goggles, hats, and masks can change the shape of that area.
FRECKLES AND MOLES: Freckles are also products of the sun. Some people have freckles that stay year-round, while others have freckles that fade in the winter and return in the summer. Moles are skin cells that grow in a cluster instead of being spread throughout the skin. When exposed to the sun, they tend to darken. (Another note on skin health: if you have any oddly-shaped/colored moles, moles that have changed color, size, or shape, or anything of the sort, please check with your doctor!)
Freckles like to cluster around each other, sort of like stars, and they vary greatly in size. You can have a few freckles in one place, or a lot of freckles in multiple places. Most commonly freckled areas are your face, shoulders and neck, back, and forearms.

FACIAL HAIR: Facial hair also affects the colors of the face. For simplicity’s sake we’ll be using black hair, as it is the most noticeable. Facial hair usually grows in these areas, and can make the skin look blueish/grayish because of the darker hairs beneath the skin. If your hair is red, this also very noticeable.

END NOTE.
There you go! That’s about all I can think of at the moment for skin tones. As always, references and practice are your best friend (and so is this neat little trick that pheberoni has.) Good luck with your arting!


So I got a lot of messages after my first post asking me to explain layers, so I have put together a cheat sheet of the different layer types. The quickest way to become awesome with layers is to know exactly what each one does. Once again, I’m no expert, and these are just my personal definitions, so please try these out for yourself! LONG POST BELOWWW THE LAYERS CHEAT SHEET PART ONE: 1. NORMAL: Aw yeah you know all about this layer its just your average layer 2 DISSOLVE: This mode “dissolves” some pixels, allowing the lower layer to show through. very pixel-y. Reducing opacity makes it dissolve more. ________ 3. DARKEN: Now the difference between darken and multiply are a little confusing, so I will explain them together. MULTIPLY is more of a glaze, while DARKEN favors the darks on all layers. So if you have a darken layer on, it tend to reduce/remove the lighter tones on the layer if there are darker tones below it, while darkening the darks. 4. MULTIPLY: A glaze that darkens the color of the layer below. It is great for shading. Reduces whites. 5. COLOR BURN: “Burns” the lower layer favoring a more saturated look. Marks made over white are not preserved. 6. LINEAR BURN: “Burns” the lower layer, with a little less saturation than color Burn. Also will preserve colors over white. 7. DARKER COLOR: I tend to avoid this puppy cause it does not darken on the RGB channel. (feel free to try him though!) ______ 8. LIGHTEN: Lightens the colors below. Favors lighter colors on lower layers. 9. SCREEN: Lightens the colors below, but much closer to the “glaze” analogy as above. Reduces blacks. 10. COLOR DODGE: Often used for magic-y effects, color dodge bumps up saturation and is very bright. 11. LINEAR DODGE: Much like color dodge, but less saturation. 12. LIGHTER COLOR: Once again, this is an outside RGB channel layer, so I don’t really use this. As you probably have noticed, the second two groups are opposites, so if you have a good handle on one, you probably know exactly what the second group does! I will do the remaining groups next week as they do not follow this pattern. Thanks! drawmaevedraw.tumblr.com EDIT: Part two here: Photoshop Layers Part Two!!


Ey yo!! Kathy, do you have tips to learn to draw faster? I know artists have a unique pace but it's pretty embarrasing that it takes me a week to draw something small n simple.. I want to be a cool artist that posts at least once every 2 or 3 days ;;
as you practice drawing more, and learn more art stuff (like anatomy, composition, gestures, coloring, shading, etc), you’ll get faster since you won’t spend as much time on every single step. eventually, you’ll figure out what works and what doesn’t, and you’ll be able to use that knowledge with future drawings. tbh i’ve always been a pretty fast sketcher, but i guess something that i always do is that i keep my sketches extremely vague and loose looking, and i finalize and draw in details along the way. my final drawings sometimes change really drastically from my initial sketches, but that’s because i’m not afraid to adjust my drawings as i line more. here’s an example of my progress to give an idea of how i draw

also goals are always something you’ve just gotta work up to! everyone has their own pace with drawing, and their own pace with learning. it’s hard not to compare yourself with everyone around you, but you just gotta do you, you feel me?
im sorry to ask, but i was wondering if you may show us how to draw abs please?
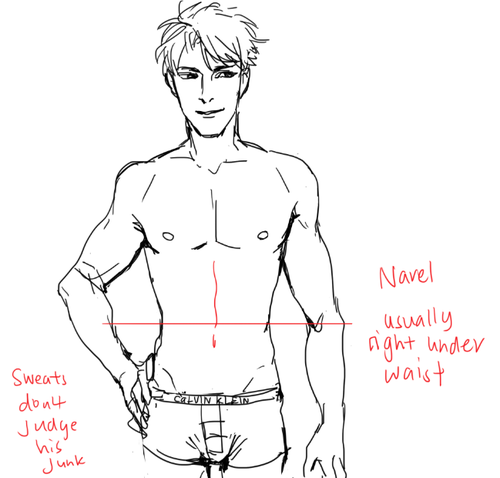
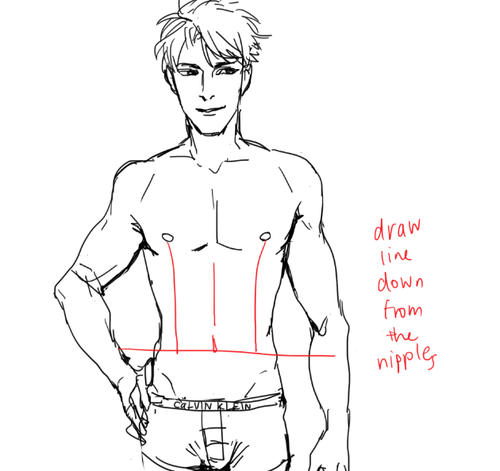
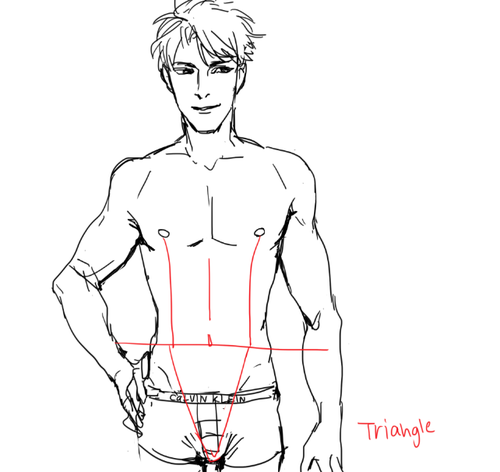
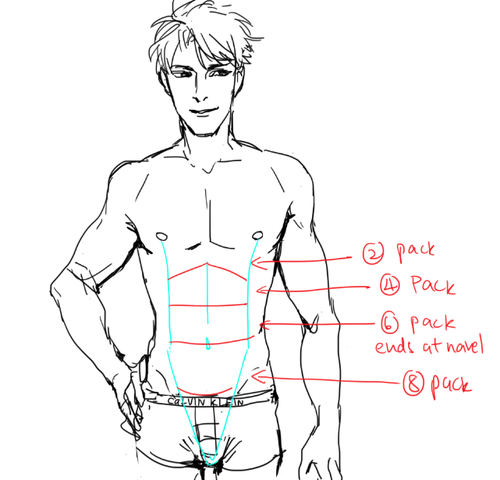
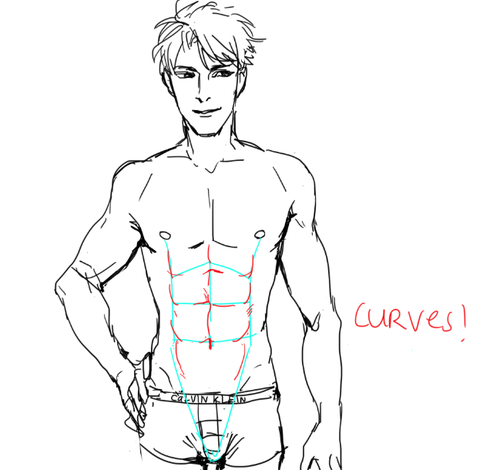
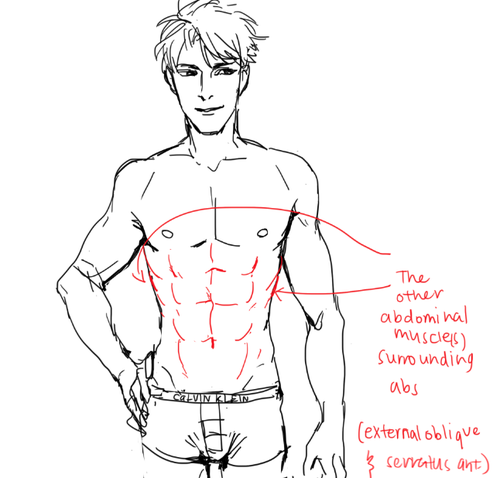

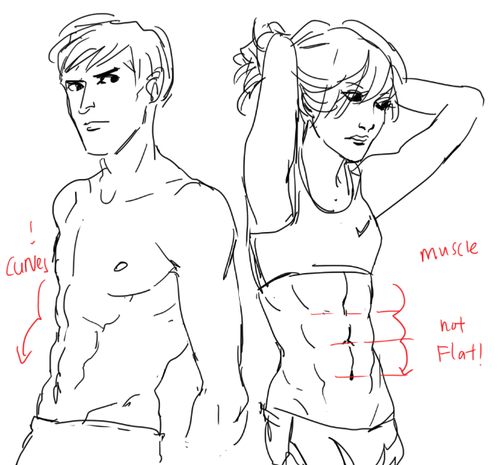
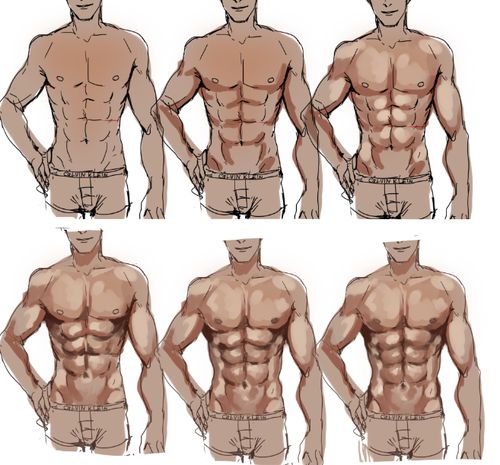
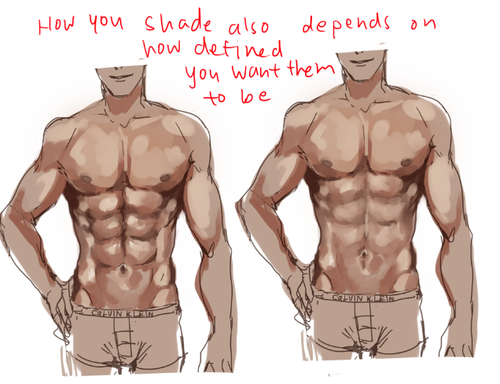
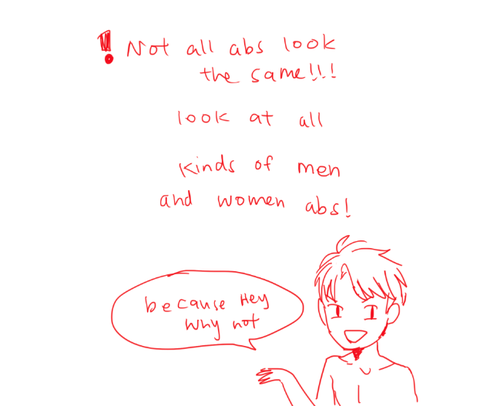
I STILL TAKE A LONG TIME TO DRAW OK looking abs HHahA SOBS AND LIES DOWN but yeah!! GO LOOK AND Some real life abs i promise you it’ll be ten times more helpful than my crude doodles!!
PLS TAKE THIS WITH A GRAIN OF ASALT AND Hope this helps u out a little!!
![Robot(?) Leggings By Balenciaga. [Source]](https://64.media.tumblr.com/866ad6086243511f29ed053237711273/tumblr_mmzhe7J65h1rjgurvo1_540.jpg)
![Robot(?) Leggings By Balenciaga. [Source]](https://64.media.tumblr.com/98eca19ecc18c7cb3107797e67e17287/tumblr_mmzhe7J65h1rjgurvo5_540.jpg)
![Robot(?) Leggings By Balenciaga. [Source]](https://64.media.tumblr.com/6e1921bac17e73c7639905d8e00624bd/tumblr_mmzhe7J65h1rjgurvo3_500.jpg)
![Robot(?) Leggings By Balenciaga. [Source]](https://64.media.tumblr.com/831e8cd52fa1b1f7d901b3ec873e5394/tumblr_mmzhe7J65h1rjgurvo4_500.jpg)
Hi! Idk if my qn got sent before (tumblr mobile yeesh) I wanted to say i really really love your blog and art style! I was wondering if you have tips to draw Dean's and Cas's hair??
REALLY LATE REPLY BUT UM Dean’s got a hair parting on either side but his hair kinda all comes out from a spot on the back of his head. Keep the sides short but flip up the hair in the front

And here’s Cas again! Recapping: part on one side and have the hair come out from the parting and flip up in front as well. He’s got a longer fringe than Dean’s

Hi. :3 I love your art and you're totally awesome! I just had a quick question. I saw your post about hair tips on Dean and Cas, and I was wondering if you had one for Sam. Thank you, it means a lot. ^.^
Sure no problem! Just part it slightly to the right and have the hair flow down from that line. Don’t forget his killer sideburns lol

do you by any chance have any art tips for how to connect arms/legs to the torso? It's something I've never seemed to be able to grasp and whenever I try it it looks a little forced and the movement doesn't flow and my art turns out a bit repetitive when it's just a bunch of head shots haha
It’s probably best to study a bit of anatomy! For arms at the very least you should be aware of the deltoid and pecs which will move with the arm

Leg muscles go all the way up to your pelvis and there’s a good number of them so it’s easier to group everything into sections. The section between the torso and thigh I guess kinda connect the two together from an artistic standpoint. Basically a GIANT COMMA starting from yer butt and wrapping around to your groin haha. When you move your leg you’ll likely see a crease following that shape

Hope that helps!!
wow, I've just discovered your art and just have to say - where has it been all my life? It's perfect and you imbue so much personality into your figures. I wondered whether you have any tips or tutorials on how you draw eyes as they always vex me. I can never get them right :/ thank you!!
Thanks very much!! Eyes are pretty much just spheres sitting in sockets with 2 strips of skin draped on it. I can’t draw a circle to save my life but I hope this helps lol

Hey there! Your Dean, Cas, Sam hair tutorials were extremely helpful; thank you! If it isn't too much trouble, do you mind making a similar tutorial for their face structures and eyes? Thanks!
No problem!! For eyes Dean’s is sort of a rounded parallelogram, Cas’ is more angled/droopy and Sam’s is pretty almond shaped. If you keep these shapes in mind you can stylize their eyes while still keeping it recognizable.

For facial structures, generally Dean has more rounded features, Cas’ is more square and Sam’s is more angular/sharp.
Dean’s face is pretty standard, the kind you’ll see in art book examples and stuff haha. I think one thing to look out for is the dip under his bottom lip in profile view. And his forehead’s a bit slanted too!

Cas’ face appears wider/blockier and from the side it’s pretty much just a straight line down. His nose is pretty sharp though

Sam’s got a stronger jaw and his cheeks are more hollow. From the side you can see he’s got a pretty prominent brow and sharp nose on an otherwise flat plane.

Hope this helps!
So I have found your tutorials super helpful, would you mind doing one on how to balance the proportions of the back of the head/ear/jaw area?
ITS REALLY EASY

Back of head follows the circle, jaw lines up with the centerline, and ear is in the bottom right quadrant in between the brow and nose
should i be trying to master like each feature before i try drawing a face? like should i be able to draw eyes really well, then move to the nose, mouth etc? i dont know when i should be moving on to the next step. right now, mouths are a frustrating thing but i also try to draw the whole face because proportions practice, so its all very over whelming and then i get discouraged cause drawing lips is so hard and putting everything to make a face is hard ;-;
I think if you’re having trouble with a feature you should definitely do some studies of it! I practiced the face all at once so I don’t really think there are any rules to this haha. The downside to trying to master one feature at a time is, like you said, not being sure when to move on. You might end up drawing amazing eyes but the rest of the face will always be a little off because you haven’t put enough time into studying the other features. I’m sure you’ve also come across artists who draw nice heads and it all falls apart when they try to draw a fullbody. Personally I’d just tackle the face all at once, take time to study the separate features but try not to neglect any of them and don’t think you can’t draw a face because you aren’t a master of a particular feature! You can do it * V * Here are some quick notes on lips, I hope they help a little.

Hello, big fan. I've been attempting to improve my art and and your tutorials are a big help. I might've missed it if you've done one but could you maybe do one specifically on noses?
Noses are pretty easy if you just break it down into planes! I think they’re a little easier to understand if you know how they work in relation to the eye sockets.

That’s preeeetty much it haha. Hope it helps!
hey i was wondering how you draw female faces? drawing guys im like hell yeah, but ladies im like hell neh. would you be able to give an example with rey?
Ahhh I’m not the best person to ask for drawing females but um I think generally you just have to be a little more careful with your marks. Everything should be a little softer, more curves, etc. Rey’s a little difficult bc she has a pretty boxy/angular face but her facial features are more delicate.

Of course these are just suggestions and stuff I noticed and not set rules ;;;; but I hope it helps a bit!!
Hi Fer! I simply love your blog and tutorials so much, but I was wondering on how you draw masculine bodies? My drawings have been female and slender men, and when I try... it just doesn't look right. So any tips can be really helpful because I want to try and draw different body shapes. Thank you so much! <3
easiest thing is probably to widen the shoulders and up the muscle mass! it really helps to study anatomy so you know which areas to exaggerate. a more muscular/masculine person will have a more defined sternocleidomastoid (in blue) and bigger traps (green); basically a thicker neck. playing with the shoulder to hip ratio will help as well. i guess if you want a super manly man just make him look like a dorito


Stumbled across your art recently, and I totally admire your work! As a complete noob to the digital art scene, I'd just like to ask whether you have any tips on colour picking (like for skin tones, under varied/dramatic lighting and such!). I have a ton of other things I want to ask, but I'll limit myself to one question and then try to google the rest, haha/ Thanks for sharing your art with us! ^^
ahh thank you so much! ♥ welcome to the digial art scene friend, i hope you enjoy your stay and ctrl + z
now onto your question! (if you don’t know what layer and layer modes are and how they generally work you should probably google that before you continue reading)
we all perceive colour differently (thx science) and i trust my intuition a lot when it comes to colour picking because of that, and also because i feel like you can make pretty much every colour combination work within the right context. context is key! but still, remember that all of this is about how i perceive colour, so you might not agree with everything i say.

here’s a quick rundown of terms you’ll see around a lot in reference to colours and shading: the hue, which is the ‘colour’ itself, the saturation aka the intensity, and the brightness [or value] which describes how dark or bright we perceive a colour to be.
rule of thumb: when you shade don’t just add black (or white) to your base colours, that will make your drawings boring and lifeless. use different hues and saturation!
now first things first: which skin colour does the character have?

you’ll mostly be navigating in the red to yellow spectrum for the skin tone. so when i pick the base colours i usually start with the skin and adjust the rest of the colours accordingly. if you’re not sure where to begin it might help if you first determine the values (brightness) of the base colours in grayscale.
and here are a few colour variations—i stuck to the approximate values but played around with a lot of different hues and levels of saturation.
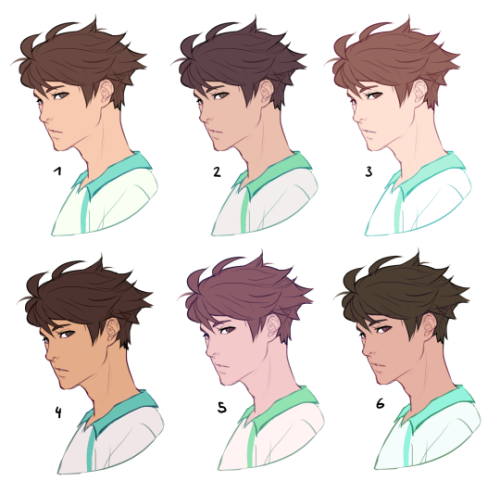
now compare 3 and 5: you’ll notice that 3 is very bright and leans towards orange hues, whereas 5 has a pinkish tint.

on the left i gave 5 the hair colour of 3 and in my opinion the pink hue of the skin doesn’t go well with the orange undertone of the hair. you’ll have to experiment a lot to find out which combinations work for you.
ctrl + u is your biggest friend (or image >> adjustments >> hue/saturation in photoshop, the shortcut works in sai and clip studio paint too). play with the sliders and see what happens. i do that a lot myself, because it’s easier to coordinate the colours like that afterwards instead of trying to manually pick perfectly matching ones right away.
for further adjustments i like to use an extra semi-transparent layer on top of everything with just a single colour to add atmospheric light. this unifies the colours and makes them more harmonious, if that’s what you’re looking for. this is about as far as i’d go if i didn’t want to shade the drawing.

if i do want to shade, especially with high contrasts and dramatic light, i darken the base by just adding an additional black layer, here set to 40% opacity. of course you could add a colour layer like the ones i mentioned previously too.


to create an impression of dramatic light you need a high contrast between light and dark areas (1). if i want additional visual intrest i often add secondary light which falls onto the main shadow areas. here i picked a faint greenish blue to balance out the yellow (2). and since light is at least partially reflected when it hits a surface you should add a faint glow that goes across the shadow/light border. i uses a mid-brown with a very soft brush on a layer set to overlay here (3).
for this shading style i like to use the layer mode colour dodge with lowered opacity + fill settings. for some layer modes opacity and fill do the exact same thing (e.g. for multiply or screen). however for colour dodge there’s a big difference:

a lowered opacity merely alters the transparency of the entire layer. that looks pretty awful sometimes, because the bright orange affects the dark of the hair much more intensely than the already brighter skin. but when you lower the fill percentage you primarily lower the amount of light that falls onto darker colours. so the layer’s opacity setting treats every colour equally whereas the fill setting takes their values into consideration. it might be hard to understand if you don’t try it out yourself, so just play around to get a feel for how it works!
and to summarise, here’s a process gif:

colour is an extremely big topic and i’ve only barely scratched the surface but i hope that still helped you out a little! the fastest way to learn is always to try things yourself, so grab a sketch and experiment. 👍
Do you have like, a coloring/lighting tutorial? I'm new to digital art and your latest lighting exercise looks.... so good???


How to show expression with the mouth!
This was a request and at first I wasn’t sure if I had anything to provide with, but as it turn out it got a little longer than I expected because there were actually things I had to say!! Wow!!
Anyway, this is some guidelines I follow when I try to make the face expressfull, more specifically the mouth! It is often neglected, since it’s actually pretty hard, I’ll admit. But I’m here to help (hopefully…)! A mouth expression tutorial as per request. Enjoy and hopefully it will help some a little. ʕ•ᴥ•ʔ
Draw the teeth at the right angle.
This is super important. The upper jaw follows the angle of the head, and the lower jaw will depend on how open it is. Make sure you have a rough estimate of where the teeth are, and how much of them you’re going to see!
The lips will VERY roughly follow the same angle as the teeth. It really depends on the character, but it gives you a sense at least.

If you DON’T do this, you’re going to lose so much volume and the mouth is going to end up looking unrelatable. I showed this example in this tutorial:

It’s not just the lips!
The cheeks, chin, and tongue play a role too!

Try look at your own mouth or references! I have a very pliable and large mouth, so that’s one reason why my characters have it too lmao.
ASYMMETRYYYYY (ง ͠° ͟ل͜ ͡°)ง
I cannot emphasize how important asymmetry is when drawing expressions. It applies not only to the eyebrows to achieve the Dreamwork Face™, but also the mouth. Seriously if you draw a symmetric mouth I will deliver myself to your mailbox and then shout at you until you fix it.
Look at the difference between these two for example: which one has more “life”?

I think you get the idea.
Push and squish - give it flow
Here’s an old drawing I have but it illustrates how I think when I squish the mouth, and use folding and wrinkles to my advantage.

Look at your own face and see where skin bundles up, where it creases the most and when bumps appear on your chin. Subtle details makes all the difference!
One VERY effective detail is illustrated in the first sketch, where I pull upwards on one side, and downwards on the other. That’s a good detail to use when the character is making a skewed expression, or is extremely frustrated. I encourage you to play around with that concept bc it’s ~super effective~!
EXAMPLES:
Happy: Your entire mouth is pushed upwards, not just the corners of your mouth!

I tend to draw a :3 mouth bc I’ve been drawing Lance too much….. You don’t have to but it’s basically imprinted in my motor memory by now.
Pouting/frowning: corners are pushed down, middle pushed slightly up. Sometimes, there’s a slight dip in the middle too. It can give a sense that the character is biting their lips.

Showing frustration/intimidating/is intimidated: basically showing a lot of teeth. The corners are as open as possible and the middle sorta more squished. An extremely important detail here is showing some of the gums, and open space between the cheeks and teeth. That way it looks like the mouth it open to it’s full potential. Here is also where you basically MUST add folds and bumps, or else it’s not going to look relatable.

(Here I am again with the pulling upwards on one side and downwards on the other, as illustrated on the last sketch)
And then again, here’s just another doodle showing how important it is to show the gums. It’s the same face twice, but the second one looks slightly more frustrated doesn’t it?

(from my other tutorial on how to draw facial expressions)
As you can see, this last one is very versatile and I draw it a lot. Play around with the basic shape and see how much subtle details makes a lot of difference!
That’s it!
I hope that cleared some things up and was somewhat helpful! Enjoy drawing ✨