
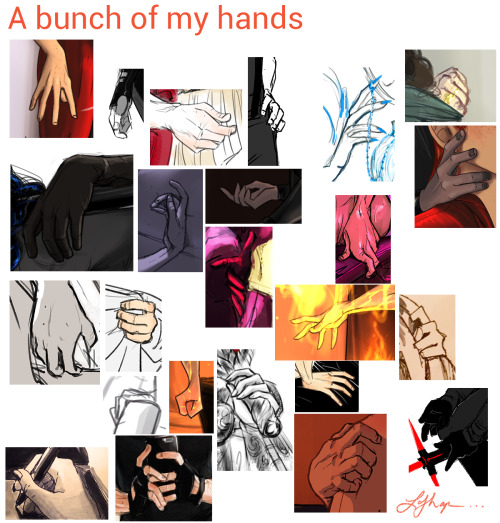
269 posts
Latest Posts by arttuti - Page 8
apparently ppl don’t know about waifu2x??? despite its… concerning name it’s literally the most convenient website i’ve ever come across as an artist
it allows you to resize artwork without it becoming pixellated. this is a MASSIVE help if you, for example, make lineart too small or something. it works best with things that 1. have no textures 2. have smooth lines 3. have cel shading, but it still works really damn well for things that don’t fit that profile
here’s an example:

normal size

2x in paint

2x in waifu2x
so like, there’s that. go wild

I’m sure someone’s already figured this out, but when this came to me yesterday night I was shook okay

First tutorial posted up for Patreon Supporters is now available for everyone! Please read the tutorial carefully. If you have a question that is not in the tutorial I’ll be happy to answer it. Want me to make more tutorials and even video walkthroughs? Support me on Patreon!
Deviantart || Twitter || Webcomic || Commissions


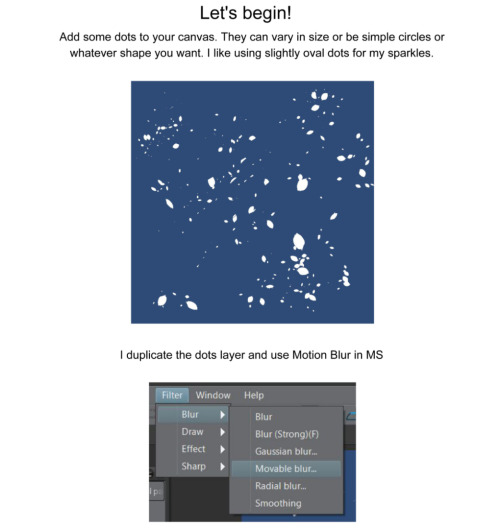
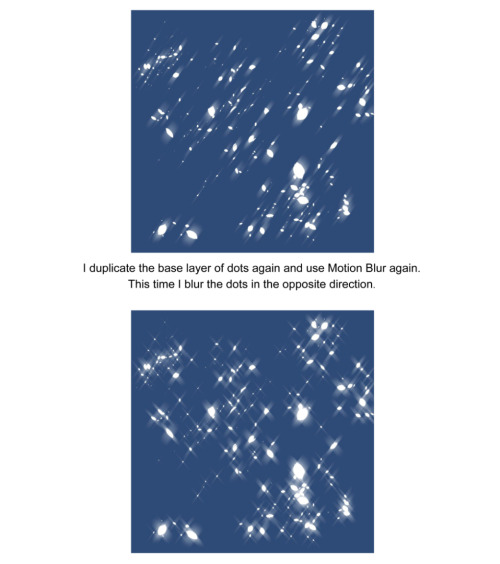
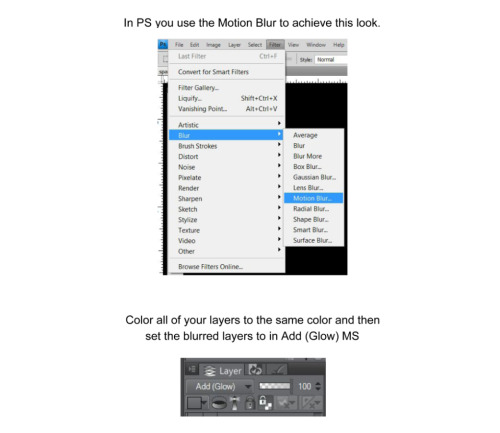
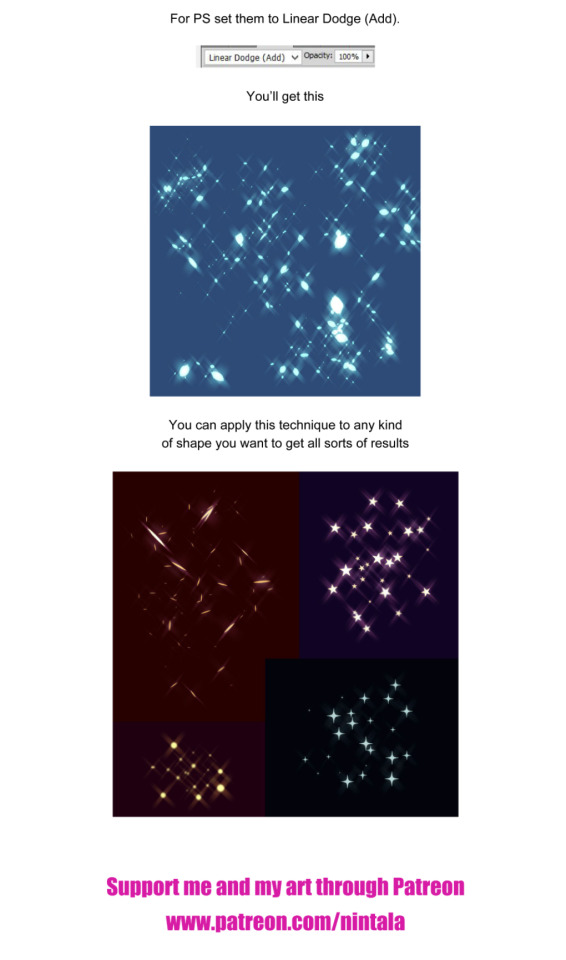
Hello there, just wanted to share some wisdom as I was recently asked how I do some of my effects in Manga Studio.
This is not a set-in-stone technique, nor is there a right or wrong way to make stylized smoke. Just passing on what I know!
How to other eye
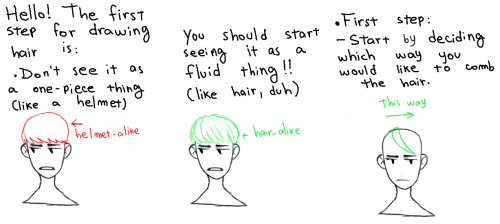
ALRIGHT, so, I know a lot of people have trouble making eyes match. Yesterday I found out a way to make it significantly easier! Here’s a small guide.

Well, first of all, you have your face. mark where the eyes should be on it.

Then mark the corners of the eyes and go over the middle again, to make the next step easier

Alright, I know it sounds a bit crazy, but draw this shape, trying to make it as symmetrical as you can.

Draw the eyes using that shape as a guide and TA-DA! They match! For different eye shapes you tweak the angle of the two guide lines.

And it also helps with angles where the size and shape of the eye is distorted, you just put it in perspective.

I think the theory behind it is that the thing that makes it hard to make the eyes match is the angle of the corners, and this type of guideline helps make them even, which makes the eyes look symmetrical. Welp, here it is! I hope it helps someone!
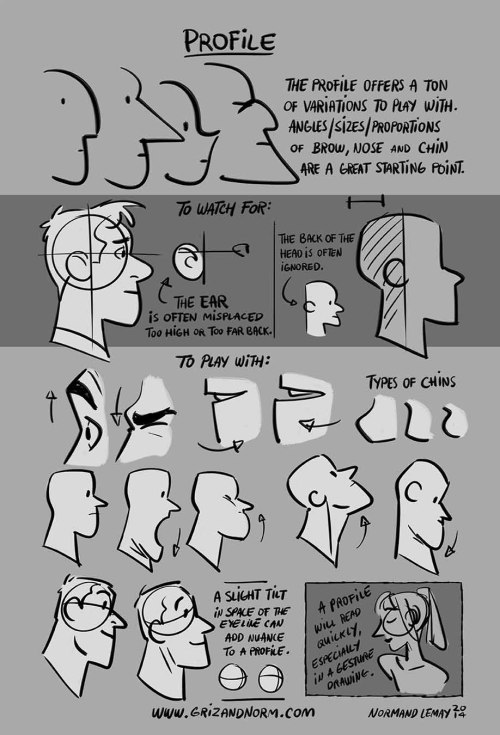
Tuesday Tips - The Face Profile Something I use all the time when I storyboard. The profile is simple, direct, and conveys a lot of information about a character. A great deal of facial features are easier to define in a profile, such as the nose and mouth shapes. Use it to your advantage! It’s really useful when thumbnailing or doing gesture drawing. -Norm


(If you haven't answered this before) how do you do shading?
i havent !! and. i cant say this is gonna be any help but heres some of the things i try to keep in mind when im shading stuff

so youve got your flats on your initial drawing, the thing thats getting the business

then youve got find out where the light is coming from ! your light source is gonna determine where all the highlights and shadows are cast, and while it doesnt have to be EXACT, its generally a good rule to keep it pretty consistent through the drawing - sometimes youll probably have to deal with multiple sources, and each ones gonna be casting its own light and shadow ( and color by extension )

the intensity and sharpness of your shadows generally also reflects the brightness or closeness of the light ! basically if you wanna make something look BRIGHT, you gotta make sure the shadows are dark enough to get the idea across

so the actual shading part - the way i shade is by getting a brush on a very low opacity, picking the color i want for shadows and then layering the strokes over and over until i get about the darkness i want ( because im LAZY and i dont actually work with complex backgrounds a bunch, i can usually get away with drawing the shadows directly on the locked flat colors layer so theres nothing to clean up after )

afterwards i clean it up a little if i need to, add highlights while keeping in mind where the light is coming from, and start on the Detail Work ( it also might be helpful to keep in mind that highlights dont always go on the EDGE of things, but rather where the curve of something is - where the light would catch. this can help add a little depth and make flat things look rounded out ! )

and THEN its basically me zooming into the drawing at least 200%, putting another layer over the top of everything, and going over the outlines with a tiny brush so the harsh black is mostly gone ! there shouldnt be anything along the edge thats darker than the darkest part of the shadow ( with exceptions like the eyes and nostrils )
and thats mostly it ! i picked red for the shadow color, but picking your shading ( and flats ! ) based on the colors in your background can go a LONG way into making it seem like your character is actually in the environment

reflective light is also an important thing to keep in mind when choosing shadows and highlights - light and color doesnt always just hit an object and stay there, and even in the shade there could be light bouncing back from stuff like water or grass creating smaller, subtle highlights along the edges of things close by
not everything reflects the same way either ! something like a piece of wood is going to react differently than say, a metal ball

so you get your light source, basic highlights and shadows, not bad ! but then theres ALSO the light reflecting from the rest of the environment along the edge of the ball, and then finally the color from both the dragon and the ball reflecting a bit on each other
honestly though these arent RULES of drawing and more just guidelines i work with sometimes, and maybe your style of shading and highlighting looks completely different than this and thats ok !! - im still figuring a bunch of stuff out about light and reflections myself, and the great thing about art is that you can do whatever the hell you want with it

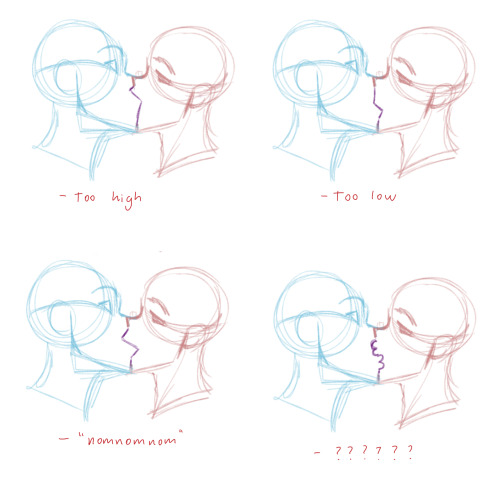
How I draw kisses!
A quick tutorial/cheat sheet on how I draw kisses!! I’m going to assume you already know how to draw a head and how to angle it, because that’s an entire procedure in itself. I’m going to focus on mainly the lips and also try and tackle some common mistakes when you’re first starting out.
Pursing the lips

So this is boring but crucial. If you don’t purse, their is no real kiss (take notes) bc placing your lips on top of someone else’s is not how you kiss… The most important part are the corners of the mouth, especially from the side view, because that’s what changes the most.
The actual kissing yeee
Let’s start do a basic side view kiss on the lips. And believe it or not, I think this one is the hardest!

Think about which parts of the face are going to be in front of the other! This can take some time to get the hang of, but once you get that down it’s easy. Also, focus on getting the heads at the right distance and angle. A common mistake is drawing them too close.
The Lightning Shape:

Still keeping in mind which part of the line is “Red’s” upper lip and which part is “Blue’s” lower lip, play around with the shape of the lightning. Very subtle changes can have a very strong impact! I usually go by feel, so take your time, but here are some things to look out for:
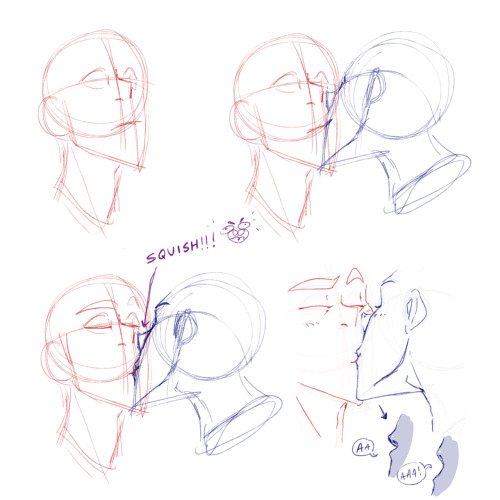
Details squishing etc.
So yeah once the lightning shape looks good, I usually add details and squish parts of the face that will touch. Which usually includes the noses, but from this angle they won’t squish unless you intend on making nice big noses <3. By now it should look something like this:

You don’t have to add the corners of the mouth! I usually do when I want to show that the character is smiling.
One technique used a lot in anime/manga + other cartoony art styles, is fading lines where two soft-ish objects press hard against each other. The picture above explains it.
Common mistakes
Getting down the crucial kissing part of fanart is hard and you will mess upp SO MANY TIIIIIIMES, but you learn from your mistakes, so don’t be discouraged. There are some things though that I frequently see when people draw kisses that makes it look awkward and stale, many of which I used to do myself. Here are some examples:
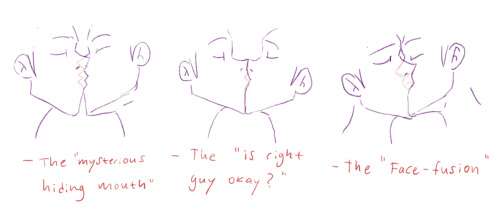
Try your best to avoid these. Most of the mistakes have little to do with the lips and more to do with the angle of the head. So getting that down before you move on to the lips is important.
¾ view Kissing
There are not a lot of angles where you actually see the lips meet (or at least not that I can draw…). Depending on how the heads are placed in relation to each other, you may or may not see the lips in a ¾ view. The way I have demonstrated is done in a way that the nose will bump into the other’s upper cheek.
Aaand that’s about it! These things will make more and more sense the more you draw them. At first it can seem very hard with so many things to keep track of, and it is, but practice makes perfect!
Rule of thumb: does the angle and position of the heads make sense? How are the lips going to align? What parts of the face are going to be in front of the other? How much will the lips purse? And finally, what is going to squish?
Thank you for reading! 😘

(☞゚∀゚)☞ now draw kisses


Here is the super fast/easy color tip I use pretty often.
Its a nice way to color doodles or coloring webcomics!
Hope this helps~
Tutorial for drawing eyes
Okay so I followed this video about foreshortening and…


Sycra. I love you so much for making this video.


Step-by-step by Joana Neves
Due to popular demand, I am sharing a step-by-step on how I render faces (though in this case I rendered a whole bust, with a focus on the face). I don’t believe this qualifies as a tutorial, but hopefully it will allow you to roughly understand how I draw and render things, and maybe help you a little bit. Remember that everyone has a different way to work, and what works for me may not work for you and that’s exactly why I wouldn’t call this a tutorial.
I am thinking of doing a similar one for faces with makeup, but I can’t tell exactly when. Anyway, if anyone is interested in that, I will be glad to know! Share your thoughts with me.
I hope you like this and as usual, thank you for the support!
hi! umm pls pls PLS if you have the time, do a thingy on arms when you get the chance, they are so hard i could almost cry aslkdjaskjsas, i keep forgetting how many curves an arm should have/how long it should be (in diff positions/when it's not resting at the hips) etc etc etc ahhh omg please!! thank you sosososo much, i l♡ve all of your art and i hope you have a nice day!! ✧ ㅠㅠ ✧


I don’t want to go into detail in terms of muscles, but I’m sure you can find them if you google arm muscles! Hope this helps u out a little!


MY FROND asked me how i draw shoes and then i got really into it and drew a whole bunch of SHOES HAHAH I hope this helps someone
DON”T worry about getting the shape perfect at first bc you can always edit it later!! ALso this is just my really quick way of drawing shoes IT PROBABLY ISN”T EVEN RIGHT SOMETIMES LIEs down


Have a great big ol’ sheet of kissing references!
Support me by reblogging and checking out my commission info here!


I got multiple people asking for help with eyes, so I threw something together quick
EDIT: ah yeah, my bad! thank you @yipyo20


Starting a mini drawing tips series! Feel free to suggest some topics you’d like covered// Hope you find this useful!
Also on: twitter / instagram


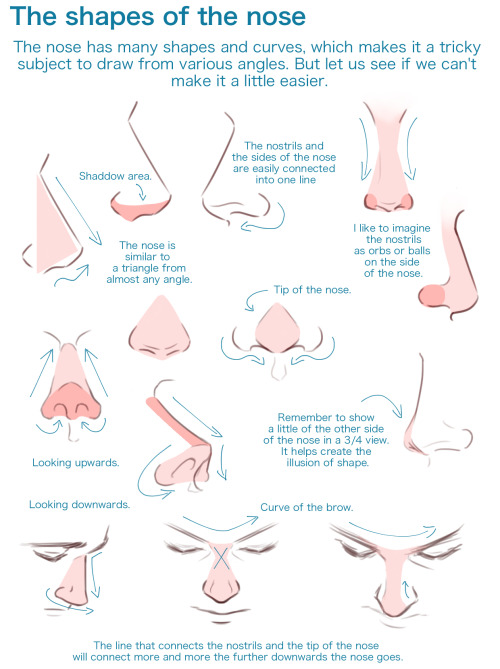
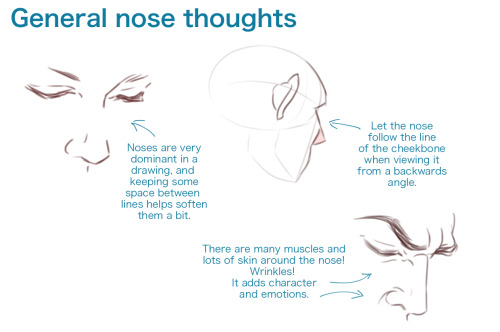
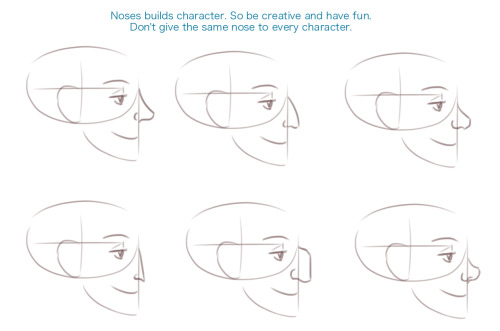
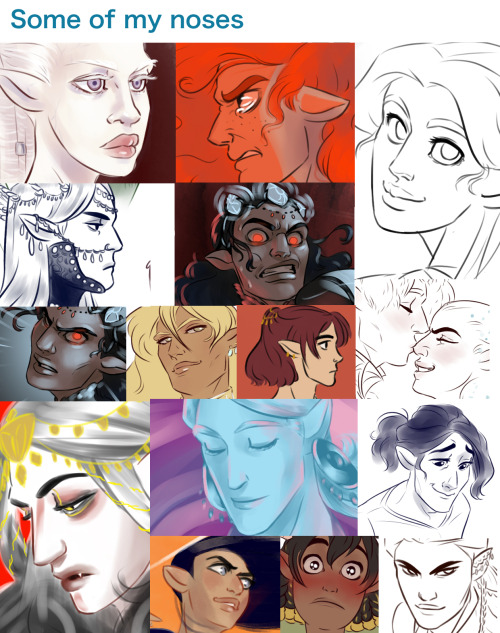
Whoo, super long nose tutorial! I’m sure there’s heaps I didn’t mention in this but this is generally how I approach it - the main thing is to check out references and try and draw different noses, it’ll help you create more diverse characters and have fun with it without being afraid of drawing the nose (since it’s genuinely one of my favourite things to draw).
Other tutorials: X


I realise that this is the shittiest tutorial in the world, but I hope it makes sense at least. I mean my coloring is pretty crappy to begin with, so it’s not such a complicated prossess as just a repetitive one.
But I hope it’s at least helpful to someone ^^ Feel free to ask me questions if you’ve got ‘em.


