269 posts
Latest Posts by arttuti - Page 5
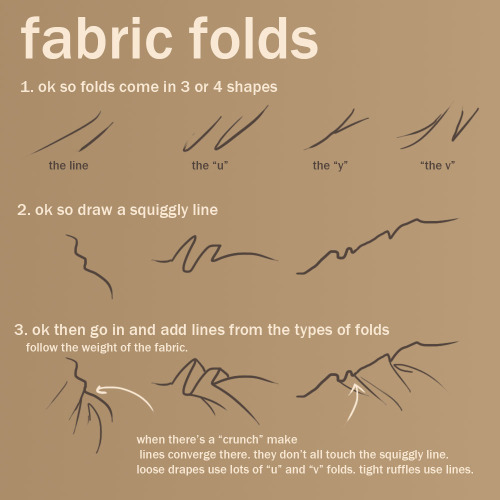
I know I asked this before but honestly i’m desperate, how do you draw folds? I understand pressure points and everything but I still can’t draw them. T^T
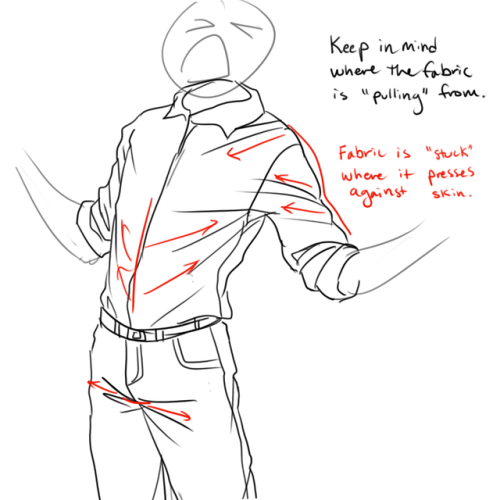
ACK! So sorry! Anyway. Tbh it’s a bit hard? But not to the point where you’ll get super frustrated. That’s why I didn’t emphasize this. Also it’s hard to explain but here are the rules I gathered:
- Remember direction. Observe real clothes and understand the type of objects that will push or pull the cloth.

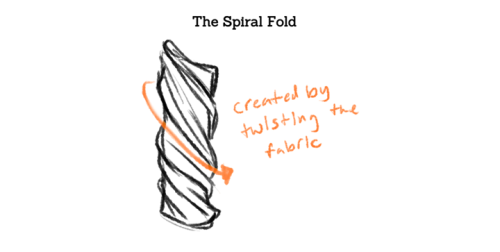
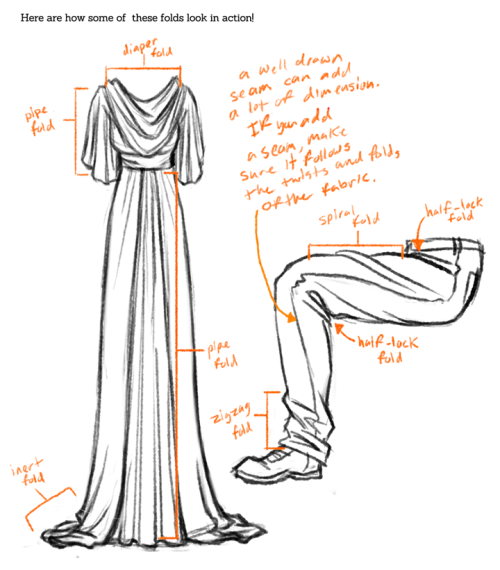
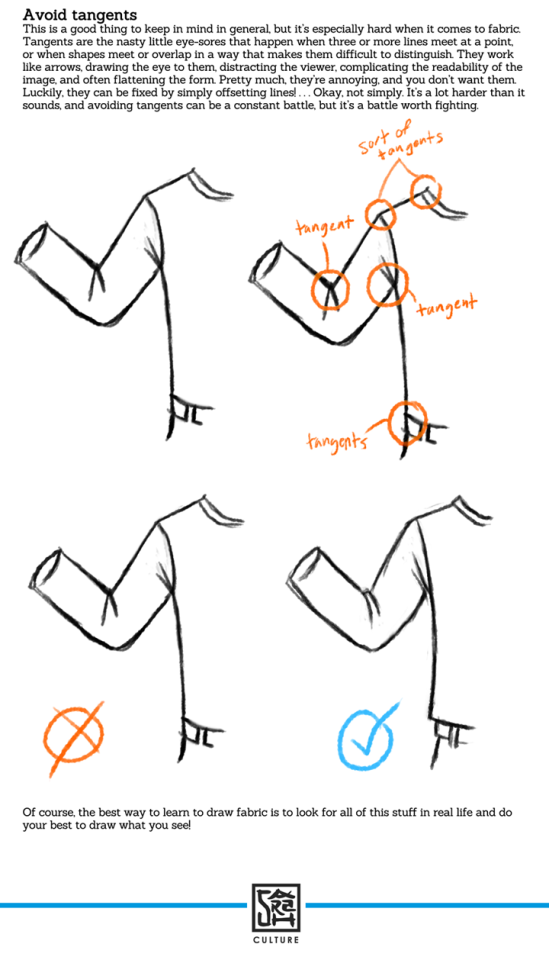
- practice on random lines/ziggy zags and make them the fabric. After you make random shapes or lines, give them the folds. Limit the folds! Large fabric and small objects, MORE folds. Small fabric and large objects, LESS folds. Equal, only NECESSARY folds.

- The type of the fabric will always also limit your drawing of folds.

- KNOW YOUR OBJECTS. BE PATIENT. Don’t just copy references of folds all the time. Try to understand the objects first that will affect the clothe and make folds. So in any angle you’ll make folds you don’t need to worry. But do lots of observing. There’s so much pictures in Google that’s easier to determine folds. Good luck!
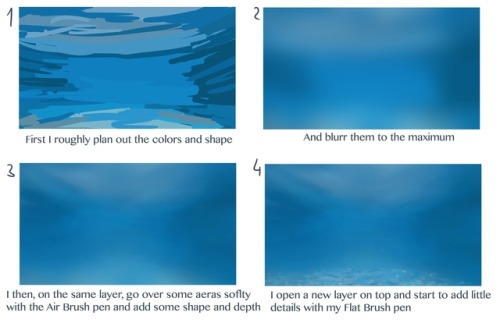


THANK YOU!! <3 I’m always very bad in explaining what I’m doing. Cause there is just a lot of trying and painting over it and mashing and mixing colors until I feel it’s good. So I tried to show you. I hope this helps!
Hands
As I do with most things, I draw hands from a series of gesture strokes that insinuate the pose and shape I want. Something I personally find very appealing about hands are all the joints, bends, and crooked bits so I start with those and build the rounder, meaty bits from there.

In the first two steps here if you just look at the individual strokes I’ve drawn, you can see they’re just some curves, really, that sketch out the shape of the hand, and I’m focusing on the joints and knuckles. (The fingertips in the second one are actually rly unnecessary and ugly to me haha – that’s usually the kind of thing I’d just throw down in step 3.)
And again below, just starting w/ some curves and squigglies to show the joints and knuckles:


These hands are by no means realistic or fully proportional but drawing’s supposed to be fun and these are really fun! I’m like, really not about that whole “draw a box and then the little tubes and those are the fingers” thing. It’s too technical and so much life gets lost when you sketch that way. Maybe it’s helpful for a pose you’re uncertain about but then just look at a photo or your own hand to see how things work, y’know?
Something else I’m really about is using shading and line to emphasize the bends and stuff even after I’ve got the hand down:

The first image here you can tell the fingers are bent, but they also look lumpy imo. To stylize further, I add some thin lines for the joints and fingernails, and then shade for some extra depth + to pronounce the foreshortening etc. (Fingers are so ugly from this angle! But we gotta draw them like this sometimes…)
Some examples where these extra lines assist in conveying the shape:

And shading:

(Bottom right is the same pose as a previous example which I didn’t realize till now sorry haha)
Some general tips:
- Use asymmetry!!! When the joints don’t line up exactly right, or you’ve drawn two hands doing the same thing but idk one’s curled a little bit more or the right pinky sticks out but the left doesn’t – these little touches make the drawing more dynamic, even if the general pose/concept is flat.
- Thumbs are really cool? They’re like trapezoidal. The same tapering thing kinda happens where the hand meets the wrist. A hand is like a big thumb
- Two things that a lot of beginner artists get wrong: which side the thumb is on (…always double-check…I still double-check sometimes too), and drawing the fingers straight instead of slightly bent when trying to draw a relaxed hand. Relaxed fingers curl! And this is much easier to draw imo than perfectly tense fingers
- Study your own hands and think about their shape. Part of developing a style + comfort with drawing a particular thing is how you choose to simplify the form thru line. I explained above that I focus on the joints and knuckles and seek to simplify those with curves and squiggles but maybe you’re more interested in a different aspect. (Like, you can see I don’t draw palms v much…that’s cuz I like knuckles haha)
Hope this is helpful/feel free to ask followup questions!
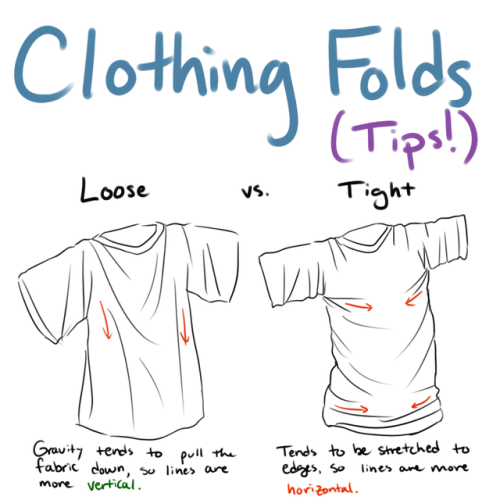
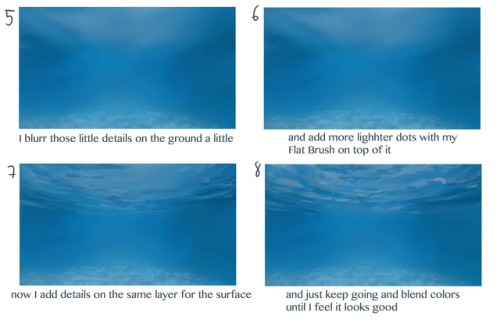
This is still something I struggle with, so this is less a tutorial and more just a collection of tips and things I’ve noticed when drawing clothing folds! I hope this helps some of you!


Hey just thought I'd let you know you have some of the best artwork I've ever seen! Congrats! Especially Chirrut, he's amazing in your style! I was also wondering if you had any advice on how to draw heads and eyes? They're one of my two biggest struggles and I'd love it if I could get your advice. Anything helps. Thank you and I hope you have a fantastic day!
*_* Thanks a bunch askdh and thanks for taking the time to write me! I had a lot of fun working on Chirrut ;;;
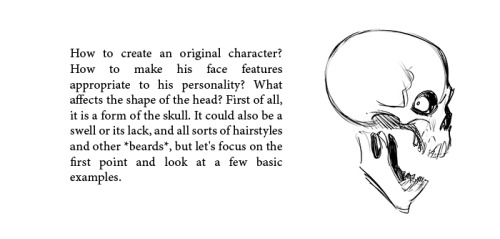
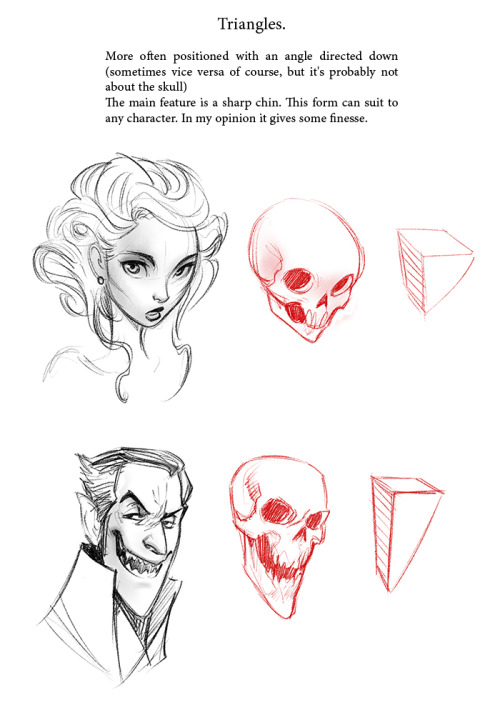
Hmmm I usually think it’s not useful to explain how I make eyes or noses, since the way to draw them changes depending on the pose… My advice would be practicing with ¾ heads. That view always force you to work volumetric shapes and also give a lot more of information. Also, I think it’s much more easy since you have more landmarks to help you.
I would also say consulting anatomy to identify the landmarks on the face (zygomatic and nasal bone , superciliary arch, mandible…) and practice on photos. Using references for drawing is not bad and drawing over photos when you need information of a face is a lot of fun. Is not necessary to draw all the bones, but knowing where the volumes and principal shapes are can help you learn. I.E:

I love that photo because it’s SO SO easy to see the volumetry of the face; just the line of the jaw gives you a lot of informacion about it. And it makes it easy to identify the elements and principal shapes of the head:

(I broke his nose, I’m sorry, but I made this quickly (??)) the point is, take your time to study the lines and understand the anatomy.Also:

that triangle is very helpful too and could help you placing the principal elements. The lines that make him look like he’s crying (?) are the relation between the eyes and the mouth and are very helpful when placing it.
Again, this is only a way to learn and understand how to build a face. That is always the key, even if you use a cartoon style. Rules can be broken, but I think it’s important to understand them first. It could help you make your style more solid.
And well, once you’ve studied it from photos, trying it on your own (even if you have references, that’s ok) and practice, practice u3u
Hope this helps and hope it’s not too technical ;;;

Basic Gesture and Body construction tutorial.
I made this tutorial for a friend who needed some advice but if it helps anyone else, free free to use!


This is for basic body construction, try it from life drawing or from a website that have these life drawing poses! Remember, don’t rush the process and don’t feel frustrated when it isn’t perfect, it takes lots of practice!


Hey! I love your art style and was wondering if you had any tips for drawing braids? Any techniques you found useful?
Hello! And thank you very much!
There may be easier ways of building braids than what I do, but this is just my process for drawing them, so take it with a grain of salt.
I’ll start with a line for whatever direction I want the braid to go in, if I don’t do a line and I have any kind of motion to the hair, boy do I mess it up lol

Next I’ll do wide half triangles, the line being my center, the right side or the left side always dropped lower than the other. If both sides meet in the center at the same level it’s not going to look very braid-like or have the illusion of being tangled with itself.

Afterwards you can remove the middle line if you want to take it further and connect each one with an alternating pattern like this one, giving it more of a braided look in the center.

Once the center is solid, you can add all the details you want in any style you like, curving inwards towards the center. I tend to like the more stained glass-ish appearance for hair so I’ll do very choppy, squared off lines to detail.


This works for whatever position you want to put the braid into using the wide triangles to build it up. It works for tightly woven or loose and messy braids depending on how wide/long you make the original half triangles.


I hope this helps!
I just read all of your art tutorials and they seem super helpful! I was wondering if you had any advice on how to draw clothing?
Yeah! here are some tips on drawing fabric and clothing that I sent to a friend a while back:


Hope that’s helpful. Thank you so much, @yosugayhomomura !
I have two questions! First: have you ever thought of doing a tarot card suit for your characters? I think it'd work really well for them! And two: help me how do I draw legs
@gravitality
Hi!! I’ve absolutely been thinking about that, yeah, in fact I recently talked about that to my boyfriend just recently. It’ll likely happen after october! And to answer your second question! I made a thing on legs that i hope you’ll find useful!!
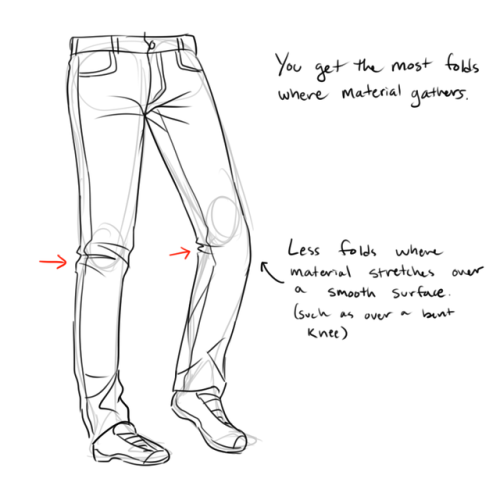
So. I’ve already explained basics on legs here, but I don’t think it hurts to go through some extra details to help you understand legs some more.

The very basic thing is to imagine legs as teardrops. Again, this has already been covered in said tutorial above, but I figured it’s still good to mention even the most basic thing that I know of. I still highly recommend you check it out to get in more detail and to see some other examples and practices that you do. But basically, think of legs in the shapes of teardrops, when it comes to shape. If you need a simple stick-figure to connect the legs in the first place, make sure that they bend at the knees a bit so that the legs don’t come off as stiff and unnatural.

As you can see, this method works perfectly for realistic legs as it does for stylistic ones. Remember to use these as a guideline, never to be the exact base of the legs you will be drawing. If you draw traditionally, remember not to draw these guides too hard, or they will be hard to erase/do freestyle!

But how do you actually draw out the legs without drawing them perfectly straight, as shown to the left? The trick is to add volume to them, and how you do that can be winged to your own liking. The idea is to think in curves. As no leg is perfectly straight. You may make these curves minimal if you don’t want them to be curvy, but keep in mind, still, that not even your own bones are perfectly straight, so it is highly recommended that you make them bend, at least a little.

It all depends on how you draw them as well. Say you put your legs together, as shown in this picture, what happens to the fat and muscle? Naturally, they press together, much like how thighs squish on the surface when you sit down (I’m sure most people know what I’m talking about). Make sure this shows in your art! This is very important to keep in mind, because it makes it all look more natural and believable. Try to cross your legs or stand up and sit down again for real-life examples!


The same applies for stretching your legs, more or less, except they appear to become more ‘hollow’ and slimmer. They become less soft to the touch, too, and might show. Try stretching your legs and feel where the muscles tense and where it feels ‘hollow’. This is very helpful with your art.

Many leg tutorials talk about legs without mentioning the behind. It requires a tutorial on it’s own, in all honesty, but this is the most simplest way to draw it connecting to the legs. Remember that it comes in many different shapes, and this is just a super basic guide! Two circles overlapping, while following the line and flow of the legs. Remember the muscle/fat as mentioned above!

Okay, so we got the basics of leg shapes figured out? What if you want o draw them in a certain pose, or with a certain silhouette, but perhaps do not have the reference for it? Or you want to blend your style into it? The key is to not shy away from doodling the form. Make mess, draw lightly and don’t care about the anatomy. That way you’ll get everything down without it appearing stiff. You can clean up the sketch later, always, and if you can, use a reference after you have drawn your pose, to correct your drawing.

Remember that the hips do a lot to the pose of the legs! Make sure they are in flow with your legs, so that it can look more natural. Remembers that hips ‘rotate’ with the spine.

I’ve talked about this method before when it comes to posing, and the same applies for the legs. One way to make legs appear ‘steady’ is to picture them standing in a line, and one of those legs need not to stray from the lines too much, making it steady. If you want a dynamic pose despite the steady pose, you can always have the other leg stray from the line, since it only matters that one leg is steady. This method can create good, casual poses without making them appear boring. (also notice how the teardrop shapes are used here, despite the highly stylized legs)

Do you want a highly dynamic pose, or them to appear unsteady, then skip the line entirely and make both legs aim away from it completely. As you can see, the legs appear more moving, in action, as if they’re fighting, falling, or dancing. As you can imagine, this is not a pose that one could stay steady on, suggesting that it’s taken mid-movement. More about posing and this ‘line’ method is talked about in this tutorial.
Hope this helped you, if you have any questions let me know, and if you’d like to check out all my tutorials they can be found here!


disclaimer: these are all based on my body. I know there are a ton of different body shapes out there. It’s important to study all sorts of body shapes but I’ve only ever use mine as a reference.
I’ve never actually studied arms so I had to google what muscles are what while drawing this so don’t quote me on any of this. I’ll make a head tutorial later

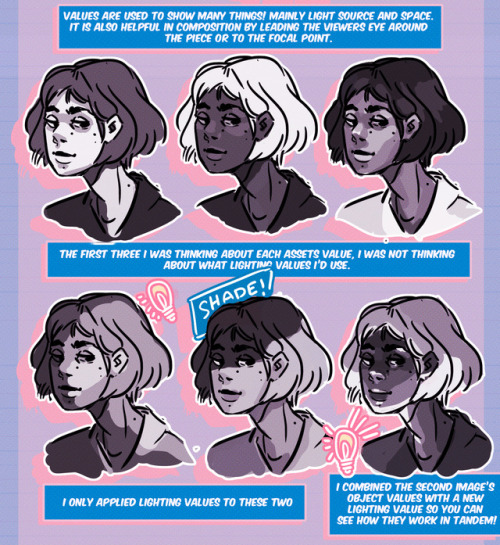
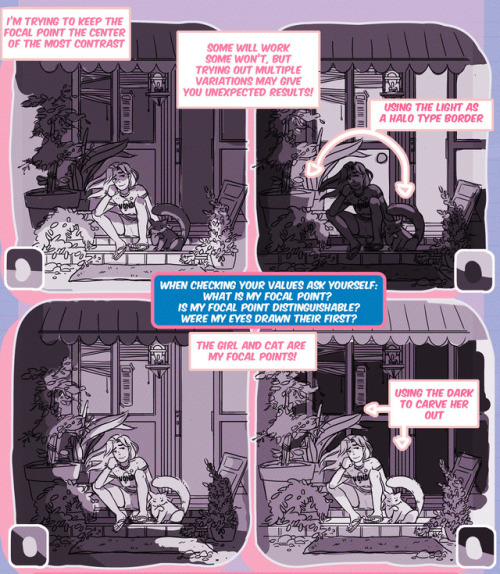

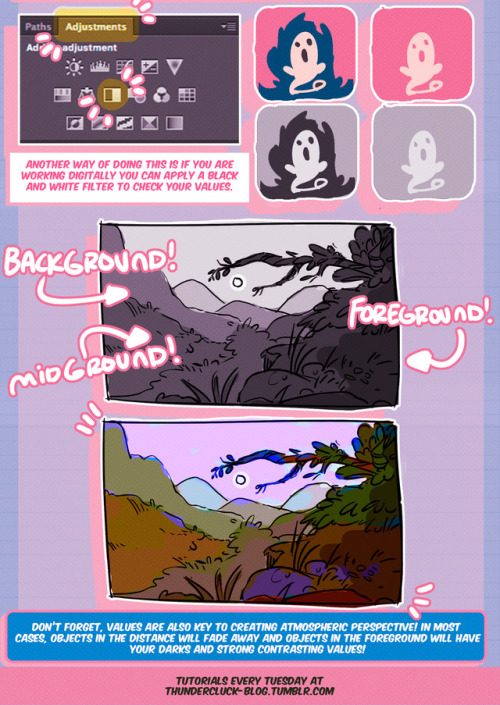
Hey friends, Meg here for WOOPS IT’S WEDNESDAY! Today we’re taking a look at how to study values and the importance of knowing how to use them! It’s not all about color, you know. If you have any tutorial recommendations send ‘em in here or my personal. Now go forth and I’ll see you next week!
A super quick trick for drawing draped fabric that my art teacher taught me in high school.


HOW THE SAUSAGE IS MADE Sketchbook and ancillary pieces of paper Scanned images arranged in a workable grid in PS Printed-out rough draft, drawn over/refined (this is usually where I mess with the word placement). I draw it 7″x7″. Lettering (I almost always do this separate) Final art on tracing paper, w pens used (a Micron and a PaperMate Flair) The final product after combining and coloring it in PS


Hey friends!
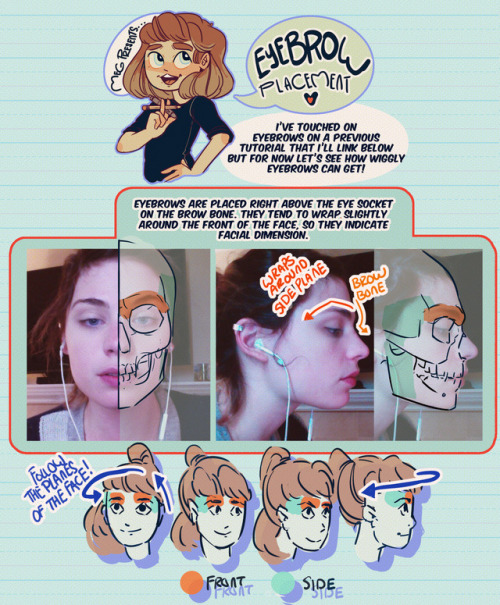
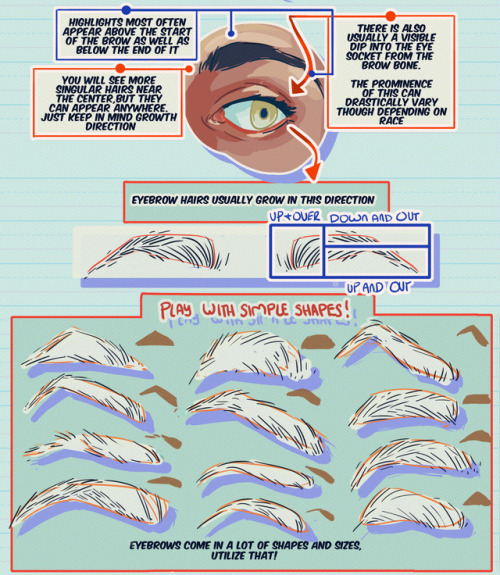
Meg here for today’s TUTOR TUES-WEEK! Today we’re taking a look at eyebrows/eyebrow placement! I’ve covered more about expressions here! If you have any tutorials you’d like to see send ‘em in here or my personal! Have fun, keep practicing, and I’ll see you soon!


for the anon that wanted more head angles. It’s not explained well, I apologize for that but maybe this will help a little bit.


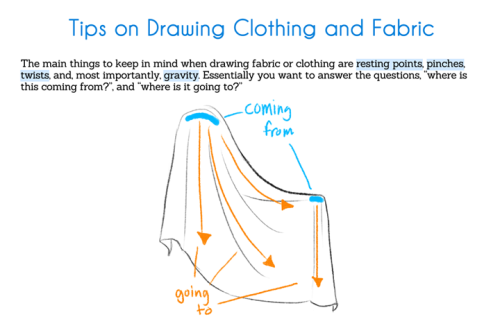
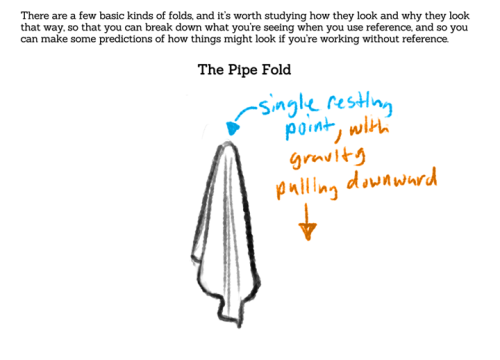
Painting & Rendering Tips

If you’re looking to start working in a painterly style, or have trouble finishing your work in it, I’ve compiled some tips for it. I love talking about painting so this got a bit long. Lots of image examples await…
Also whether you’re using digital or traditional mediums, all of this stuff can be applied to both. I’ll separate general tips from ones about rendering with headings so it’s easier to navigate this.
Keep reading

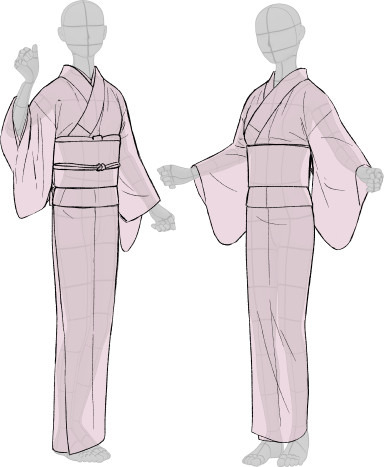
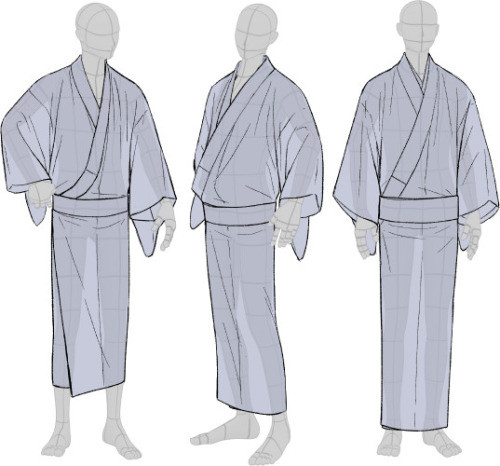
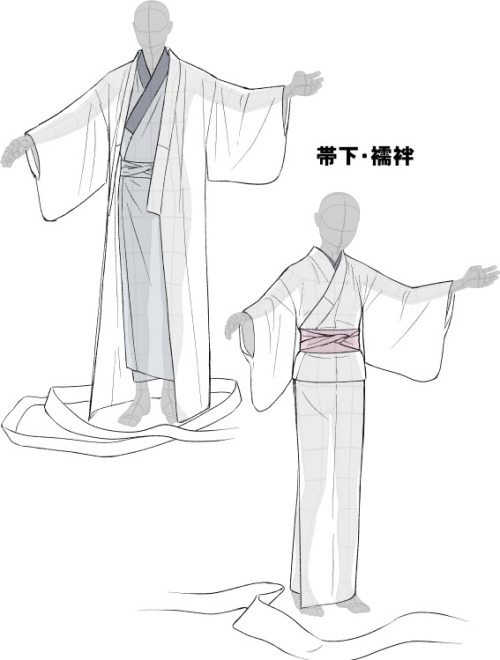
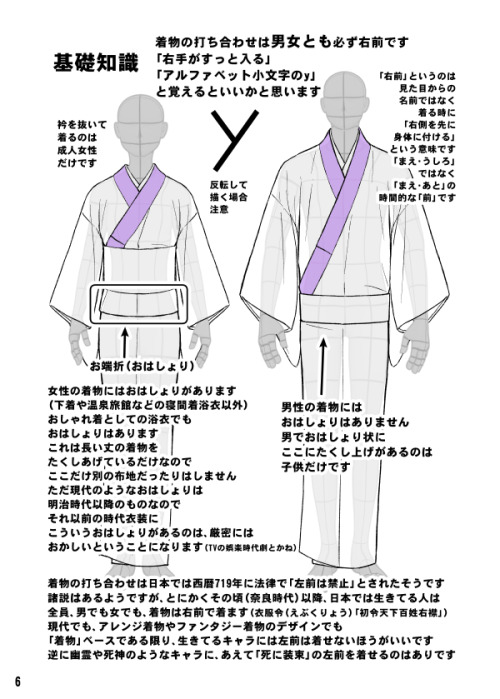
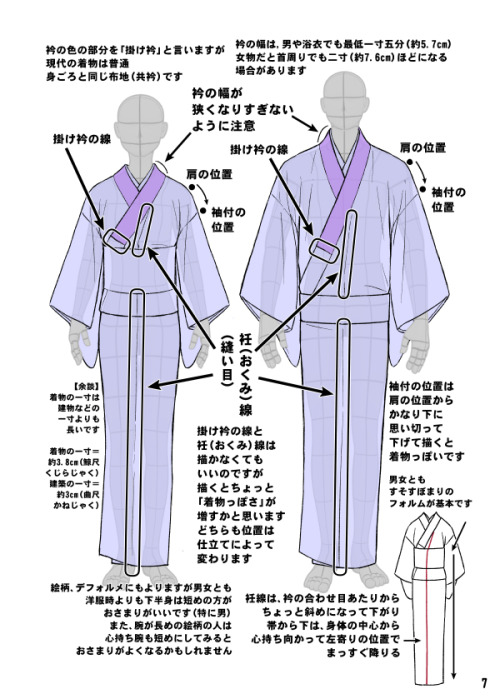
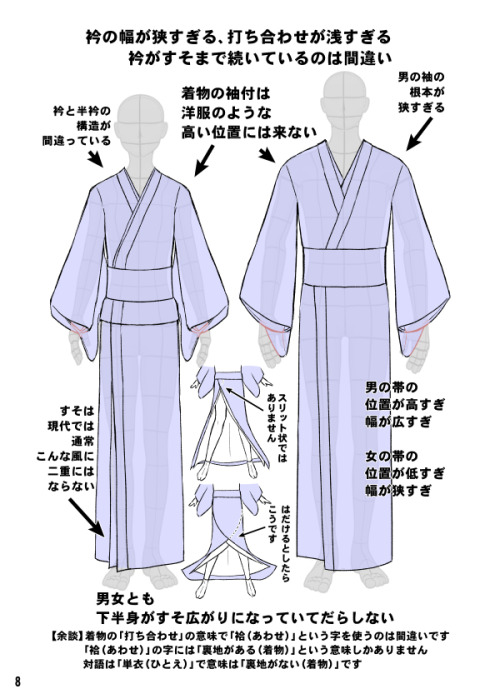
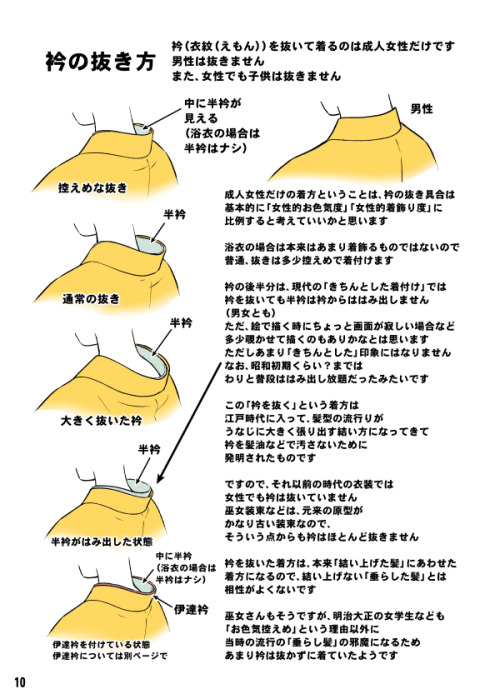

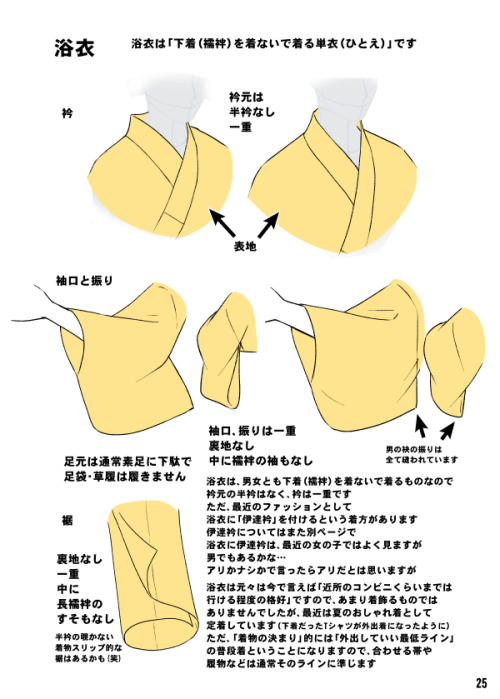
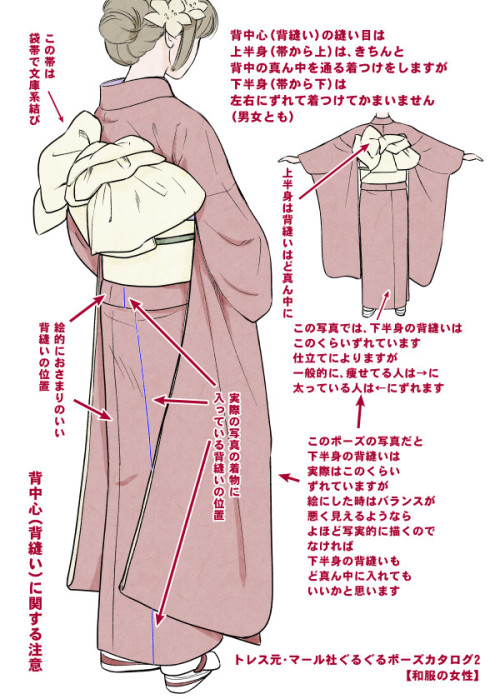
Kimono drawing guide ½, by Kaoruko Maya (tumblr, pixiv, site). Booklet is available in pdf for ¥ 900 here.
Here you can see:
female kimono and yukata (note how the juban underwear peeks when in kimono + how belts differ)
male yukata and kimono (note how the juban underwear peeks when in kimono)
dressing up: male (kimono is not closed yet) and female (kimono closed with datejime belt and ready to put on obi)
differences between female and male kimono once dressed (note how the collars and belts set)
common drawing mistakes (compare with previous picture: shoulders lines are too defined, there is a double hem, collars are narrow, belt is not at the right place etc)
women back collar (the lower the sexier) and men back collar (close to the nape)
back and sleeves differences between men and women
collars and sleeves and view of how kimono drapes around body
Furisode back (long sleeves kimono) and formal furisode obi knot example